<%= page.title %>
<%= page.tip %>
<%- page.content %>
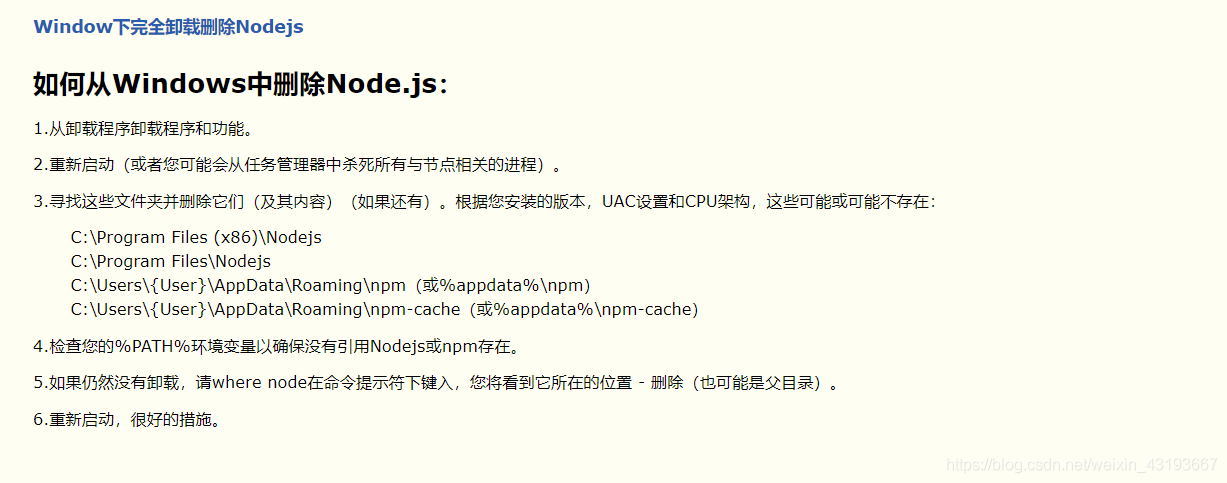
在windows下删除C:\Users\Sam\AppData\Roaming\npm 以及C:\Users\Sam\AppData\Roaming\npm-cache.
2.刷新环境变量 关于刷新环境,二选一就可以 方法一:重启电脑(耗时
1 | PS C:\Users\lcf\Documents\lucfe_website> hexo init lucfe-hexo |
powershell执行命令时出错,提示权限问题,请更换为git bash
git clone -b 分支名 –single-branch
要在Git中只克隆一个特定分支,可以使用以下命令: 其中,“-b”选项指定要克隆的分支名称,“–single-branch”选项告诉Git只克隆指定的分支,而不是整个代码库。请将“
clone
https
https://github.com/lucfe2010/lucfe-hexo-private.git
like:
git clone -b gh-pages –single-branch https://github.com/lucfe2010/lucfe-hexo-private.git
在远程分支上窥视,无需在本地存储库中配置远程
$ git fetch git://git.kernel.org/pub/scm/git/git.git maint
Shell
第一个命令从 git://git.kernel.org/pub/scm/git/git.git 从存储库中获取maint分支
如
git fetch https://github.com/lucfe2010/lucfe-hexo-private.git gh-pages
最后
添加远程仓库
先在github上创建一个仓库,复制仓库的HTTP地址,然后回到本地
origin_learn_git是给这个远程仓库取的别名,随便取
git remote add origin_learn_git https://github.com/DejaVuyan/learn_git.git
push到远程仓库
git push -u origin_learn_git main 将当前所在的分支推送到远端的main分支,
git push -u https://github.com/lucfe2010/lucfe-hexo.git gh-pages
看来上述需求还是比较普遍的,自从 1.8 版本之后 git 就添加了 subtree 子命令,使用这个新命令我们可以很简单高效地解决这个问题。
首先,进入 big-repo 所在的目录,运行:
git subtree split -P
1.在主原仓库下执行 ---@!!!注意,要在主原仓库commit变动后才有变化update(主仓库有变动时 要刷新才能COMMIT)
git subtree split -P public -b hexo-public-folder
运行后,git 会遍历原仓库中所有的历史提交,挑选出与指定路径相关的 commit 并存入名为 name-of-new-branch 的临时分支中。另外需要注意的是,如果你在使用 Windows,且该文件夹深度 > 1,你必须使用斜杠 / 作为目录分隔符而不是默认的反斜杠 \。
然后,我们创建一个新的 git 仓库:
mkdir
git init
接着把原仓库中的临时分支拉到新仓库中:
git pull </path/to/big-repo>
好了,完成。现在看看你的新仓库,是不是已经包含了原子文件夹中的所有文件和你之前在原仓库中的所有提交历史呢?
第一种方法 .gitignore中已经标明忽略的文件目录下的文件,git push的时候还会出现在push的目录中,或者用git status查看状态,想要忽略的文件还是显示被追踪状态。
原因是因为在git忽略目录中,新建的文件在git中会有缓存,如果某些文件已经被纳入了版本管理中,就算是在.gitignore中已经声明了忽略路径也是不起作用的,
这时候我们就应该先把本地缓存删除,然后再进行git的提交,这样就不会出现忽略的文件了。 解决方法: git清除本地缓存(改变成未track状态),然后再提交:
1 | git rm -r --cached . |
需要特别注意的是:
1).gitignore只能忽略那些原来没有被track的文件,如果某些文件已经被纳入了版本管理中,则修改.gitignore是无效的。
2)想要.gitignore起作用,必须要在这些文件不在暂存区中才可以,.gitignore文件只是忽略没有被staged(cached)文件, 对于已经被staged文件,加入ignore文件时一定要先从staged移除,才可以忽略。
Once initialized, here’s what your project folder will look like:
1 | . |
scaffolds
脚手架;建筑架;鹰架
A scaffold is a temporary raised platform on which workers stand to paint, repair, or build high parts of a building.
Scaffold folder. When you create a new post, Hexo bases the new file on the scaffold.
source
Source folder. This is where you put your site’s content. Hexo ignores hidden files and files or folders whose names are prefixed with
_ (underscore)- except the _posts folder.
Renderable files (e.g. Markdown, HTML) will be processed and put into the public folder, while other files will simply be copied.
themes
Theme folder. Hexo generates a static website by combining the site contents with the theme.
To create a new post or a new page, you can run the following command:
$ hexo new [layout] <title>
post is the default layout, but you can supply your own.
There are three default layouts in Hexo: post, page and draft. Files created by each of them is saved to a different path. Newly created posts are saved to the source/_posts folder.
By default, Hexo uses the post title as its filename. You can edit the new_post_name setting in _config.yml to change the default filename.
Previously, we mentioned a special layout in Hexo: draft. Posts initialized with this layout are saved to the source/_drafts folder.
Drafts are not displayed by default. You can add the –draft option when running Hexo or enable the render_drafts setting in _config.yml to render drafts.
You can use the publish command to move drafts to the source/_posts folder. publish works in a similar way to the new command.
$ hexo publish [layout] <title>
You can use the publish command to move drafts to the source/_posts folder. publish works in a similar way to the new command.
Hexo support posts written in any format, as long as the corresponding renderer plugin is installed.
For example, Hexo has hexo-renderer-marked and hexo-renderer-ejs installed by default, so you can write your posts in markdown or in ejs.
$ hexo publish [layout] <title>
Front-matter is a block of YAML or JSON at the beginning of the file that is used to configure settings for your writings. Front-matter is terminated by three dashes when written in YAML or three semicolons when written in JSON.
YAML
1 |
|
JSON
“title”: “Hello World”,
“date”: “2013/7/13 20:46:25”
;;;
Setting Description Default
layout Layout config.default_layout
title Title Filename (posts only)
date Published date File created date
tags Tags (Not available for pages)
categories Categories (Not available for pages)
permalink Overrides the default permalink of the post. Permalink should end with / or .html null
Categories & Tags
Only posts support the use of categories and tags. Categories apply to posts in order, resulting in a hierarchy of classifications and sub-classifications. Tags are all defined on the same hierarchical level so the order in which they appear is not important.
Example
categories:
If you want to apply multiple category hierarchies, use a list of names instead of a single name. If Hexo sees any categories defined this way on a post, it will treat each category for that post as its own independent hierarchy.
Example
categories:
Tag plugins are different from post tags. They are ported from Octopress and provide a useful way for you to quickly add specific content to your posts.
Although you can write your posts in any formats, but the tag plugins will always be available and syntax remains the same.
Inserts a link with target=”_blank” attribute.
{% link text url [external] [title] %}Inserts code snippets in source/downloads/code folder. The folder location can be specified through the code_dir option in the config.
{% include_code [title] [lang:language] [from:line] [to:line] path/to/file %}Include links to other posts.
{% post_path filename %}You can ignore permalink and folder information, like languages and dates, when using this tag.
For instance: .
This will work as long as the filename of the post is how-to-bake-a-cake.md, even if the post is located at source/posts/2015-02-my-family-holiday and has permalink 2018/en/how-to-bake-a-cake.
You can customize the text to display, instead of displaying the post’s title.
Post’s title and custom text are escaped by default. You can use the escape option to disable escaping.
Display title of the post.
{% post_link hexo-3-8-released %}Hexo 3.8.0 Released
Display custom text.
Link to a post
Escape title.
If certain content is causing processing issues in your posts, wrap it with the raw tag to avoid rendering errors.
contentInserts an image with specified size.
{% img [class names] /path/to/image [width] [height] '"title text" "alt text"' %}hexo-renderer-marked 3.1.0 introduced a new option that allows you to embed an image in markdown without using asset_img tag plugin.
To enable:
_config.yml
post_asset_folder: true
marked:
prependRoot: true
postAsset: true
/2020/01/02/foo/image.jpg
/2020/01/02/foo.md
Once enabled, an asset image will be automatically resolved to its corresponding post’s path. For example, “image.jpg” is located at “/2020/01/02/foo/image.jpg”, meaning it is an asset image of “/2020/01/02/foo/“ post,  will be rendered as
<img src="/2020/01/02/foo/image.jpg">.
“foo.jpg” is located at http://example.com/2020/01/02/hello/foo.jpg.
Default (no option)
{% asset_img foo.jpg %}<img src="/2020/01/02/hello/foo.jpg">
Global Asset Folder
Assets are non-post files in the source folder, such as images, CSS or JavaScript files. For instance, If you are only going to have a few images in the Hexo project, then the easiest way is to keep them in a source/images directory. Then, you can access them using something like
.
for vscode edit the md file as open the source directory as project file
For users who expect to regularly serve images and/or other assets, and for those who prefer to separate their assets on a post-per-post basis, Hexo also provides a more organized way to manage assets. This slightly more involved, but very convenient approach to asset management can be turned on by setting the post_asset_folder setting in _config.yml to true.
_config.yml
post_asset_folder: true
With asset folder management enabled, Hexo will create a folder every time you make a new post with the hexo new [layout] <title> command. This asset folder will have the same name as the markdown file associated with the post.
Place all assets related to your post into the associated folder, and you will be able to reference them using a relative path, making for an easier and more convenient workflow.
Relative Image Path
The build-in way to include images in your posts works fine, but it is a little aside the normal way to declare images in Markdown. The plugin [Hexo Asset Link] corrects that. After installing via npm install hexo-asset-link –save you can write this:

The best is, that VS Code’s Markdown can now show the image.
hexo and vscode img path problem
$ npm i -s hexo-asset-link
add
1 | --- |
git config –global http.sslVerify “false”
每个用户唯一的一个PAGE REPOSITORY
USERNAME.github.io
网站地址默认为https://USERNAME.github.io
navigate to the location where you want to store your site’s source files, replacing PARENT-FOLDER with the folder you want to contain the folder for your repository.
cd PARENT-FOLDER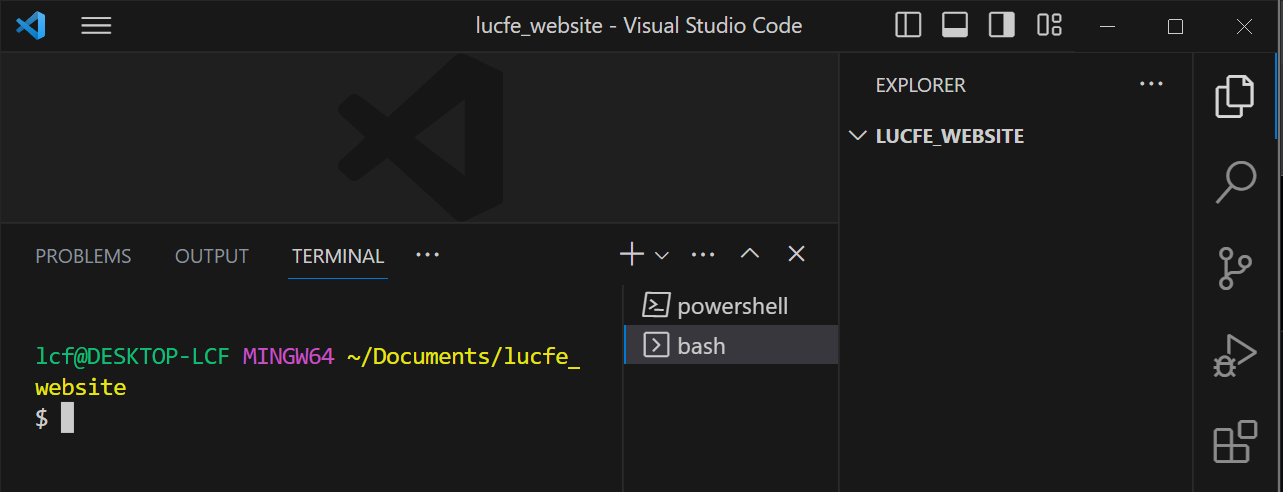
initialize a local Git repository, replacing REPOSITORY-NAME with the name of your repository.
$ git init REPOSITORY-NAME
1 | $ cd REPOSITORY-NAME |
1 | $ mkdir docs |
1 | $ git checkout --orphan gh-pages |
$ jekyll new –skip-bundle .
Creates a Jekyll site in the current directory
Add “#” to the beginning of the line that starts with gem “jekyll” to comment out this line.
Add the github-pages gem by editing the line starting with # gem “github-pages”. Change this line to:
gem “github-pages”, “~> GITHUB-PAGES-VERSION”, group: :jekyll_plugins
Replace GITHUB-PAGES-VERSION with the latest supported version of the github-pages gem. You can find this version here: “Dependency versions.”
The correct version Jekyll will be installed as a dependency of the github-pages gem.
gem “github-pages”, “~> 228”, group: :jekyll_plugins
Save and close the Gemfile.
Bundler
Conveniently, bundler has a feature to alias a Gem-server to another one. This way, you can leave your Gemfile source ‘https://rubygems.org‘ at the top of each Gemfile.
Run this command:
bundle config mirror.https://rubygems.org https://gems.ruby-china.com
To remove the aliasing, just delete the appropriate line in ~/.bundle/config.
bundle config mirror.https://rubygems.org https://gems.ruby-china.com
bundle config mirror.https://rubygems.org https://rubygems.org
From the command line, run bundle install.
1 | baseurl: "/lucfe/" # the subpath of your site, e.g. /blog |
10.Run your Jekyll site locally.
$ bundle add webrick
$ bundle exec jekyll serve
git add .
git commit -m ‘Initial GitHub pages site with Jekyll’
11.Add your repository on GitHub.com as a remote, replacing USER with the account that owns the repository and REPOSITORY with the name of the repository.
$ git remote add origin https://github.com/USER/REPOSITORY.git
如果你clone下来一个别人的仓库,在此基础上完成你的代码,推送到自己的仓库可能遇到如下问题: error: remote origin already exists.表示远程仓库已存在。 因此你要进行以下操作: 1、先输入git remote rm origin 删除关联的origin的远程库
12.Push the repository to GitHub, replacing BRANCH with the name of the branch you’re working on.
git branch -M main
git push -u origin main
git push -u origin BRANCH
main branch,doc/ folder
gh-pages, / folder
permalink
_config.yml
# Outputting
permalink: none
PERMALINK STYLE URL TEMPLATE
date /:categories/:year/:month/:day/:title:output_ext
none /:categories/:title:output_ext
Markdown › Copy Files: Destination
Defines where files copied created by drop or paste should be created. This is a map from globs that match on the Markdown document to destinations.
item value
when copy image to vs code the ![](),is relative path like
../../../assets/images/2023-09-05-jekyll-wiki/image-6.png
_includes
These are the partials that can be mixed and matched by your layouts and posts to facilitate reuse. The liquid tag
can be used to include the partial in _includes/file.ext.
_layouts
These are the templates that wrap posts. Layouts are chosen on a post-by-post basis in the front matter, which is described in the next section. The liquid tag {{ content }} is used to inject content into the web page.
_posts
Your dynamic content, so to speak. The naming convention of these files is important, and must follow the format: YEAR-MONTH-DAY-title.MARKUP. The permalinks can be customized for each post, but the date and markup language are determined solely by the file name.
_site
This is where the generated site will be placed (by default) once Jekyll is done transforming it. It’s probably a good idea to add this to your .gitignore file.
index.html or index.md and other HTML, Markdown files
Provided that the file has a front matter section, it will be transformed by Jekyll. The same will happen for any .html, .markdown, .md, or .textile file in your site’s root directory or directories not listed above.
The Gemfile and Gemfile.lock files are used by Bundler to keep track of the required gems and gem versions you need to build your Jekyll site.
Assets
Any file in /assets will be copied over to the user’s site upon build unless they have a file with the same relative path. You can ship any kind of asset here: SCSS, an image, a webfont, etc.
All files in /assets will be output into the compiled site in the /assets folder just as you’d expect from using Jekyll on your sites.
To locate a theme’s files on your computer:
Run bundle info –path followed by the name of the theme’s gem, e.g., bundle info –path minima for Jekyll’s default theme.
This returns the location of the gem-based theme files.
To override the default structure and style of minima, simply create the concerned directory at the root of your site, copy the file you wish to customize to that directory, and then edit the file.
e.g., to override the _includes/head.html file to specify a custom style path, create an _includes directory, copy _includes/head.html from minima gem folder to <yoursite>/_includes and start editing that file.
To modify any stylesheet you must take the extra step of also copying the main sass file (_sass/minima.scss in the Minima theme) into the _sass directory in your site’s source.
An alternative, to continue getting theme updates on all stylesheets, is to use higher specificity CSS selectors in your own additional, originally named CSS files.
Suppose you want to get rid of the gem-based theme and convert it to a regular theme, where all files are present in your Jekyll site directory, with nothing stored in the theme gem.
To do this, copy the files from the theme gem’s directory into your Jekyll site directory. (For example, copy them to /myblog if you created your Jekyll site at /myblog. See the previous section for details.)
Then you must tell Jekyll about the plugins that were referenced by the theme. You can find these plugins in the theme’s gemspec file as runtime dependencies. If you were converting the Minima theme, for example, you might see:
spec.add_runtime_dependency “jekyll-feed”, “> 0.12”> 2.6”
spec.add_runtime_dependency “jekyll-seo-tag”, “
You should include these references in the Gemfile.
You could list them individually in both Gemfile and _config.yml.
1 | # ./Gemfile |
1 | # ./_config.yml |
If you’re publishing on GitHub Pages you should update only your _config.yml as GitHub Pages doesn’t load plugins via Bundler.
Either way, don’t forget to bundle update.
Finally, remove references to the theme gem in Gemfile and configuration. For example, to remove minima:
Open Gemfile and remove gem “minima”, “~> 2.5”.
Open _config.yml and remove theme: minima.
Now bundle update will no longer get updates for the theme gem.
Docsify makes it easy to create a documentation website, but is not a static-site generator and is not SEO friendly.
The docs feature provides users with a way to organize Markdown files in a hierarchical format.
Extend and customize with React
MDX:Write interactive components via JSX and React embedded in Markdown.
MDX allows you to use JSX in your markdown content. You can import components, such as interactive charts or alerts, and embed them within your content. This makes writing long-form content with components a blast.
MDX has no runtime, all compilation occurs during the build stage
ruby
Static
Markdown, Liquid, HTML & CSS go in. Static sites come out ready for deployment.
Blog-aware
Permalinks, categories, pages, posts, and custom layouts are all first-class citizens here.
Simple
No more databases, comment moderation, or pesky updates to install—just your content.
moderation
适度;适中;合理
the quality of being reasonable and not being extreme
评审
pesky
causing trouble; annoying.
Hexo provides the Nunjucks template engine by default
Valine was born in August 7, 2017. It’s a fast, simple & efficient Leancloud based no back end comment system.
Theoretically, but not limited to static blog. Hexo, Jekyll, Typecho, Hugo, Ghost, Docsify and other blog or document programs are currently using Valine.
valine 需要 leancloud
leancloud开发版:开发版让用户可以在开发阶段和个人项目中免费使用 LeanCloud 的大部分功能。大部分商业应用在发布给外部用户后会超过开发版的用量限制,将会需要升级到商用版。
Jinja is a fast, expressive, extensible templating engine. Special placeholders in the template allow writing code similar to Python syntax. Then the template is passed data to render the final document.
Nunjucks is essentially a port of jinja2
A notable feature of Hexo is tag plugins. Tag plugins are snippets of code you can add to your Markdown files without having to write complex or messy HTML to render specific content.
Octopress plugins.
Tag Plugins
Tag plugins are different from post tags. They are ported from Octopress and provide a useful way for you to quickly add specific content to your posts.
theme layout
Layout folder. This folder contains the theme’s template files, which define the appearance of your website. Hexo provides the Nunjucks template engine by default, but you can easily install additional plugins to support alternative engines such as EJS or Pug. Hexo chooses the template engine based on the file extension of the template (just like the posts). For example:
layout.ejs - uses EJS
layout.njk - uses Nunjucks
A JSON database with Models, Schemas, and a flexible querying interface. It powers the wildly successful static site generator Hexo.
One of the advantages of using Hugo is that it doesn’t depend on client-side JS.
Hugo supports unlimited content types, taxonomies, menus, dynamic API-driven content, and more, all without plugins.
Hugo ships with pre-made templates to make quick work of SEO, commenting, analytics and other functions. One line of code, and you’re done.
Hugo’s Go-based templating
Typecho Blogging Platform
Typecho is a PHP-based blog software and is designed to be the most powerful blog engine in the world.
Octopress is basically some guy’s Jekyll blog you can fork and modify.
Octopress is single product with a theme, plugins, and command line automation, the best I could offer the Jekyll community was a pile of source code.
Octopress is an obsessively designed framework for Jekyll blogging. It’s easy to configure and easy to deploy.
EJS is a simple templating language that lets you generate HTML markup with plain JavaScript. No religiousness about how to organize things. No reinvention of iteration and control-flow. It’s just plain JavaScript.
迭代
the process of repeating a mathematical or computing process or set of instructions again and again, each time applying it to the result of the previous stage
(computer science) executing the same set of instructions a given number of times or until a specified result is obtained
religiousness虔诚
the quality of being extremely conscientious
conscientious一丝不苟的,认真的
Someone who is conscientious is very careful to do their work properly.
1 | <% if (user) { %> |
1 | <% 'Scriptlet' tag, for control-flow, no output |
You’ll likely want to use the raw output tag (<%-) with your include to avoid double-escaping the HTML output.
1 | <ul> |
1 | <%- include('header'); -%> |
Site Variables
Variable Description Type
site.posts All posts array of post objects
site.pages All pages array of page objects
site.categories All categories array of categories objects
site.tags All tags array of tags objects
1 | config: { |
<html lang={language ? language.substr(0, 2) : ''}>
_config.yml
head:
# URL or path to the website’s icon
favicon: /assets/images/favicon_l.png
# Web application manifests configuration
# https://developer.mozilla.org/en-US/docs/Web/Manifest
manifest:
# Name of the web application (default to the site title)
name:
    ...

meta:
rss
{rss ? <link rel="alternate" href={url_for(rss)} title={config.title} type="application/atom+xml" /> : null}
head:
# URL or path to the website’s icon
favicon: /assets/images/favicon_l.png
{favicon ? <link rel="icon" href={url_for(favicon)} /> : null}
article:
# Code highlight settings
highlight:
# Code highlight themes
# https://github.com/highlightjs/highlight.js/tree/master/src/styles
theme: atom-one-light
highlight
variant = ‘default’# the theme variant 'default' or 'cyberpunk'
see cnd
let hlTheme, images;
if (highlight && highlight.enable === false) {
hlTheme = null;
} else if (article && article.highlight && article.highlight.theme) {
hlTheme = article.highlight.theme;
} else {
hlTheme = ‘atom-one-light’;
}
config.title
site title
1 | page: { |
Variable Description Type
page.title Article title string
page.date Article created date Moment.js object
page.updated Article last updated date Moment.js object
page.comments Comment enabled or not boolean
page.layout Layout name string
page.content The full processed content of the article string
page.excerpt Article excerpt string
page.more Contents except article excerpt string
page.source The path of the source file string
page.full_source Full path of the source file string
page.path The URL of the article without root URL. We usually use url_for(page.path) in theme. string
page.permalink Full (encoded) URL of the article string
page.prev The previous post, null if the post is the first post ???
page.next The next post, null if the post is the last post ???
page.raw The raw data of the article ???
page.photos The photos of the article (Used in gallery posts) array of ???
page.link The external link of the article (Used in link posts) string
Same as page layout but add the following variables.
Variable Description Type
page.published True if the post is not a draft boolean
page.categories All categories of the post array of ???
page.tags All tags of the post array of ???
Variable Description Type
page.per_page Posts displayed per page number
page.total Total number of pages number
page.current Current page number number
page.current_url The URL of current page string
page.posts Posts in this page (Data Model) object
page.prev Previous page number. 0 if the current page is the first. number
page.prev_link The URL of previous page. ‘’ if the current page is the first. string
page.next Next page number. 0 if the current page is the last. number
page.next_link The URL of next page. ‘’ if the current page is the last. string
page.path The URL of current page without root URL. We usually use url_for(page.path) in theme. string
Same as index layout but add the following variables.
Variable Description Type
page.archive Equals true boolean
page.year Archive year (4-digit) number
page.month Archive month (2-digit without leading zeros) number
Same as index layout but add the following variables.
Variable Description Type
page.category Category name string
Same as index layout but add the following variables.
Variable Description Type
page.tag Tag name string
Full (encoded) URL of the article string
canonical_url = page.permalink
{canonical_url ? <link rel="canonical" href={canonical_url} /> : null}
1 | helper: { |
partial
Loads other template files. You can define local variables in locals.
<%- partial(layout, [locals], [options]) %>
Option Description Default
cache Cache contents (Use fragment cache) false
only Strict local variables. Only use variables set in locals in templates. false
fragment_cache
Caches the contents in a fragment. It saves the contents within a fragment and serves the cache when the next request comes in.
<%- fragment_cache(id, fn);
Examples:
<%- fragment_cache(‘header’, function(){
return ‘
}) %>
is_current
Check whether path matches the URL of the current page. Use strict options to enable strict matching.
<%- is_current(path, [strict]) %>
is_home
Check whether the current page is home page.
<%- is_home() %>
is_post
Check whether the current page is a post.
<%- is_post() %>
is_archive
Check whether the current page is an archive page.
<%- is_archive() %>
is_year
Check whether the current page is a yearly archive page.
<%- is_year() %>
is_month
Check whether the current page is a monthly archive page.
<%- is_month() %>
is_category
Check whether the current page is a category page.
If a string is given as parameter, check whether the current page match the given category.
<%- is_category() %>
<%- is_category(‘hobby’) %>
is_tag
Check whether the current page is a tag page.
If a string is given as parameter, check whether the current page match the given tag.
<%- is_tag() %>
<%- is_tag(‘hobby’) %>
helper.is_archive()
https://lucfe2010.github.io/lucfe-hexo/archives/
helper.is_month()
https://lucfe2010.github.io/lucfe-hexo/archives/2023/09/
helper.is_year()
https://lucfe2010.github.io/lucfe-hexo/archives/2023/
Templates
Use __ or _p helpers in templates to get the translated strings. The former is for normal usage and the latter is for plural strings. For example:
en.yml
index:
title: Home
add: Add
video:
zero: No videos
one: One video
other: %d videos
<%= __(‘index.title’) %>
// Home
<%= _p(‘index.video’, 3) %>
// 3 videos
helper._p(‘common.archive’, Infinity);
if (helper.is_tag()) {
title = helper._p(‘common.tag’, 1) + ‘: ‘ + page.tag;
}
if (helper.is_categories()) {
title = helper._p(‘common.category’, Infinity);}
url_for
Returns a url with the root path prefixed. You should use this helper instead of config.root + path since Hexo 2.7.
<%- url_for(path) %>
gravatar
Inserts a Gravatar image.
<%- gravatar(‘a@abc.com‘ {s: 40, d: ‘http://example.com/image.png'}) %>
// http://www.gravatar.com/avatar/b9b00e66c6b8a70f88c73cb6bdb06787?s=40&d=http%3A%2F%2Fexample.com%2Fimage.png
cdn()
{hlTheme ? <link rel="stylesheet" href={cdn('highlight.js', '11.7.0', 'styles/' + hlTheme + '.css')} /> : null}
fontcdn()
1 | <link rel="stylesheet" href={fontCssUrl[variant]} /> |
iconcdn()
<link rel="stylesheet" href={iconcdn()} />
css
<%- css(‘style.css’) %>
//
js
<%- js(‘script.js’) %>
//
link_to
<%- link_to(‘http://www.google.com‘, ‘Google’, {external: true}) %>
// Google
image_tag
favicon_tag
feed_tag
Inserts a list of all categories.
<%- list_categories([options]) %>
Option Description Default
orderby Order of categories name
order Sort of order. 1, asc for ascending; -1, desc for descending 1
show_count Display the number of posts for each category true
style Style to display the category list. list displays categories in an unordered list. list
separator Separator between categories. (Only works if style is not list) ,
depth Levels of categories to be displayed. 0 displays all categories and child categories; -1 is similar to 0 but displayed in flat; 1 displays only top level categories. 0
class Class name of category list. category
transform The function that changes the display of category name.
suffix Add a suffix to link. None
Inserts a list of all tags.
<%- list_tags([options]) %>
Option Description Default
orderby Order of categories name
order Sort of order. 1, asc for ascending; -1, desc for descending 1
show_count Display the number of posts for each tag true
style Style to display the tag list. list displays tags in an unordered list. list
separator Separator between categories. (Only works if style is not list) ,
class Class name of tag list. tag
transform The function that changes the display of tag name.
amount The number of tags to display (0 = unlimited) 0
suffix Add a suffix to link. None
Inserts a list of archives.
<%- list_archives([options]) %>
Option Description Default
type Type. This value can be yearly or monthly. monthly
order Sort of order. 1, asc for ascending; -1, desc for descending 1
show_count Display the number of posts for each archive true
format Date format MMMM YYYY
style Style to display the archive list. list displays archives in an unordered list. list
separator Separator between archives. (Only works if style is not list) ,
class Class name of archive list. archive
transform The function that changes the display of archive name.
Inserts a list of posts.
<%- list_posts([options]) %>
Option Description Default
orderby Order of posts date
order Sort of order. 1, asc for ascending; -1, desc for descending 1
style Style to display the post list. list displays posts in an unordered list. list
separator Separator between posts. (Only works if style is not list) ,
class Class name of post list. post
amount The number of posts to display (0 = unlimited) 6
transform The function that changes the display of post name.
Inserts a tag cloud.
<%- tagcloud([tags], [options]) %>
Option Description Default
min_font Minimal font size 10
max_font Maximum font size 20
unit Unit of font size px
amount Total amount of tags 40
orderby Order of tags name
order Sort order. 1, sac as ascending; -1, desc as descending 1
color Colorizes the tag cloud false
start_color Start color. You can use hex (#b700ff), rgba (rgba(183, 0, 255, 1)), hsla (hsla(283, 100%, 50%, 1)) or color keywords. This option only works when color is true.
end_color End color. You can use hex (#b700ff), rgba (rgba(183, 0, 255, 1)), hsla (hsla(283, 100%, 50%, 1)) or color keywords. This option only works when color is true.
paginator
Inserts a paginator.
<%- paginator(options) %>
Option Description Default
base Base URL /
format URL format page/%d/
total The number of pages 1
current Current page number 0
prev_text The link text of previous page. Works only if prev_next is set to true. Prev
next_text The link text of next page. Works only if prev_next is set to true. Next
space The space text &hellp;
prev_next Display previous and next links true
end_size The number of pages displayed on the start and the end side 1
mid_size The number of pages displayed between current page, but not including current page 2
show_all Display all pages. If this is set true, end_size and mid_size will not works. false
toc
Parses all heading tags (h1~h6) in the content and inserts a table of contents.
date
Inserts formatted date. date can be unix time, ISO string, date object, or Moment.js object. format is date_format setting by default.
<%- date(date, [format]) %>
Examples:
<%- date(Date.now()) %>
// 2013-01-01
<%- date(Date.now(), ‘YYYY/M/D’) %>
// Jan 1 2013
date_xml
Inserts date in XML format. date can be unix time, ISO string, date object, or Moment.js object.
<%- date_xml(date) %>
Examples:
<%- date_xml(Date.now()) %>
// 2013-01-01T00:00:00.000Z
time
Inserts formatted time. date can be unix time, ISO string, date object, or Moment.js object. format is time_format setting by default.
<%- time(date, [format]) %>
Examples:
<%- time(Date.now()) %>
// 13:05:12
<%- time(Date.now(), ‘h:mm:ss a’) %>
// 1:05:12 pm
full_date
Inserts formatted date and time. date can be unix time, ISO string, date object, or Moment.js object. format is date_format + time_format setting by default.
<%- full_date(date, [format]) %>
Examples:
<%- full_date(new Date()) %>
// Jan 1, 2013 0:00:00
<%- full_date(new Date(), ‘dddd, MMMM Do YYYY, h:mm:ss a’) %>
// Tuesday, January 1st 2013, 12:00:00 am
<%- toc(str, [options]) %>
Option Description Default
class Class name toc
list_number Displays list number true
max_depth Maximum heading depth of generated toc 6
Examples:
<%- toc(page.content) %>
1 | Class component: |
1 | export declare class Component<P = {}, S = {}> implements IComponent<P, S> { |
This is the base class for Inferno Components when they’re defined using ES6 classes.
1 | let img; |
the rendered html from another layout files.
也就是layout文件夹第一层的中去除layout.jsx的其他*.jsx文件
1 | <OpenGraph |
1 | <MetaTags meta={meta} /> |
1 | <WebApp |
{followItVerificationCode ? <meta name="follow.it-verification-code" content={followItVerificationCode} /> : null}
let followItVerificationCode = null;
if (Array.isArray(config.widgets)) {
const widget = config.widgets.find(widget => widget.type === ‘followit’);
if (widget) {
followItVerificationCode = widget.verification_code;
}
}
languages 文件夹放有一个或多个语言文件。
layout 文件夹下面用于存放页面文件,通常第一层有 Index 首页 、 Archive 归档页 、 Tag 标签页 、 Category 分类页 、 Post 文章页 、 Page 页面详情页 、 layout 布局 ,一般还会创建一个公共页面的文件夹,该文件夹用于放置一个页面的部分内容,用于复用。
source 文件夹用于放一些资源文件,例如: 字体 、 CSS 、 JS 、 图片 等,也会根据他们的文件类型进行再次分类,图片放到图片的文件夹,JS 放到 JS 的文件夹。
先从 layout.ejs 文件开始,该文件是布局文件,其他页面都按照其来进行渲染,编写时遵循 HTML5 规范
1 | <!DOCTYPE html> |
config.language 表示使用根目录配置文件中 language 属性,假设配置文件中该属性填的是 zh-CN ,则最终渲染成 。
partial() 用于引入公共布局,当引用后,每个页面都会存在你引用的这个布局,上面一共引用了三个文件 head 、 header 、 footer ,三个文件都在 common 文件夹下,这时候应该建立该文件夹,并在下面创建对应的三个 ejs 文件。假设 head.ejs 中的内容为 this is head ,最终渲染成如下:(每个页面都会存在此内容)
this is head <%- body %> 表示其他页面内容,例如: index.ejs 、 archive.ejs 等,假设 index.ejs 内容为 this is index ,则最终渲染成如下:(因为是写在首页文件中,所以只有首页会存在该内容)post.ejs 文件内容如下:
<%= page.tip %>
1 | --- |
1 |
|
首先在根目录资源文件夹创建一个名为 about 的文件夹,再到该文件夹下创建一个 index.md 文件,内容为:
1 | --- |
到主题文件夹中布局文件夹中创建一个 about.ejs 页面,内容为:
<%- page.content %>
// 假设引入友情链接文件
<% if (is_page() && page.type === ‘links’) { %> // is_page() 是啥请看官方文档 - 辅助函数
<%- partial(‘links’) %>
<% } %>
最终渲染结果
这是一个关于页面内容
官方文档中有 list_categories 、 list_posts 等函数,都有具体的使用方法,在这里对于列表我写出我常用的方法。
文章列表:
对于文章通常有两种,一种是每页只显示 config.per_page 数量的文章,带有分页,另外一种是一个页面显示所有文章。
// 带分页,使用 Hexo 预置变量 page.posts
<% page.posts.each(function(post) { %> // 因为这里有个对象 post
post-card 文件内容为:
// 一个页面显示所有文章
<% site.posts.each(function(post) { %>
category.ejs 页面只显示单个分类,当你点击分类 1 跳转过去的页面就是 category ,它不会显示出网站中所有的分类。
想要全部显示出来,需要自行创建一个页面categories 、 tags
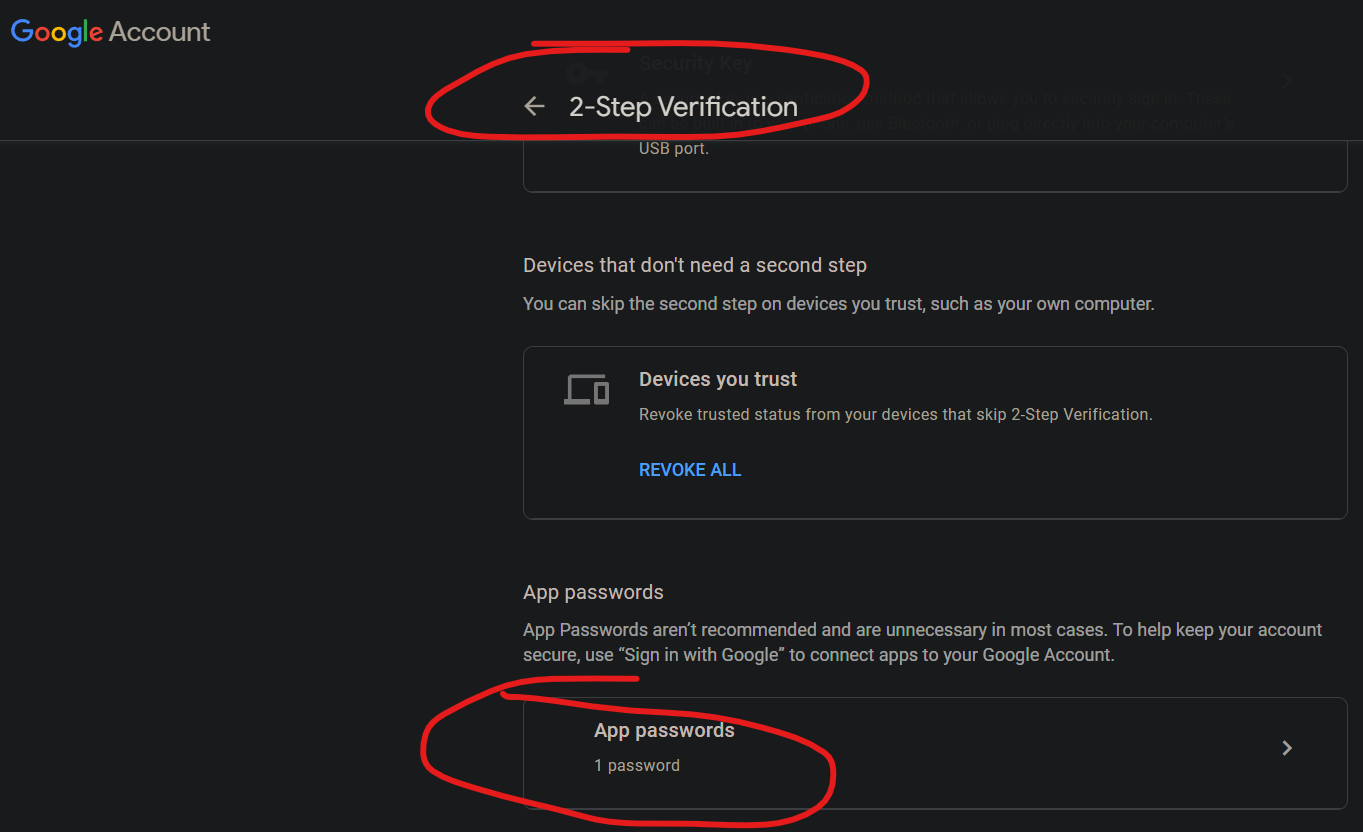
查看当前地址npm config get registry
复制
设置当前地址(设置为淘宝镜像)
不要用这个npm config set registry http://registry.npm.taobao.org/npm config set registry https://registry.npmmirror.com
复制
设置当前地址(设置为默认地址)npm config set registry https://registry.npmjs.org/
MAKE A PROJECT DIRECTORY
Create a directory for your project using the mkdir command (short for make directory):
mkdir eleventy-sample
Now move into that directory with the cd command (short for change directory):
cd eleventy-sample
Installing Eleventy into a project requires a package.json file. The npm command (provided by Node.js) will create one for you with npm init -y. -y tells npm to use default values and skips the command line questionnaire.
npm init -y
@11ty/eleventy is published on npm and we can install and save it into our project’s package.json by running:
npm install @11ty/eleventy --save-dev
You may also install Eleventy globally but the package.json installation method above is recommended.
We can use the npx command (also provided by Node.js) to run our local project’s version of Eleventy. Let’s make sure our installation went okay and try to run Eleventy:
npx @11ty/eleventy
A template is a content file written in a format such as Markdown, HTML, Liquid, Nunjucks, and more, which Eleventy transforms into a page (or pages) when building our site.
Let’s run two commands to create two new template files.
1 | echo '<!doctype html><title>Page title</title><p>Hi</p>' > index.html |
Alternatively, you can create these using any text editor—just make sure you save them into your project folder and they have the correct file extensions.
npx @11ty/eleventy
The output might look like this:
1 | npx @11ty/eleventy |
Use –serve to start up a hot-reloading local web server.
npx @11ty/eleventy –serve
Your command line might look something like:
1 | npx @11ty/eleventy --serve |
When deploying your Eleventy site, the goal is to provide your chosen host with your project’s build output (the _site folder by default). The command you run is usually configured via a build script in your package.json file. It might look like this:
FILENAME package.json
1 |
|
.nojekyll file: Open a plain-text editor and save an empty file in the root of your repo (where you have the .eleventy.js) with the filename .nojekyll. This will stop GitHub from trying to build your site as a Jekyll site.
.github directory: Create a new directory in the root of your repo and name it .github (yes, starting with a period). Inside that directory, make a directory named workflows. Open a plain-text editor and save a file inside the workflows directory called build.yml. Copy the contents from my build.yml file here.
Note: my build.yml file was updated 6/14/23 with Node version improvements thanks to Simon Wiles
1 | name: Build Eleventy |
Depending on your Eleventy setup, you may need to change publish_dir in your build.yml file. My Eleventy site builds to a folder called dist. If yours builds to a folder with a different name, change it in this file.
Using the GitHub interface, you’ll need to create a new branch of your repo called gh-pages where the built version of your site will be hosted from. If you’re looking at your repo on GitHub, you should see a little button that says main towards the upper left, under the <> Code tab. Click that button, then type gh-pages into the field that says Find or create a branch. This will create a new branch called gh-pages
important!!!!
the gh-pages branch will be update by the github page action definded up right in the workflow. so dont use the gh-pages branch for editing content
Go into the settings for your repo, click on Actions in the set of tabs on the left, then General.
Make sure that “Allow all actions and reusable workflows” is selected,
and at the bottom of that page, under Workflow permissions make sure that you have “Read and write permissions” selected.
Go into the settings for your repo, and click on “Pages” in the set of tabs on the left. Use the dropdown under Source to choose the gh-pages branch.
In theory, if you’ve set up all these things, anytime you push changes to GitHub, it will trigger an action that will build the site and move those files to the GitHub Pages hosting environment.
If everything isn’t set up just right, you’ll get an email that an action failed. Click the “View workflow run” link in the email, which will take you to a page with information on the failed workflow. Click on the text in the middle panel where you see a red circle with an x – what the text says depends on where exactly it failed. Eventually you’ll see text reflecting where exactly the process failed, and you can search parts of that error message to figure out what’s going wrong.
Eleventy Layouts are special templates that can be used to wrap other content.
To denote that a piece of content should be wrapped in a template, use the layout key in your front matter, like so:
content-using-layout.md
1 | --- |
This will look for a mylayout.njk Nunjucks file in your includes folder at _includes/layouts/mylayout.njk.
FILENAME _includes/mylayout.njk
1 | {% raw %} |
If you are using a language that contains curly braces, you will likely need to place and tags around your code. Since Jekyll 4.0 , you can add render_with_liquid: false in your front matter to disable Liquid entirely for a particular document.
Note that the layout template will populate the content data with the child template’s content.
Also note that we don’t want to double-escape the output, so we’re using the provided Nunjucks safe filter here (see more language double-escaping syntax below).
Layouts can contain their own front matter data! It’ll be merged with the content’s data on render. Content data takes precedence(优先), if conflicting keys arise.
Front matter data set in a content template takes priority over layout front matter! Chained layouts have similar merge behavior. The closer to the content, the higher priority the data.
SOURCES OF DATA
When the data is merged in the Eleventy Data Cascade, the order of priority for sources of data is (from highest priority to lowest):
Create a virtual environment
A best practice among Python developers is to use a project-specific virtual environment. Once you activate that environment, any packages you then install are isolated from other environments, including the global interpreter environment, reducing many complications that can arise from conflicting package versions. You can create non-global environments in VS Code using Venv or Anaconda with Python: Create Environment.
Open the Command Palette (Ctrl+Shift+P), start typing the Python: Create Environment command to search, and then select the command.
The command then presents a list of interpreters that can be used for your project.
Ensure your new environment is selected by using the Python: Select Interpreter command from the Command Palette.
1 | print("print('what to print')") |
print("Hello world!\nHello World!")
output
Hello world!
Hello World
1 | print ("Hello" + " Angela") |
Hello Angela
Hello Angela
print("Hello world!")
1 | File "c:\Users\lcf\Documents\learning\udemy_python\02.py", line 6 |
print(("Hello world")
1 | print(("Hello world") |
print('string concatenation with "+" sign')
string concatenation with “+” sign
input("some prompt")
print("Hello " + input("What is your name?"))
print(len(input("What is your name? ")))
1 | name = input("What is your name? ") |
What is your name? lucfe
lucfe
1 | name = "Jack" |
Jack
Angela
print(len(input("What is your name? ")))
1 | name = input("What is your name? ") |
What is your name? lucfe
5
–
1 | a = input("a: ") |
a: 146
b: 645
a = 645
b = 146
1 | name = "Jack" |
1 | Traceback (most recent call last): |
data type
string
1 | print("Hello"[0]) |
integer
print(123 + 345)
print(12_34_435_4)
float
3.1415
boolean
True
False
len(132)
1 | Traceback (most recent call last): |
num_char = len(input("what is your name?"))print("your name " + num_char + " characters.")
print(“your name “ + num_char + “ characters.”)
~~~~~~~~~~~~~^~~~~~~~~~
TypeError: can only concatenate str (not “int”) to str
new_num_char = str(num_char)
print(type(1234))
<class 'int'>
float("100.5)
1 | two_digit_num = input("your number is?") |
mathmatical operator
7 - 4
3 * 2
2 ** 3
6 / 3
print(type(6/2))<class 'float'>
pemdas
parentheses ()
exponents **
multiplication/division * /
addition/subtraction + -
left to right
1 | print(3 * 3 + 3 / 3 - 3) |
7.0
3.0
print(8 / 3)
print(round(8 / 3))
print(round(8 / 3, 2))
print(8 // 3)print(type(8 // 3))
2.6666666666666665
3
2.67
2<class 'int'>
% remainder
1 | score = 4 |
2
1 | score = 0 |
your name is john,your score is 0, your height is 1.8, your are winning is True
pay_each = round(pay_each)
33.6
pay_each = "{:.2f}".format(pay_each)
33.60
if condition:
do this
else:
do that
1 | height = int(input("what is your height? ")) |
1 | number = int(input("number pls? ")) |
if condition1:
if condition2:
do this
else:
do that
else:
do else
if condition1:
do A
elif condition2:
do B
else:
do that
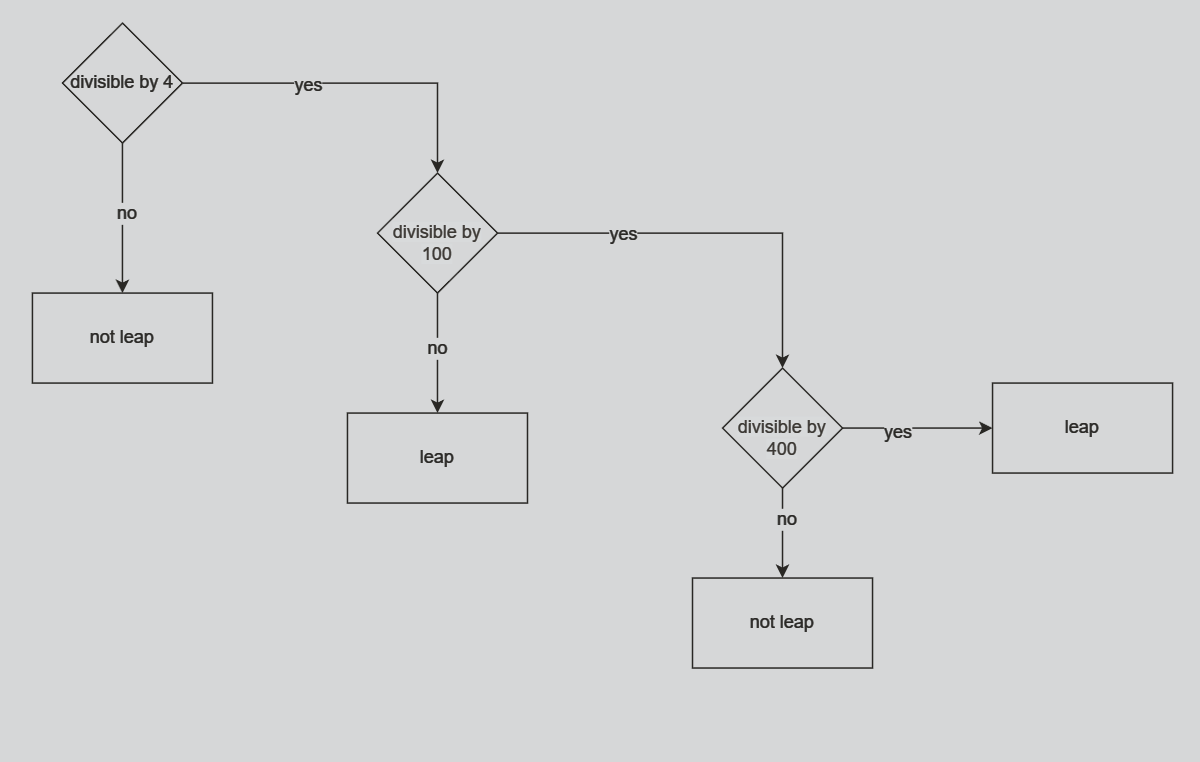
year = int(input(“which year? “))
1 | if year % 4 == 0: |
if condition1:
do A
if condition2:
do B
if condition3:
do C
logical operators
and or not
1 | print("""dfas |
randomisation
mersenne twister
python module
1 | import random |
Returns a random integer between a and b (both inclusive).
random.random() -> Returns the next random floating point number between [0.0 to 1.0)
1 | import random |
0.0000000… -> 0.9999999…
0.9597056472657862
print(random_float * 5)
0.000000… –> 4.99999…
2.441770790800433
list
have order
fruits = [item1, item2]
for item in items_list:
do someting on item
1 | students_heights = input("a list of student height").split() |
rge = range(1, 10)
<class 'range'>
Return an object that produces a sequence of integers from start (inclusive) to stop (exclusive) by step.
1 | print(students_scores) |
Randomize a List using Random.Shuffle()
Random.Shuffle() is the most recommended method to shuffle a list. Python in its random library provides this inbuilt function which in-place shuffles the list.
letters[random.randint(0, len(letters)-1)]
random.choice(letters)
1 | def my_function(): |
range(6)
How To Use Break, Continue, and Pass Statements when Working with Loops in Python 3
1 | # import moduel_07_01 |
argument parameter
def my_function(something)
#do this with something
my_function(123)
somthing -> parameter
123 -> arguments
positional argument
keyword argument
greet_with(name = "Angela", location = "London")greet_with(location = "London", name = "Angela")
math.ceil(-23.11) : -23.0
math.ceil(300.16) : 301.0
math.ceil(300.72) : 301.0
math.floor(-23.11) : -24.0
math.floor(300.16) : 300.0
math.floor(300.72) : 300.0
1 | #for n in range(len(alphabet)): |
dictionares
{key: value}
1 |
|
dic1[“bug”]
dic1[123]
dic1[“bog”]
KeyError: ‘bog’
add a pair
dic1[“Loop”] = “asdf asdf wrye”
wipe a dic
dic1 = {}
edit an item
dic1[“bug”] = “sdaf dasfa das g”
1 | for key in dic1: |
{
key: [list],
key2: {dict},
}
1 |
|
1 | def my_function(): |
str.title()
Return a titlecased version of the string where words start with an uppercase character and the remaining characters are lowercase.
1 | def add(a, b): |
1 | # local scope |
1 | enemies = 1 |
1 | enemies = 1 |
1 | enemies = 1 |
# global constant
PI = 3.1415926
debug
object oriented programming oop
attribute
has
method
does
class
type/blueprint
object
car = CarBlueprint()
object.attribute
car.speed
object.method()
car.move()
class name PascalCase
not camelCase
else: snake_case
initialize -> construtor
def init(self):
dontfrom turtle import *
module aliasimport turtle as t
installing moduel
tuple
tuple_a = (1, 2, 3)
= list(tuple)
event listeners
higher order function
object state
instance
class inheritance
slicing list/dictionary
[2: 5: 2]
[::-1]
create the screen
create the paddle
create the ball and move
detect collision with wall and bounce
detect collision with paddle
detect when paddle misses
keep score
move the turtle with keypress
create and move the cars
detect collision with car
detect when turtle reaches the other side
create a scoreboard
read/write files
1 | with open("data.txt") as file: |
absolute file path
relative file path
./ working directry or “”
../ working directory parent folder
1 | strip_name = name.strip() |
The readlines() method returns a list containing each line in the file as a list item.
The replace() method replaces a specified phrase with another specified phrase.
Note: All occurrences of the specified phrase will be replaced, if nothing else is specified.
string.strip(characters)
Remove spaces at the beginning and at the end of the string:
include “\n”
csv files
1 | import csv |
pandas -> data analysis
1 | # print(data["temp"]) |
Series column
DataFrame table
import pandas
data = pandas.read_csv(“data.csv”)
print(data[data["day"] == "Monday"])print(type(data[data["day"] == "Monday"])) -> DataFrame
ser.iloc[0]
Purely integer-location based indexing for selection by position.
Series.item()
Return the first element of the underlying data as a Python scalar.
1 | data_dict = { |
comprehension
create a list from a exsiting list
1 | # new_list = [new_item for item in list] |
1 | numbers = range(1, 5) |
1 | name = "Angela" |
1 | names = ['Alwe', 'Betaafh', 'carol', 'dava'] |
[‘Alwe’, ‘dava’]
[‘BETAAFH’, ‘CAROL’]
int(num.strip()) -> int(num)
new_dict = {new_key:new_value for item in list}
new_dict = {new_key:new_value for (key, value) in dict_1.items()}
1 | names = ['Alwe', 'Betaafh', 'carol', 'dava'] |
{‘Alwe’: 45, ‘Betaafh’: 95, ‘carol’: 21, ‘dava’: 24}
1 | student_scores = {'Alwe': 45, 'Betaafh': 95, 'carol': 21, 'dava': 24} |
The split() method splits a string into a list.
You can specify the separator, default separator is any whitespace.
1 | student_dict = { |
1 | for (index, row) in student_data.iterrows(): |
1 | 0 |
tkinter
gui
function advanced argument
default value
# def my_function(a=0, b, c=0):
def my_function(b, a=0, c=0):
=…
any number of arguments
unlimited position arguments
1 | def add(*args): |
<class 'tuple'>
1 | def calc(n, **kwargs): |
<class 'dict'>
{‘add’: 3, ‘multi’: 5}
1 | class Car: |
None
Options control things like the color and border width of a widget. Options can be set in three ways:
At object creation time, using keyword argumentsfred = Button(self, fg="red", bg="blue")
After object creation, treating the option name like a dictionary indexfred["fg"] = "red"fred["bg"] = "blue"
Use the config() method to update multiple attrs subsequent to object creationfred.config(fg="red", bg="blue")
1 | ## label |
dynamic type
a = 1
a = “Hello”
1 | passwords_1 = ['a', 'b'] |
final_password = "".join(passwords)
messagebox.showinfo(title="oops", message="Please dont leave any fields empty!")
is_ok = messagebox.askokcancel(title=f"{website}", message=f"Email: {username}\nPassword: {password}\n Is it ok to save?")
1 |
|
1 | window = Tk() |
1 | # # FileNotFoundError |
1 | try: |
1 | try: |
1 | height = float(input("height: ")) |
1 | fruits = ["Apple", "Pear", "Orange"] |
1 | facebook_posts = [ |
1 | phonetic_dict = {row["letter"]: row.code for (index, row) in data.iterrows()} |
1 | website = text_website.get() |
1 | def search(): |
https://en.wiktionary.org/wiki/Wiktionary:Frequency_lists
https://github.com/hermitdave/FrequencyWords
google excel=GOOGLETRANSLATE(A2,"fr","en")
https://cloud.google.com/translate/docs/languages?hl=zh-cn
1 | French,English |
1 | import random |
1 | import smtplib |
1 | import datetime as dt |
1 | import datetime as dt |
1 | def get_quote(): |
1 | import smtplib |
import htmlq_text = html.unescape(self.current_question.text)
1 | # type hints |
main.py
1 | from question_model import Question |
quizbrain.py
1 | import html |
ui.py
1 | THEME_COLOR = "#375362" |
uri url
URL stands for Uniform Resource Locator. A URL is nothing more than the address of a given unique resource on the Web. In theory, each valid URL points to a unique resource.

http https
tls/ssl
Transport Layer Security (TLS) is a cryptographic protocol designed to provide communications security over a computer network. The protocol is widely used in applications such as email, instant messaging, and voice over IP, but its use in securing HTTPS remains the most publicly visible.
TLS builds on the now-deprecated SSL (Secure Sockets Layer) specifications (1994, 1995, 1996)
chrome developer tool
network
Status. The HTTP response code.
Type. The resource type.
Initiator. What caused a resource to be requested. Clicking a link in the Initiator column takes you to the source code that caused the request.
Time. How long the request took.
Waterfall. A graphical representation of the different stages of the request. Hover over a Waterfall to see a breakdown.
detail
The Headers tab is shown. Use this tab to inspect HTTP headers.
the Preview tab. A basic rendering of the HTML is shown.
the Response tab. The HTML source code is shown.
the Timing tab. A breakdown of the network activity for this resource is shown.
http request
header
content-type: internet media type MIME
HTML –> text/html
GIF –> image/gif
JSON –> application/json
xml –> text/xml
form file –> multipart/form-data
form data –> application/x-www-form-urlencoded
http response
Information responses
100 Continue
This interim response indicates that the client should continue the request or ignore the response if the request is already finished.
101 Switching Protocols
This code is sent in response to an Upgrade request header from the client and indicates the protocol the server is switching to.
102 Processing (WebDAV)
This code indicates that the server has received and is processing the request, but no response is available yet.
103 Early Hints
This status code is primarily intended to be used with the Link header, letting the user agent start preloading resources while the server prepares a response or preconnect to an origin from which the page will need resources.
Successful responses
200 OK
The request succeeded. The result meaning of “success” depends on the HTTP method:
GET: The resource has been fetched and transmitted in the message body.
HEAD: The representation headers are included in the response without any message body.
PUT or POST: The resource describing the result of the action is transmitted in the message body.
TRACE: The message body contains the request message as received by the server.
201 Created
The request succeeded, and a new resource was created as a result. This is typically the response sent after POST requests, or some PUT requests.
202 Accepted
The request has been received but not yet acted upon. It is noncommittal, since there is no way in HTTP to later send an asynchronous response indicating the outcome of the request. It is intended for cases where another process or server handles the request, or for batch processing.
203 Non-Authoritative Information
This response code means the returned metadata is not exactly the same as is available from the origin server, but is collected from a local or a third-party copy. This is mostly used for mirrors or backups of another resource. Except for that specific case, the 200 OK response is preferred to this status.
204 No Content
There is no content to send for this request, but the headers may be useful. The user agent may update its cached headers for this resource with the new ones.
205 Reset Content
Tells the user agent to reset the document which sent this request.
206 Partial Content
This response code is used when the Range header is sent from the client to request only part of a resource.
207 Multi-Status (WebDAV)
Conveys information about multiple resources, for situations where multiple status codes might be appropriate.
208 Already Reported (WebDAV)
Used inside a dav:propstat response element to avoid repeatedly enumerating the internal members of multiple bindings to the same collection.
226 IM Used (HTTP Delta encoding)
The server has fulfilled a GET request for the resource, and the response is a representation of the result of one or more instance-manipulations applied to the current instance.
Redirection messages
300 Multiple Choices
The request has more than one possible response. The user agent or user should choose one of them. (There is no standardized way of choosing one of the responses, but HTML links to the possibilities are recommended so the user can pick.)
301 Moved Permanently
The URL of the requested resource has been changed permanently. The new URL is given in the response.
302 Found
This response code means that the URI of requested resource has been changed temporarily. Further changes in the URI might be made in the future. Therefore, this same URI should be used by the client in future requests.
303 See Other
The server sent this response to direct the client to get the requested resource at another URI with a GET request.
304 Not Modified
This is used for caching purposes. It tells the client that the response has not been modified, so the client can continue to use the same cached version of the response.
305 Use Proxy Deprecated
Defined in a previous version of the HTTP specification to indicate that a requested response must be accessed by a proxy. It has been deprecated due to security concerns regarding in-band configuration of a proxy.
306 unused
This response code is no longer used; it is just reserved. It was used in a previous version of the HTTP/1.1 specification.
307 Temporary Redirect
The server sends this response to direct the client to get the requested resource at another URI with the same method that was used in the prior request. This has the same semantics as the 302 Found HTTP response code, with the exception that the user agent must not change the HTTP method used: if a POST was used in the first request, a POST must be used in the second request.
308 Permanent Redirect
This means that the resource is now permanently located at another URI, specified by the Location: HTTP Response header. This has the same semantics as the 301 Moved Permanently HTTP response code, with the exception that the user agent must not change the HTTP method used: if a POST was used in the first request, a POST must be used in the second request.
Client error responses
400 Bad Request
The server cannot or will not process the request due to something that is perceived to be a client error (e.g., malformed request syntax, invalid request message framing, or deceptive request routing).
401 Unauthorized
Although the HTTP standard specifies “unauthorized”, semantically this response means “unauthenticated”. That is, the client must authenticate itself to get the requested response.
402 Payment Required Experimental
This response code is reserved for future use. The initial aim for creating this code was using it for digital payment systems, however this status code is used very rarely and no standard convention exists.
403 Forbidden
The client does not have access rights to the content; that is, it is unauthorized, so the server is refusing to give the requested resource. Unlike 401 Unauthorized, the client’s identity is known to the server.
404 Not Found
The server cannot find the requested resource. In the browser, this means the URL is not recognized. In an API, this can also mean that the endpoint is valid but the resource itself does not exist. Servers may also send this response instead of 403 Forbidden to hide the existence of a resource from an unauthorized client. This response code is probably the most well known due to its frequent occurrence on the web.
405 Method Not Allowed
The request method is known by the server but is not supported by the target resource. For example, an API may not allow calling DELETE to remove a resource.
406 Not Acceptable
This response is sent when the web server, after performing server-driven content negotiation, doesn’t find any content that conforms to the criteria given by the user agent.
407 Proxy Authentication Required
This is similar to 401 Unauthorized but authentication is needed to be done by a proxy.
408 Request Timeout
This response is sent on an idle connection by some servers, even without any previous request by the client. It means that the server would like to shut down this unused connection. This response is used much more since some browsers, like Chrome, Firefox 27+, or IE9, use HTTP pre-connection mechanisms to speed up surfing. Also note that some servers merely shut down the connection without sending this message.
409 Conflict
This response is sent when a request conflicts with the current state of the server.
410 Gone
This response is sent when the requested content has been permanently deleted from server, with no forwarding address. Clients are expected to remove their caches and links to the resource. The HTTP specification intends this status code to be used for “limited-time, promotional services”. APIs should not feel compelled to indicate resources that have been deleted with this status code.
411 Length Required
Server rejected the request because the Content-Length header field is not defined and the server requires it.
412 Precondition Failed
The client has indicated preconditions in its headers which the server does not meet.
413 Payload Too Large
Request entity is larger than limits defined by server. The server might close the connection or return an Retry-After header field.
414 URI Too Long
The URI requested by the client is longer than the server is willing to interpret.
415 Unsupported Media Type
The media format of the requested data is not supported by the server, so the server is rejecting the request.
416 Range Not Satisfiable
The range specified by the Range header field in the request cannot be fulfilled. It’s possible that the range is outside the size of the target URI’s data.
417 Expectation Failed
This response code means the expectation indicated by the Expect request header field cannot be met by the server.
418 I’m a teapot
The server refuses the attempt to brew coffee with a teapot.
421 Misdirected Request
The request was directed at a server that is not able to produce a response. This can be sent by a server that is not configured to produce responses for the combination of scheme and authority that are included in the request URI.
422 Unprocessable Content (WebDAV)
The request was well-formed but was unable to be followed due to semantic errors.
423 Locked (WebDAV)
The resource that is being accessed is locked.
424 Failed Dependency (WebDAV)
The request failed due to failure of a previous request.
425 Too Early Experimental
Indicates that the server is unwilling to risk processing a request that might be replayed.
426 Upgrade Required
The server refuses to perform the request using the current protocol but might be willing to do so after the client upgrades to a different protocol. The server sends an Upgrade header in a 426 response to indicate the required protocol(s).
428 Precondition Required
The origin server requires the request to be conditional. This response is intended to prevent the ‘lost update’ problem, where a client GETs a resource’s state, modifies it and PUTs it back to the server, when meanwhile a third party has modified the state on the server, leading to a conflict.
429 Too Many Requests
The user has sent too many requests in a given amount of time (“rate limiting”).
431 Request Header Fields Too Large
The server is unwilling to process the request because its header fields are too large. The request may be resubmitted after reducing the size of the request header fields.
451 Unavailable For Legal Reasons
The user agent requested a resource that cannot legally be provided, such as a web page censored by a government.
Server error responses
500 Internal Server Error
The server has encountered a situation it does not know how to handle.
501 Not Implemented
The request method is not supported by the server and cannot be handled. The only methods that servers are required to support (and therefore that must not return this code) are GET and HEAD.
502 Bad Gateway
This error response means that the server, while working as a gateway to get a response needed to handle the request, got an invalid response.
503 Service Unavailable
The server is not ready to handle the request. Common causes are a server that is down for maintenance or that is overloaded. Note that together with this response, a user-friendly page explaining the problem should be sent. This response should be used for temporary conditions and the Retry-After HTTP header should, if possible, contain the estimated time before the recovery of the service. The webmaster must also take care about the caching-related headers that are sent along with this response, as these temporary condition responses should usually not be cached.
504 Gateway Timeout
This error response is given when the server is acting as a gateway and cannot get a response in time.
505 HTTP Version Not Supported
The HTTP version used in the request is not supported by the server.
506 Variant Also Negotiates
The server has an internal configuration error: the chosen variant resource is configured to engage in transparent content negotiation itself, and is therefore not a proper end point in the negotiation process.
507 Insufficient Storage (WebDAV)
The method could not be performed on the resource because the server is unable to store the representation needed to successfully complete the request.
508 Loop Detected (WebDAV)
The server detected an infinite loop while processing the request.
510 Not Extended
Further extensions to the request are required for the server to fulfill it.
511 Network Authentication Required
Indicates that the client needs to authenticate to gain network access.
response header
content-type:
application/x-javascript –> javascirpt file
html css js
html dom
document object model
css selector
| Selector | Example | Example description |
|---|---|---|
| .class | .intro | Selects all elements with class=”intro” |
| .class1.class2 | .name1.name2 | Selects all elements with both name1 and name2 set within its class attribute |
| .class1 .class2 | .name1 .name2 | Selects all elements with name2 that is a descendant of an element with name1 |
| #id | #firstname | Selects the element with id=”firstname” |
| * | * | Selects all elements |
| element | p | Selects all <p> elements |
| element.class | p.intro | Selects all <p> elements with class=”intro” |
| element,element | div, p | Selects all <div> elements and all <p> elements |
| element element | div p | Selects all <p> elements inside <div> elements |
| element>element | div > p | Selects all <p> elements where the parent is a <div> element |
| element+element | div + p | Selects the first <p> element that is placed immediately after <div> elements |
| element1~element2 | p ~ ul | Selects every <ul> element that is preceded by a <p> element |
| [attribute] | [target] | Selects all elements with a target attribute |
| [attribute=value] | [target=”_blank”] | Selects all elements with target=”_blank” |
| [attribute~=value] | [title~=”flower”] | Selects all elements with a title attribute containing the word “flower” |
| [attribute|=value] | [lang|=”en”] | Selects all elements with a lang attribute value equal to “en” or starting with “en-“ |
| [attribute^=value] | a[href^=”https”] | Selects every <a> element whose href attribute value begins with “https” |
| [attribute$=value] | a[href$=”.pdf”] | Selects every <a> element whose href attribute value ends with “.pdf” |
| [attribute*=value] | a[href*=”w3schools”] | Selects every <a> element whose href attribute value contains the substring “w3schools” |
| :active | a:active | Selects the active link |
| ::after | p::after | Insert something after the content of each <p> element |
| ::before | p::before | Insert something before the content of each <p> element |
| :checked | input:checked | Selects every checked <input> element |
| :default | input:default | Selects the default <input> element |
| :disabled | input:disabled | Selects every disabled <input> element |
| :empty | p:empty | Selects every <p> element that has no children (including text nodes) |
| :enabled | input:enabled | Selects every enabled <input> element |
| :first-child | p:first-child | Selects every <p> element that is the first child of its parent |
| ::first-letter | p::first-letter | Selects the first letter of every <p> element |
| ::first-line | p::first-line | Selects the first line of every <p> element |
| :first-of-type | p:first-of-type | Selects every <p> element that is the first <p> element of its parent |
| :focus | input:focus | Selects the input element which has focus |
| :fullscreen | :fullscreen | Selects the element that is in full-screen mode |
| :hover | a:hover | Selects links on mouse over |
| :in-range | input:in-range | Selects input elements with a value within a specified range |
| :indeterminate | input:indeterminate | Selects input elements that are in an indeterminate state |
| :invalid | input:invalid | Selects all input elements with an invalid value |
| :lang(language) | p:lang(it) | Selects every <p> element with a lang attribute equal to “it” (Italian) |
| :last-child | p:last-child | Selects every <p> element that is the last child of its parent |
| :last-of-type | p:last-of-type | Selects every <p> element that is the last <p> element of its parent |
| :link | a:link | Selects all unvisited links |
| ::marker | ::marker | Selects the markers of list items |
| :not(selector) | :not(p) | Selects every element that is not a <p> element |
| :nth-child(n) | p:nth-child(2) | Selects every <p> element that is the second child of its parent |
| :nth-last-child(n) | p:nth-last-child(2) | Selects every <p> element that is the second child of its parent, counting from the last child |
| :nth-last-of-type(n) | p:nth-last-of-type(2) | Selects every <p> element that is the second <p> element of its parent, counting from the last child |
| :nth-of-type(n) | p:nth-of-type(2) | Selects every <p> element that is the second <p> element of its parent |
| :only-of-type | p:only-of-type | Selects every <p> element that is the only <p> element of its parent |
| :only-child | p:only-child | Selects every <p> element that is the only child of its parent |
| :optional | input:optional | Selects input elements with no “required” attribute |
| :out-of-range | input:out-of-range | Selects input elements with a value outside a specified range |
| ::placeholder | input::placeholder | Selects input elements with the “placeholder” attribute specified |
| :read-only | input:read-only | Selects input elements with the “readonly” attribute specified |
| :read-write | input:read-write | Selects input elements with the “readonly” attribute NOT specified |
| :required | input:required | Selects input elements with the “required” attribute specified |
| :root | :root | Selects the document’s root element |
| ::selection | ::selection | Selects the portion of an element that is selected by a user |
| :target | #news:target | Selects the current active #news element (clicked on a URL containing that anchor name) |
| :valid | input:valid | Selects all input elements with a valid value |
| :visited | a:visited | Selects all visited links |
1 | from urllib.request import urlopen |
服务器渲染
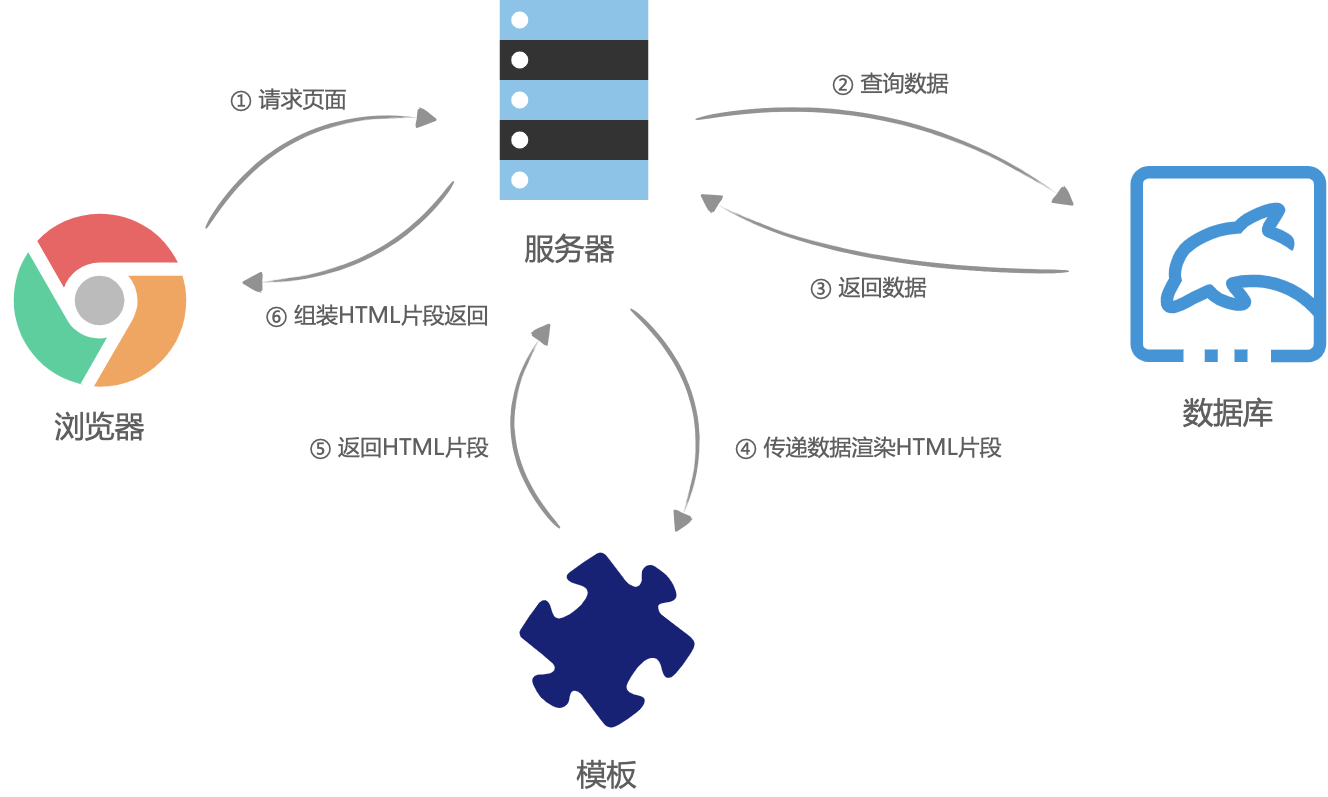
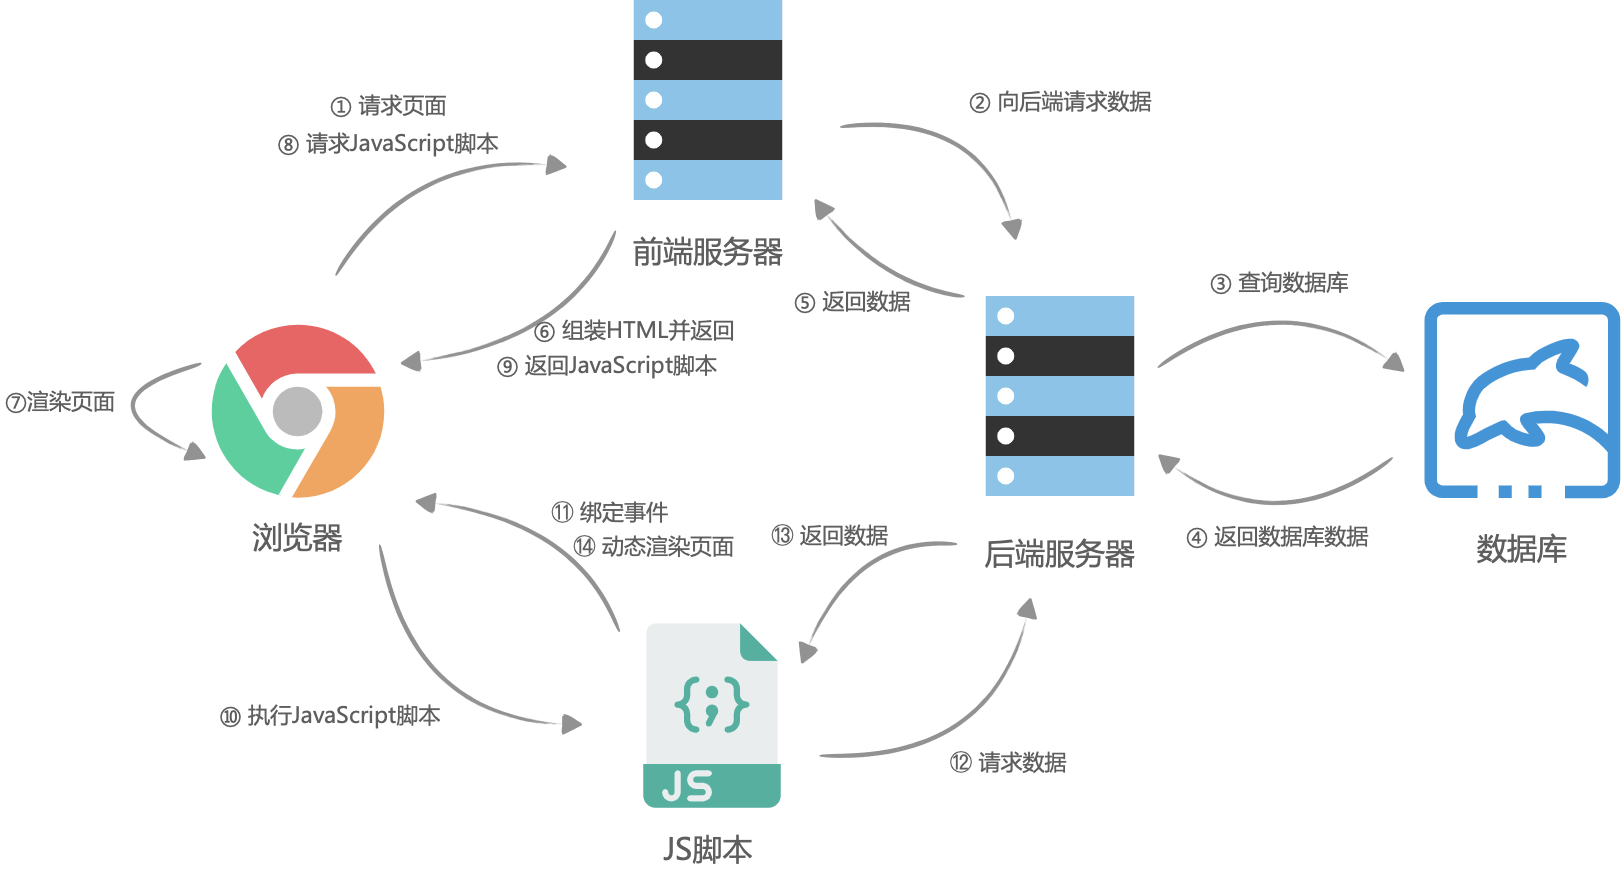
在没有AJAX的时候,也就是web1.0时代,几乎所有应用都是服务端渲染(此时服务器渲染非现在的服务器渲染),那个时候的页面渲染大概是这样的,浏览器请求页面URL,然后服务器接收到请求之后,到数据库查询数据,将数据丢到后端的组件模板(php、asp、jsp等)中,并渲染成HTML片段,接着服务器在组装这些HTML片段,组成一个完整的HTML,最后返回给浏览器,这个时候,浏览器已经拿到了一个完整的被服务器动态组装出来的HTML文本,然后将HTML渲染到页面中
客户端渲染
前后端分离之后,网页开始被当成了独立的应用程序(SPA,Single Page Application),前端团队接管了所有页面渲染的事,后端团队只负责提供所有数据查询与处理的API,大体流程是这样的:首先浏览器请求URL,前端服务器直接返回一个空的静态HTML文件(不需要任何查数据库和模板组装),这个HTML文件中加载了很多渲染页面需要的 JavaScript 脚本和 CSS 样式表,浏览器拿到 HTML 文件后开始加载脚本和样式表,并且执行脚本,这个时候脚本请求后端服务提供的API,获取数据,获取完成后将数据通过JavaScript脚本动态的将数据渲染到页面中,完成页面显示。
服务端渲染
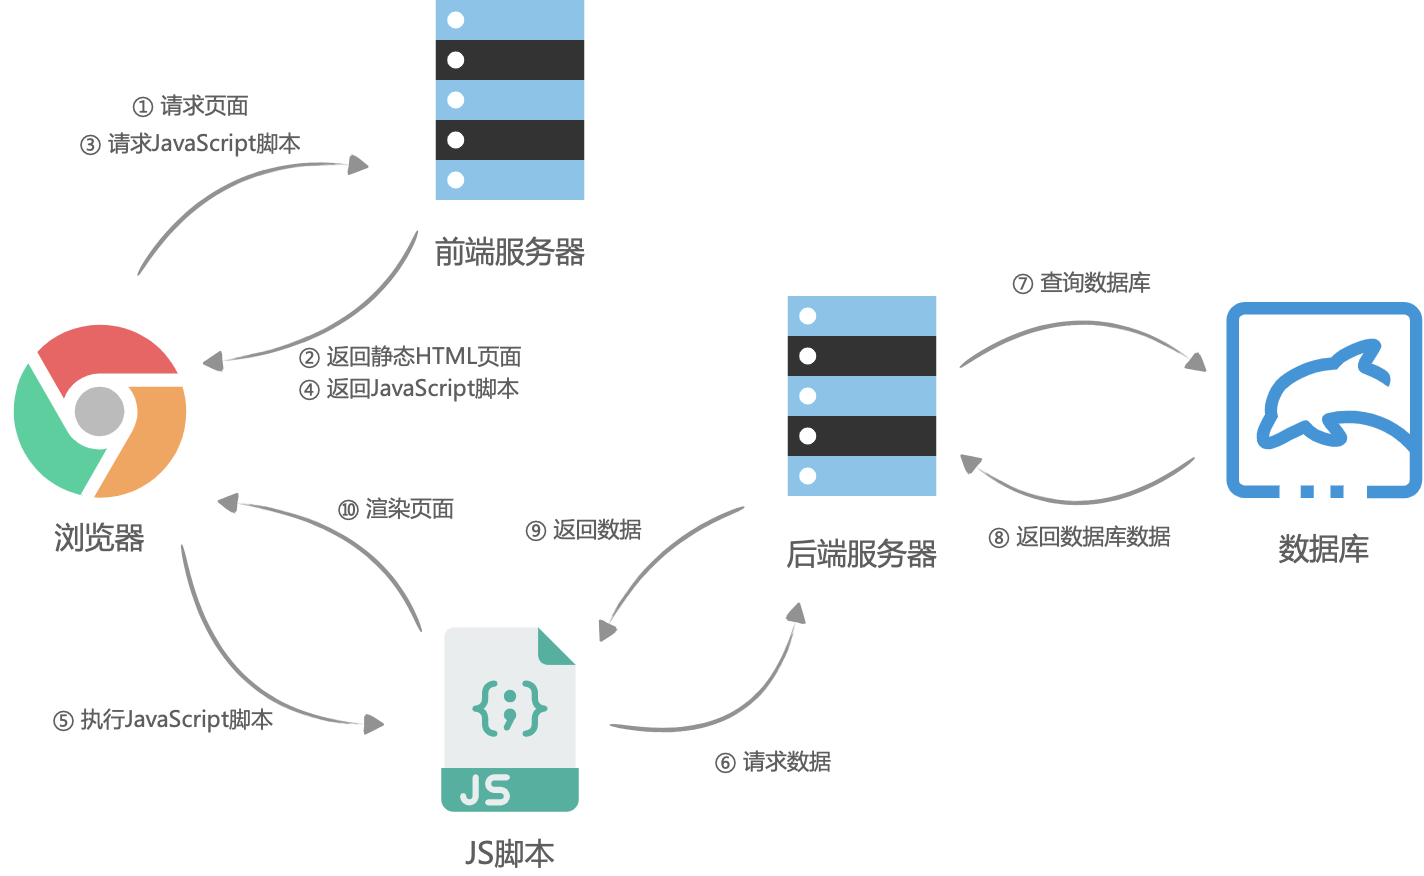
服务端渲染。大体流程与客户端渲染有些相似,首先是浏览器请求URL,前端服务器接收到URL请求之后,根据不同的URL,前端服务器向后端服务器请求数据,请求完成后,前端服务器会组装一个携带了具体数据的HTML文本,并且返回给浏览器,浏览器得到HTML之后开始渲染页面,同时,浏览器加载并执行 JavaScript 脚本,给页面上的元素绑定事件,让页面变得可交互,当用户与浏览器页面进行交互,如跳转到下一个页面时,浏览器会执行 JavaScript 脚本,向后端服务器请求数据,获取完数据之后再次执行 JavaScript 代码动态渲染页面。
响应头
请求头
GET
POST
1 | import requests |
1 | import requests |
str.rsplit(sep=None, maxsplit=-1)
Return a list of the words in the string, using sep as the delimiter string. If maxsplit is given, at most maxsplit splits are done, the rightmost ones. If sep is not specified or None, any whitespace string is a separator. Except for splitting from the right, rsplit() behaves like split() which is described in detail below.
str.split(sep=None, maxsplit=- 1)
Return a list of the words in the string, using sep as the delimiter string. If maxsplit is given, at most maxsplit splits are done (thus, the list will have at most maxsplit+1 elements). If maxsplit is not specified or -1, then there is no limit on the number of splits (all possible splits are made).
If sep is given, consecutive delimiters are not grouped together and are deemed to delimit empty strings (for example, '1,,2'.split(',') returns ['1', '', '2']). The sep argument may consist of multiple characters (for example, '1<>2<>3'.split('<>') returns['1', '2', '3']). Splitting an empty string with a specified separator returns [‘’].
To convert a regular Python string to bytes, call the encode() method on the string. Going the other direction, the byte string decode() method converts encoded plain bytes to a unicode string:
1 | > ustring = 'A unicode \u018e string \xf1' |
1 | from urllib import request |
1 | from urllib import request |
1 | # 对URL编码 |
1 | from urllib import request, parse |
import requests
1 | headers = { |
1 | params = { |
1 | data = { |
1 | resp = requests.get(url) |
match()
Determine if the RE matches at the beginning of the string.
search()
Scan through a string, looking for any location where this RE matches.
findall()
Find all substrings where the RE matches, and returns them as a list.
finditer()
Find all substrings where the RE matches, and returns them as an iterator.
group()
Return the string matched by the RE
Method/Attribute Purpose
start()
Return the starting position of the match
end()
Return the ending position of the match
span()
Return a tuple containing the (start, end) positions of the match
re.S
re.DOTALL
Makes the ‘.’ special character match any character at all, including a newline; without this flag, ‘.’ will match anything except a newline.
(?P<name>...). name is, obviously, the name of the group.The match object methods that deal with capturing groups all accept either integers that refer to the group by number or strings that contain the desired group’s name.
1 | p = re.compile(r'(?P<word>\b\w+\b)') |
1 | import re |
效率不高
1 | # iterator |
1 | # match object group() return the first result |
正则预加载
1 | obj = re.compile(r"\d+") |
提取字符段
1 | # 提取字符段 |
Python 3 the file must be opened in untranslated text mode with the parameters 'w', newline=''(empty string) or it will write \r\r\n on Windows, where the default text mode will translate each \n into \r\n.
1 | import csv |
1 | import re |
1 | html_content = """ |
1 | html = 'A B C D' |
1 | import re |
1 | import csv |
1 | import csv |
1 | import os.path |
1 | <html> |
For getting the text inside the <p> tag,
XPath : html/body/p/text()
Result : This is the first paragraph
For getting a value inside the <href> attribute in the anchor or <a> tag,
XPath : html/body/a/@href
Result: www.example.com
For getting the value inside the second <h2> tag,
XPath : html/body/h2[2]/text()
Result: Hello World
注意//h1/text()结果是个数组
title = root.xpath('/html/body/div/div/div[2]/h1')is the full path to my blog title. Notice how we request the 2nd element of the third set of div elements using div[2] – xpath arrays are one-based, not zero-based.
title = root.xpath('//div[2]/h1')
tagcloud = root.xpath('//*[@class="tagcloud"]')
this selects the tag cloud on my blog by selecting elements which having the class attribute “tagcloud”.
subtitle = root.xpath(‘//h1[contains(@class,”header_title”)]/../h2’)
this selects the h1 title of my blog (SomeBeans) then navigates to the parent with .. and selects the sibling h2 element (the subtitle “the makings of a small casserole”).
The same effect can be achieved with the following-sibling keyword:
subtitle = root.xpath(‘//h1[contains(@class,”header_title”)]/following-sibling::h2’)
1 | from lxml import etree |
The fromstring() function
The fromstring() function is the easiest way to parse a string:
some_xml_data = “
data “
root = etree.fromstring(some_xml_data)
print(root.tag)
root
etree.tostring(root)
b’data ‘
The XML() function
The XML() function behaves like the fromstring() function, but is commonly used to write XML literals right into the source:
There is also a corresponding function HTML() for HTML literals.
root = etree.HTML("<p>data</p>")
The parse() function
The parse() function is used to parse from files and file-like objects.
1 | from lxml import etree |
//tagname
at nay level of parent element//tagename[1]//tagname[@attributeName="value"]
contain()//tagname[contains(@attributeName,'value')]
starts-with()
and or//tagname[(expression 1)and(expression 2)]
get text//h1/text()
/
the children//
all the children within any level.
current..
parent*
any elements
xpath: /html/body/p
CSS selector: html > body > p
Basic CSS Selectors Cheatsheet
| Selector | Description | Example | Explanation |
|---|---|---|---|
| Tag Selector | Selects elements based on their tag name. | p | Selects all <p> elements. |
| Class Selector | Selects elements based on their class name. | .example | Selects all elements with the class name “example”. |
| ID Selector | Selects an element based on its ID. | #example | Selects the element with the ID “example”. |
| Attribute Selector | Selects elements based on their attribute and value. | [type=”text”] | Selects all elements with the attribute “type” and |
| Descendant Selector | Selects elements that are descendants of another element. | div p | Selects all <p> elements that are descendants of a <div> |
| Child Selector | Selects elements that are direct children of another element. | ul > li | Selects all <li> elements that are direct children of a <ul> element. |
| Pseudo-Class Selector | Selects elements based on their state or position in the document. | a:hover | Selects all <a> elements when the mouse is |
There are many pseudo-class selectors, some of which are described in this table.
| Pseudo-class Selector | Description |
|---|---|
| :hover | Selects an element when the mouse pointer |
| :active | Selects an element when it is being |
| :visited | Selects a link that has been visited by |
| :focus | Selects an element when it has focus (e.g. |
| :first-child | Selects the first child element of its |
| :last-child | Selects the last child element of its |
| :nth-child(n) | Selects the nth child element of its |
| :nth-of-type(n) | Selects the nth element of its type |
| :last-of-type | Selects the last occurrence of an |
The CSS expression below shows how to select the first div of the body element.
html > body > div:nth-of-type(1)
1 | <html> |
The next-sibling combinator (+) separates two selectors and matches the second element only if it immediately follows the first element, and both are children of the same parent element.
1 | <ul> |
select the <li>Two!</li>
1 | li:first-of-type + li { |
Select by attribute value containinginput[class*="example"]
Select by attribute value starting withinput[id^="example"]
Select by attribute value ending witha[href$="example"]
XPath to CSS Selector Conversion
| Equivalency | XPath Notation | CSS Selector |
|---|---|---|
| Select by element type | //div | div |
| Select by class name | //div[@class=”example”] |
div.example |
| Select by ID | //*[@id=”example”] |
#example |
| Select by attribute | //input[@name=”example”] |
input[name=”example”] |
| Select by attribute value containing | //input[contains(@class, “example”)] |
input[class*=”example”] |
| Select by attribute value starting with | //input[starts-with(@id, “example”)] |
input[id^=”example”] |
| Select by attribute value ending with | //a[ends-with(@href, “example”)] |
a[href$=”example”] |
| Select by sibling | //div/following-sibling::p | div + p |
| Select by descendant | //div//p | div p |
| Select by first child | //div/p[1] |
div > |
| Select by last child | //div/p[last()] |
div > |
$ pip install parsel
.xpath() and .css() methods return a SelectorList instance, which is a list of new selectors.
If you want to extract only the first matched element, you can call the selector .get()
1 | from parsel import Selector |
selecting the text inside the title tag:
1 | selector.xpath('//title/text()') |
To actually extract the textual data, you must call the selector .get() or .getall() methods, as follows:
1 | selector.xpath('//title/text()').getall() |
query for attributes using .attrib property of a Selector:
1 | [img.attrib['src'] for img in selector.css('img')] |
As a shortcut, .attrib is also available on SelectorList directly; it returns attributes for the first matching element:
1 | selector.css('img').attrib['src'] |
1 | from parsel import Selector |
1 | page = BeautifulSoup(content, "html.parser") |
1 | img = article.find_all("img")[0] |
1 | html = requests.get("https://www.google.com/search?q=minecraft", headers=headers) |
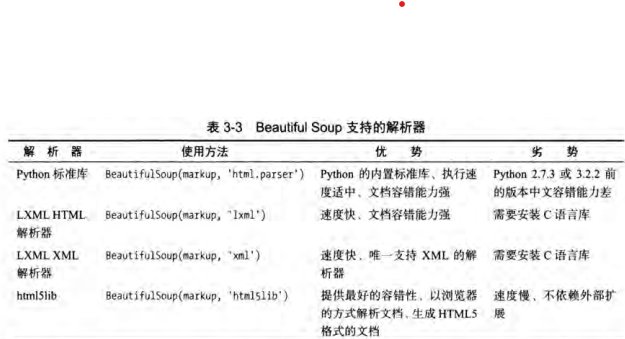
1 | html = """ |
节点名称print(first_a_link.name) # "a"
节点属性
1 | print(first_a_link.attrs) # dictinary : {'href': 'http://news.baidu.com', 'class': ['mnav'], 'name': 'tj_trnews'} |
节点文本内容print(first_a_link.string) # "news"
嵌套选择节点
1 | first_div_element = bs.find(name="div") |
findall(name=””, attrs={}, text=””)
name节点名称
attrs节点属性
常用属性id class 直接传入
1 | print(bs.find(id="head")) |
text节点文本内容
1 | a_link = bs.find_all("a", attrs={"href": "http://news.baidu.com"}) |
install packages:
requests
beautifulsoup4
lxml
1 | import requests |
subscript = soup.find('div', class_='full-script').get_text(separator="\n", strip=True)
def get_text(self,
separator: str = “”,
strip: bool = False,
types: tuple[Type[NavigableString], …] = …) -> str
Get all child strings of this PageElement, concatenated using the given separator.
Params:
separator – Strings will be concatenated using this separator.
strip – If True, strings will be stripped before being concatenated.
types – A tuple of NavigableString subclasses. Any strings of a subclass not found in this list will be ignored. Although there are exceptions, the default behavior in most cases is to consider only NavigableString and CData objects. That means no comments, processing instructions, etc.
Returns:
A string.
1 | movie_urls = movie_list.find_all('a', href=True) |
1 | import requests |
1 | print(bs.select("div")) |
1 | import pandas |
json_string = resp.text().decode() # 是 json格式字符串
json_dict = json.loads(json_string, encoding=’utf-8’)
json dict -> json string
json.dumps()
1 | response = requests.post(url, data=data, headers=headers) |
1 | import requests |
1 | my_header = { |
1 | my_headers = { |
The Visual C++ Redistributable installs Microsoft C and C++ (MSVC) runtime libraries. These libraries are required by many applications built by using Microsoft C and C++ tools. If your app uses those libraries, a Microsoft Visual C++ Redistributable package must be installed on the target system before you install your app.
Microsoft C++ 生成工具通过可编写脚本的独立安装程序提供 MSVC 工具集,无需使用 Visual Studio。 如果从命令行界面(例如,持续集成工作流中)生成面向 Windows 的 C++ 库和应用程序, 则推荐使用此工具。
Win7安装pycrypto报错ucrt\inttypes.h(26): error C2061: syntax error: identifier ‘intmax_t‘
1.将C:\Program Files (x86)\Microsoft Visual Studio 14.0\VC\include下的stdint.h复制到C:\Program Files (x86)\Windows Kits\10\Include\10.0.18362.0\ucrt2.编辑C:\Program Files (x86)\Windows Kits\10\Include\10.0.18362.0\ucrt下的inttypes.h将#include <stdint.h>改为#include “stdint.h”, 目的是让它使用上面第一点复制的头文件stdint.h
pycrypto is no longer maintained: see pycrypto.org pycryptodome is the modern maintained replacement for pycrypto
m3u8
https%3A%2F%2Fnew.1080pzy.co%2F20230116%2F34sxZOJQ%2Findex.m3u8
1 | https://new.1080pzy.co/20230116/34sxZOJQ/index.m3u8 |
1 | https://new.1080pzy.co/20230116/34sxZOJQ/1100kb/hls/index.m3u8 |
The data is UTF-8 encoded bytes escaped with URL quoting, so you want to decode, with urllib.parse.unquote(), which handles decoding from percent-encoded data to UTF-8 bytes and then to text, transparently:
1 | >>> from urllib.parse import unquote |
ffmpeg使用语法:
具体一点来说:
-f concat,-f 一般设置输出文件的格式,如-f psp(输出psp专用格式),但是如果跟concat,则表示采用concat协议,对文件进行连接合并。
-safe 0,用于忽略一些文件名错误,如长路径、空格、非ANSIC字符
-i D:\ProgramData\study\mov\order.m3u8,-i后面加输入文件名,当然也可以加输入文件名组成的文件名,即order.m3u8,但是要满足文件格式,即类似于下面这种:
file ‘D:\ProgramData\study\mov\tsfiles\MQJ9iKoM.ts’
file ‘D:\ProgramData\study\mov\tsfiles\8LeDe7Wu.ts’
-c copy D:\ProgramData\study\mov\hello.mp4,-c表示输出文件采用的编码器,后面跟copy,表示直接复制,不重新编码。
1 | from threading import Thread |
1 | from threading import Thread |
1 | from concurrent.futures import ThreadPoolExecutor, ProcessPoolExecutor |
阻塞requests.get(url)
网络请求返回数据之前,处于阻塞状态。
协程:
当程序遇见IO操作时,选择性的切换到其他任务
微观上,单线程下,一个任务一个任务的进行切换,切换条件即IO操作
宏观上,多个任务同时执行,即多任务异步操作。
DeprecationWarning: The explicit passing of coroutine objects to asyncio.wait() is deprecated since Python 3.8, and scheduled for removal in Python 3.11.
The asyncio.wait() documentation obviously says nothing about this or what you’re supposed to do instead, but as far as I can figure out you replace asyncio.wait([a, b]) with asyncio.gather(a, b).
1 | import time |
1 | import aiohttp |
1 | async def dec_ts(name, key): |
1 | # mac os |
pip install selenium
install chrome driver
copy to the python.exe and scripts folder
if you have selenium above the 4.6.0 you don’t need to add executable_url and in the latest version of Selenium you don’t need to download webdriver.
With latest selenium(v4.6.0 and onwards), its in-built tool known as SeleniumManger can download and handle the driver.exe if you do not specify.
Selenium Manager provides automated driver management for: Google Chrome, Mozilla Firefox, Microsoft Edge.
Selenium Manager is invoked transparently by the Selenium bindings when:
No browser driver is detected on the PATH
No third party driver manager is being used
1 | from selenium.webdriver import Chrome, ChromeOptions |
With WebDriverWait, you don’t really have to take that into account. It will wait only as long as necessary until the desired element shows up (or it hits a timeout).
A WebElement is a Selenium object representing an HTML element.
There are many actions that you can perform on those objects, here are the most useful:
Accessing the text of the element with the property element.text
Clicking the element with element.click()
Accessing an attribute with element.get_attribute('class')
Sending text to an input with element.send_keys('mypassword')
WebDriver provides two main methods for finding elements.
find_element
find_elements
| Type | Description | DOM Sample | Example |
|---|---|---|---|
| By.ID | Searches for elements based on their HTML ID | <div id="myID"> |
find_element(By.ID, “myID”) |
| By.NAME | Searches for elements based on their name attribute | <input name="myNAME"> |
find_element(By.NAME, “myNAME”) |
| By.XPATH | Searches for elements based on an XPath expression | <span>My <a>Link</a></span> |
find_element(By.XPATH, “//span/ |
| By.LINK_TEXT | Searches for anchor elements based on a match of their text content | <a>My Link</a> |
find_element(By.LINK_TEXT, “My Link”) |
| By.PARTIAL_LINK_TEXT | Searches for anchor elements based on a sub-string match of their text content | <a>My Link</a> |
find_element(By.PARTIAL_LINK_TEXT, “Link”) |
| By.TAG_NAME | Searches for elements based on their tag name | <h1> |
find_element(By.TAG_NAME, “h1”) |
| By.CLASS_NAME | Searches for elements based on their HTML classes | <div class="myCLASS"> |
find_element(By.CLASSNAME, |
| By.CSS_SELECTOR | Searches for elements based on a CSS selector | <span>My <a>Link</a></span> |
find_element(By.CSS_SELECTOR, |
1 | # from selenium.webdriver import Chrome, ChromeOptions |
1 | browser = Chrome() |
1 | from selenium.webdirver import ChromeOptions |
1 | from selenium import webdriver |
1 | from selenium import webdriver |
1 | import time |
1 | from selenium import webdriver |
regex: (.*): (.*)
replace: "$1": "$2",
1 | i: 好人 |
1 | "i": "好人", |
from hashlib import md5
def md5_string(string_0):
s = md5()
s.update(string_0.encode())
return s.hexdigest()