def input(__prompt: object = “”) -> str Read a string from standard input. The trailing newline is stripped. The prompt string, if given, is printed to standard output without a trailing newline before reading input.
def len(__obj: Sized) -> int Return the number of items in a container.
1 2
length_1 = len('Enter a title: ') print(length_1) # 15
using leading or trailing underscores
invoke引用 If you invoke something such as a principle, a saying, or a famous person, you refer to them in order to support your argument.
mangling 扭曲 f you say that someone mangles words or information, you are criticizing them for not speaking or writing clearly or correctly.
To avoid name clashes with subclasses, use two leading underscores to invoke Python’s name mangling rules.
_single_leading_underscore: weak “internal use” indicator. E.g. from M import * does not import objects whose names start with an underscore.
single_trailing_underscore_: used by convention to avoid conflicts with Python keyword, e.g. : tkinter.Toplevel(master, class_=’ClassName’)
__double_leading_underscore: when naming a class attribute, invokes name mangling (inside class FooBar, __boo becomes _FooBar__boo; see below). Python mangles these names with the class name: if class Foo has an attribute named __a, it cannot be accessed by Foo.__a. (An insistent user could still gain access by calling Foo._Foo__a.) Generally, double leading underscores should be used only to avoid name conflicts with attributes in classes designed to be subclassed.
__double_leading_and_trailing_underscore__: “magic” objects or attributes that live in user-controlled namespaces. E.g. __init__, __import__ or __file__. Never invent such names; only use them as documented.
Python mangles these names with the class name: if class Foo has an attribute named __a, it cannot be accessed by Foo.__a. (An insistent user could still gain access by calling Foo._Foo__a.) Generally, double leading underscores should be used only to avoid name conflicts with attributes in classes designed to be subclassed.
boolean type
is_male = True
list.append()
def append(self, __object: _T) -> None Append object to the end of the list
1 2 3 4
todos = [] todo = 'Hello' todos.append(todo) print(todos) # ['Hello']
str.capitalize() str.title()
print('hello world'.title()) # Hello world
def capitalize(self: LiteralString) -> LiteralString Return a capitalized version of the string. More specifically, make the first character have upper case and the rest lower case.
print('hello world'.title()) # Hello World
def title(self: LiteralString) -> LiteralString Return a version of the string where each word is titlecased. More specifically, words start with uppercased characters and all remaining cased characters have lower case.
pycharm shortcut
cut a line ctrl + x
paste a line before this line ctrl + v
ctrl + b
while loop
1 2 3 4 5
password = input("Enter password: ")
while password != 'pass123': password = input("Enter password: ") print("Password was correct!")
1 2 3 4
x = 1 while x <= 6: print(x) x = x + 1
break statement
break may only occur syntactically nested in a for or while loop, but not nested in a function or class definition within that loop. It terminates the nearest enclosing loop, skipping the optional else clause if the loop has one. If a for loop is terminated by break, the loop control target keeps its current value. When break passes control out of a try statement with a finally clause, that finally clause is executed before really leaving the loop
1 2 3 4 5 6 7 8 9 10 11 12
todos = [] whileTrue: # prompt = 'Enter a todo: ' user_action = input("Type add, show, or exit: ") match user_action: case'add': todo = input("Enter a todo: ") todos.append(todo) case'show': print(todos) case'exit': break
dir(str)
print(dir(str)) print(dir('Hello'))
def dir(__o: object = …) -> list[str] Show attributes of an object. If called without an argument, return the names in the current scope. Else, return an alphabetized list of names comprising (some of) the attributes of the given object, and of attributes reachable from it. If the object supplies a method named __dir__, it will be used; otherwise the default dir() logic is used and returns:
for a module object: the module’s attributes. for a class object: its attributes, and recursively the attributes of its bases. for any other object: its attributes, its class’s attributes, and recursively the attributes of its class’s base classes.
1 2
import builtins print(dir(builtins))
help()
help("Hello".capitalize)
Help on built-in function capitalize:
capitalize() method of builtins.str instance Return a capitalized version of the string. More specifically, make the first character have upper case and the rest lower case.
match
1
2
3
4
5
6
7
user_action = input("Type add or show: ") match user_action: case'add': todo = input("Enter a todo: ") todos.append(todo) case'show': print(todos)
1 2 3 4 5 6 7 8 9 10 11 12 13
user_action = input("Type add, show, or exit: ").strip() match user_action: case'add': todo = input("Enter a todo: ") todos.append(todo) case'show' | 'display': print(todos) for item in todos: print(item) case'exit': break case _: print("please enter a correct command!")
for loop
1 2 3 4
todo_list = ['todo 1', 'todo 2', 'todo 3'] for todo in todo_list: item = item.title() print(todo)
def strip(self: LiteralString, __chars: LiteralString | None = None) -> LiteralString Return a copy of the string with leading and trailing whitespace removed. If chars is given and not None, remove characters in chars instead
list index
list indices must be integers or slices, not str
int() float() str()
1 2 3 4 5 6 7 8
x = 10.2 print(type(x)) # <class 'float'>
y = 10 print(type(y)) # <class 'int'>
z = 'a' print(type(z)) # <class 'str'>
number = int(input("Number of the todo to edit: ")) int([x]) -> integer int(x, base=10) -> integer Convert a number or string to an integer, or return 0 if no arguments are given. If x is a number, return x.__int__(). For floating point numbers, this truncates towards zero.
If x is not a number or if base is given, then x must be a string, bytes, or bytearray instance representing an integer literal in the given base. The literal can be preceded by ‘+’ or ‘-‘ and be surrounded by whitespace. The base defaults to 10.
number = float('1.23')
str1 = str(12.3)
str(object=’’) -> str str(bytes_or_buffer[, encoding[, errors]]) -> str Create a new string object from the given object. If encoding or errors is specified, then the object must expose a data buffer that will be decoded using the given encoding and error handler. Otherwise, returns the result of object.__str__() (if defined) or repr(object). encoding defaults to sys.getdefaultencoding(). errors defaults to ‘strict’.
def index(self, __value: _T, __start: SupportsIndex = 0, __stop: SupportsIndex = sys.maxsize) -> int Return first index of value. Raises ValueError if the value is not present
def replace(self: LiteralString, __old: LiteralString, __new: LiteralString, __count: SupportsIndex = -1) -> LiteralString Return a copy with all occurrences of substring old replaced by new.
count Maximum number of occurrences to replace. -1 (the default value) means replace all occurrences. If the optional argument count is given, only the first count occurrences are replaced.
class enumerate(Iterator[tuple[int, _T]], Generic[_T]) Return an enumerate object.
The enumerate object yields pairs containing a count (from start, which defaults to zero) and a value yielded by the iterable argument. enumerate is useful for obtaining an indexed list: (0, seq[0]), (1, seq[1]), (2, seq[2]), …
iterable an object supporting iteration
1 2 3 4 5 6
# 0 - todo 1 # 1 - todo 2 # 2 - todo 3 todo_list = ['todo 1', 'todo 2', 'todo 3'] for index, item inenumerate(todo_list): print(index, " - ", item)
Sort the list in ascending order and return None. The sort is in-place (i.e. the list itself is modified) and stable (i.e. the order of two equal elements is maintained). If a key function is given, apply it once to each list item and sort them, ascending or descending, according to their function values. The reverse flag can be set to sort in descending order.
网站服务器 WSGI: The Web Server Gateway Interface is a simple calling convention for web servers to forward requests to web applications or frameworks written in the Python programming language.
浏览器客户端 WebKit is a browser engine developed by Apple and primarily used in its Safari web browser, as well as all web browsers on iOS and iPadOS.
HTTP Requests Start line HTTP requests are messages sent by the client to initiate an action on the server. Their start-line contain three elements:
An HTTP method, a verb (like GET, PUT or POST) or a noun (like HEAD or OPTIONS), that describes the action to be performed. For example, GET indicates that a resource should be fetched or POST means that data is pushed to the server (creating or modifying a resource, or generating a temporary document to send back).
The request target, usually a URL, or the absolute path of the protocol, port, and domain are usually characterized by the request context. The format of this request target varies between different HTTP methods.
The HTTP version, which defines the structure of the remaining message, acting as an indicator of the expected version to use for the response.
HTTP request header The start-line and HTTP headers of the HTTP message are collectively known as the head of the requests, whereas its payload is known as the body.
Body The final part of the request is its body. Not all requests have one: requests fetching resources, like GET, HEAD, DELETE, or OPTIONS, usually don’t need one. Some requests send data to the server in order to update it: as often the case with POST requests (containing HTML form data).
Bodies can be broadly divided into two categories:
Single-resource bodies, consisting of one single file, defined by the two headers: Content-Type and Content-Length.
Multiple-resource bodies, consisting of a multipart body, each containing a different bit of information. This is typically associated with HTML Forms.
HTTP Responses
Status line The start line of an HTTP response, called the status line, contains the following information:
The protocol version, usually HTTP/1.1.
A status code, indicating success or failure of the request. Common status codes are 200, 404, or 302
A status text. A brief, purely informational, textual description of the status code to help a human understand the HTTP message.
A typical status line looks like: HTTP/1.1 404 Not Found.
网络请求:
urllib urllib is a package that collects several modules for working with URLs:
requests Requests is an HTTP client library for the Python programming language. Requests is one of the most, if not the most, popular Python libraries that is not included with Python due to its elegant mapping of the HTTP protocol onto Python’s object-oriented semantics It is implemented as a wrapper for urllib3, another 3rd party Python HTTP library.
selenium
appium 手机app
数据解析
re This module provides regular expression matching operations similar to those found in Perl.
xpath XPath (XML Path Language) is an expression language designed to support the query or transformation of XML documents. The XPath language is based on a tree representation of the XML document, and provides the ability to navigate around the tree, selecting nodes by a variety of criteria.
run the installer. Make sure you select the option Add Python to PATH, which will make it easier to configure your system correctly. Figure 1-1 shows this option selected.
Running Python in a Terminal Session
Open a new command window and enter python in lowercase. You should see a Python prompt (>>>), which means Windows has found the version of Python you just installed.
Installing the Python Extension for VS Code
To install the Python extension, click the Manage icon, which looks like a gear in the lower-left corner of the VS Code app. In the menu that appears, click Extensions. Enter python in the search box and click the Python extension. (If you see more than one extension named Python, choose the one supplied by Microsoft.)
running hello_world.py
folder: python_work
file: hello_world.py
print("Hello Python world!")
vscode -> run -> Run Without Debugging or press CTRL-F5
Hello Python world!
Running Python Programs from a Terminal
terminal to run hello_world.py:
1
2
3
4
5
C:\> cd Desktop\python_work C:\Desktop\python_work> dir hello_world.py C:\Desktop\python_work> python hello_world.py Hello Python world!
First, use the cd command to navigate to the python_work folder, which is in the Desktop folder.
Next, use the dir command to make sure hello_world.py is in this folder.
Then run the file using the command python hello_world.py.
Variables and Simple Data Types
variable
1 2
message = "Hello Python world!" print(message)
output
Hello Python world!
We’ve added a variable named message.
Every variable is connected to a value, which is the information associated with that variable.
You can change the value of a variable in your program at any time, and Python will always keep track of its current value.
Naming and Using Variables
rules:
Variable names can contain only letters, numbers, and underscores. They can start with a letter or an underscore, but not with a number. For instance, you can call a variable message_1 but not 1_message.
Spaces are not allowed in variable names, but underscores can be used to separate words in variable names. For example, greeting_message works but greeting message will cause errors.
Avoid using Python keywords and function names as variable names. For example, do not use the word print as a variable name; Python has reserved it for a particular programmatic purpose. (See “Python Keywords and Built-in Functions” on page 466.)
Variable names should be short but descriptive. For example, name is better than n, student_name is better than s_n, and name_length is better than length_of_persons_name.
Be careful when using the lowercase letter l and the uppercase letter O because they could be confused with the numbers 1 and 0.
The Python variables you’re using at this point should be lowercase. You won’t get errors if you use uppercase letters, but uppercase letters in variable names have special meanings that we’ll discuss in later chapters.
When an error occurs in your program, The interpreter provides a traceback when a program cannot run successfully.
A traceback is a record of where the interpreter ran into trouble when trying to execute your code.
example:
1 2 3 4 5
Traceback (most recent call last): File "hello_world.py", line 2, in <module> # 1 print(mesage) # 2 ^^^^^^ NameError: name 'mesage' is not defined. Did you mean: 'message'? # 3
The output reports that an error occurs in line 2 of the file hello_world.py and tells us what kind of error it found 3. In this case it found a name error and reports that the variable being printed, mesage, has not been defined.
A name error usually means we either forgot to set a variable’s value before using it, or we made a spelling mistake when entering the variable’s name.
If Python finds a variable name that’s similar to the one it doesn’t recognize, it will ask if that’s the name you meant to use.
Variables Are Labels
It’s much better to think of variables as labels that you can assign to values. You can also say that a variable references a certain value.
Strings
A string is a series of characters. Anything inside quotes is considered a string in Python, and you can use single or double quotes around your
strings like this:
“This is a string.” ‘This is also a string.’
use quotes and apostrophes within your strings:
‘I told my friend, “Python is my favorite language!”‘ “The language ‘Python’ is named after Monty Python, not the snake.” “One of Python’s strengths is its diverse and supportive community.”
Changing Case in a String with Methods
string.title()
Return a version of the string where each word is titlecased. More specifically, words start with uppercased characters and all remaining cased characters have lower case.
1 2
name = "ada lovelace" print(name.title())
output: Ada Lovelace
A method is an action that Python can perform on a piece of data. The dot (.) after name in name.title() tells Python to make the title() method act on the variable name.
Every method is followed by a set of parentheses, because methods often need additional information to do their work. That information is provided inside the parentheses.
The title() function doesn’t need any additional information, so its parentheses are empty.
change a string to all uppercase or all lowercase letters like this:
1 2 3
name = "Ada Lovelace" print(name.upper()) print(name.lower())
This will display the following:
ADA LOVELACE ada lovelace
The lower() method is particularly useful for storing data. You typically won’t want to trust the capitalization that your users provide, so you’ll convert strings to lowercase before storing them. Then when you want to display the information, you’ll use the case that makes the most sense foreach string.
place the letter f immediately before the opening quotation mark 1. Put braces around the name or names of any variable you want to use inside the string.
These strings are called f-strings. The f is for format, because Python formats the string by replacing the name of any variable in braces with its value. The output from the previous code is: ada lovelace
Adding Whitespace to Strings with Tabs or Newlines
whitespace refers to any nonprinting characters, such as spaces, tabs, and end-of-line symbols. use whitespace to organize your output so it’s easier for users to read.
However, it is only removed temporarily. If you ask for the value of favorite_language again, the string looks the same as when it was entered, including the extra whitespace 4. To remove the whitespace from the string permanently, you have to associate the stripped value with the variable name:
Enter the name of the variable followed by a dot, and then the method removeprefix(). Inside the parentheses, enter the prefix you want to remove from the original string.
Like the methods for removing whitespace, removeprefix() leaves the original string unchanged. If you want to keep the new value with the prefix removed, either reassign it to the original variable or assign it to a new variable:
A syntax error occurs when Python doesn’t recognize a section of your program as valid Python code.
example
1 2
message = 'One of Python's strengths is its diverse community.' print(message)
You’ll see the following output:
1 2 3 4
File "apostrophe.py", line 1 message = 'One of Python's strengths is its diverse community.' 1 ^ SyntaxError: unterminated string literal (detected at line 1)
Your editor’s syntax highlighting feature should help you spot some syntax errors quickly as you write your programs. If you see Python code highlighted as if it’s English or English highlighted as if it’s Python code, you probably have a mismatched quotation mark somewhere in your file.
Numbers
Integers
You can add (+), subtract (-), multiply (*), and divide (/) integers in Python.
1 2 3 4 5 6 7 8
>>> 2 + 3 5 >>> 3 - 2 1 >>> 2 * 3 6 >>> 3 / 2 1.5
uses two multiplication symbols to represent exponents:
1 2 3 4 5 6
>>> 3 ** 2 9 >>> 3 ** 3 27 >>> 10 ** 6 1000000
Python supports the order of operations too, so you can use multiple operations in one expression. You can also use parentheses to modify the order of operations. For example:
1 2 3 4
>>> 2 + 3*4 14 >>> (2 + 3) * 4 20
The spacing in these examples has no effect on how Python evaluates the expressions; it simply helps you more quickly spot the operations that have priority when you’re reading through the code.
Floats
Python calls any number with a decimal point a float. it refers to the fact that a decimal point Variables and can appear at any position in a number.
For the most part, you can use floats without worrying about how they behave. Simply enter the numbers you want to use, and Python will most likely do what you expect:
This happens in all languages and is of little concern. Python tries to find a way to represent the result as precisely as possible, which is sometimes difficult given how computers have to represent numbers internally.
Integers and Floats
When you divide any two numbers, even if they are integers that result in a whole number, you’ll always get a float:
1 2
>>> 4/2 2.0
If you mix an integer and a float in any other operation, you’ll get a float as well:
1 2 3 4 5 6
>>> 1 + 2.0 3.0 >>> 2 * 3.0 6.0 >>> 3.0 ** 2 9.0
Python defaults to a float in any operation that uses a float, even if the output is a whole number.
Underscores in Numbers
When you’re writing long numbers, you can group digits using underscores to make large numbers more readable:
Python ignores the underscores when storing these kinds of values.
Even if you don’t group the digits in threes, the value will still be unaffected. To Python, 1000 is the same as 1_000, which is the same as 10_00. This feature works for both integers and floats.
Multiple Assignment
You can assign values to more than one variable using just a single line of code. This can help shorten your programs and make them easier to read;
you’ll use this technique most often when initializing a set of numbers. For example, here’s how you can initialize the variables x, y, and z to zero:
>>> x, y, z = 0, 0, 0
You need to separate the variable names with commas, and do the same with the values, and Python will assign each value to its respective variable. As long as the number of values matches the number of variables, Python will match them up correctly
Constants
A constant is a variable whose value stays the same throughout the life of a program.
Python doesn’t have built-in constant types, but Python programmers use all capital letters to indicate a variable should be treated as a constant and never be changed:
MAX_CONNECTIONS = 5000
Comments
u should add notes within your programs that describe your overall approach to the problem you’re solving.
A comment allows you to write notes in your spoken language, within your programs.
How Do You Write Comments?
In Python, the hash mark (#) indicates a comment. Anything following a hash mark in your code is ignored by the Python interpreter. For example:
1 2
# Say hello to everyone. print("Hello Python people!")
Python ignores the first line and executes the second line. Hello Python people!
Introducing Lists
what is a list
A list is a collection of items in a particular order
Because a list usually contains more than one element, it’s a good idea to make the name of your list plural, such as letters, digits, or names
In Python, square brackets ([]) indicate a list, and individual elements in the list are separated by commas.example
Lists are ordered collections, so you can access any element in a list by telling Python the position, or index, of the item desired. To access an element in a list, write the name of the list followed by the index of the item enclosed in square brackets.
Python has a special syntax for accessing the last element in a list. If you ask for the item at index -1, Python always returns the last item in the list:
The index -2 returns the second item from the end of the list, the index -3 returns the third item from the end, and so forth.
Using Individual Values from a List
You can use individual values from a list just as you would any other variable.
1 2 3
bicycles = ['trek', 'cannondale', 'redline', 'specialized'] message = f"My first bicycle was a {bicycles[0].title()}." print(message)
Modifying, Adding, and Removing Elements
Most lists you create will be dynamic, meaning you’ll build a list and then add and remove elements from it as your program runs its course.
Modifying Elements in a List
To change an element, use the name of the list followed by the index of the element you want to change, and then provide the new value you want that item to have.
To put your users in control, start by defining an empty list that will hold the users’ values. Then append each new value provided to the list you just created.
You can add a new element at any position in your list by using the insert() method. You do this by specifying the index of the new element and the value of the new item: This operation shifts every other value in the list one position to the right.
know the position of the item you want to remove from a list, you can use the del statement:
motorcycles = [‘honda’, ‘yamaha’, ‘suzuki’] print(motorcycles) del motorcycles[0] print(motorcycles)
Removing an Item Using the pop() Method
The pop() method removes the last item in a list, but it lets you work with that item after removing it. The term pop comes from thinking of a list as a stack of items and popping one item off the top of the stack. In this analogy, the top of a stack corresponds to the end of a list.
motorcycles = ['honda', 'yamaha', 'suzuki'] first_owned = motorcycles.pop(0) print(f"The first motorcycle I owned was a {first_owned.title()}.")
The first motorcycle I owned was a Honda.
Remember that each time you use pop(), the item you work with is no longer stored in the list.
when you want to delete an item from a list and not use that item in any way, use the del statement; if you want to use an item as you remove it, use the pop() method.
Removing an Item by Value
If you only know the value of the item you want to remove, you can use the remove() method
The remove() method deletes only the first occurrence of the value you specify. If there’s a possibility the value appears more than once in the list, you’ll need to use a loop to make sure all occurrences of the value are removed.
Organizing a List
Sometimes you’ll want to preserve the original order of your list, and other times you’ll want to change the original order.
Sorting a List Permanently with the sort() Method
The sort() method changes the order of the list permanently. The cars are now in alphabetical order, and we can never revert to the original order:
Sorting a List Temporarily with the sorted() Function
The sorted() function lets you display your list in a particular order, but doesn’t affect the actual order of the list.
1 2 3 4 5 6 7
cars = ['bmw', 'audi', 'toyota', 'subaru'] print("Here is the original list:") print(cars) print("\nHere is the sorted list:") print(sorted(cars)) print("\nHere is the original list again:") print(cars)
output:
Here is the original list: [‘bmw’, ‘audi’, ‘toyota’, ‘subaru’] Here is the sorted list: [‘audi’, ‘bmw’, ‘subaru’, ‘toyota’] 1 Here is the original list again: [‘bmw’, ‘audi’, ‘toyota’, ‘subaru’]
The sorted() function can also accept a reverse=True argument if you want to display a list in reverse-alphabetical order.
Sorting a list alphabetically is a bit more complicated when all the values are not in lowercase
Printing a List in Reverse Order
If we originally stored the list of cars in chronological order according to when we owned them, we could easily rearrange the list into reverse-chronological order:
Traceback (most recent call last): File "motorcycles.py", line 2, in <module> print(motorcycles[3]) ~~~~~~~~~~~^^^ IndexError: list index out of range
Keep in mind that whenever you want to access the last item in a list, you should use the index -1. This will always work, even if your list has changed size since the last time you accessed it:
The only time this approach will cause an error is when you request the last item from an empty list:
1 2
motorcycles = [] print(motorcycles[-1])
No items are in motorcycles, so Python returns another index error:
1 2 3 4 5 6
Traceback (most recent call last): File "motorcyles.py", line 3, in <module> print(motorcycles[-1]) ~~~~~~~~~~~^^^^ IndexError: list index out of range
If an index error occurs and you can’t figure out how to resolve it, try printing your list or just printing the length of your list. Your list might look much different than you thought it did, especially if it has been managed dynamically by your program. Seeing the actual list, or the exact number of items in your list, can help you sort out such logical errors.
Working with Lists
Looping allows you to take the same action, or set of actions, with every item in a list
Looping Through an Entire List
Say we have a list of magicians’ names, and we want to print out each name in the list.
We could do this by retrieving each name from the list individually, but this approach could cause several problems. For one, it would be repetitive to do this with a long list of names. Also, we’d have to change our code each time the list’s length changed. Using a for loop avoids both of these issues by letting Python manage these issues internally.
1 2 3
magicians = ['alice', 'david', 'carolina'] for magician in magicians: print(magician)
alice david carolina
A Closer Look at Looping
for magician in magicians:
This line tells Python to retrieve the first value from the list magicians and associate it with the variable magician.
the set of steps is repeated once for each item in the list, no matter how many items are in the list.
you can choose any name you want for the temporary variable that will be associated with each value in the list. However, it’s helpful to choose a meaningful name that represents a single item from the list.
Using singular and plural names can help you identify whether a section of code is working with a single element from the list or the entire list.
Doing More Work Within a for Loop
1 2 3 4
magicians = ['alice', 'david', 'carolina'] for magician in magicians: print(f"{magician.title()}, that was a great trick!") print(f"I can't wait to see your next trick, {magician.title()}.\n")
Alice, that was a great trick! I can’t wait to see your next trick, Alice.
David, that was a great trick! I can’t wait to see your next trick, David.
Carolina, that was a great trick! I can’t wait to see your next trick, Carolina.
Doing Something After a for Loop
Any lines of code after the for loop that are not indented are executed once without repetition.
1 2 3 4 5
magicians = ['alice', 'david', 'carolina'] for magician in magicians: print(f"{magician.title()}, that was a great trick!") print(f"I can't wait to see your next trick, {magician.title()}.\n") print("Thank you, everyone. That was a great magic show!")
Alice, that was a great trick! I can’t wait to see your next trick, Alice.
David, that was a great trick! Working with Lists 53 I can’t wait to see your next trick, David.
Carolina, that was a great trick! I can’t wait to see your next trick, Carolina.
Thank you, everyone. That was a great magic show!
Avoiding Indentation Errors
Python uses indentation to determine how a line, or group of lines, is related to the rest of the program.
common indentation errors. For example, people sometimes indent lines of code that don’t need to be indented or forget to indent lines that need to be indented.
Forgetting to Indent
1 2 3
magicians = ['alice', 'david', 'carolina'] for magician in magicians: print(magician)
1 2 3 4
File "magicians.py", line 3 print(magician) ^ IndentationError: expected an indented block after 'for' statement on line 2
Forgetting to Indent Additional Lines
This is a logical error. The syntax is valid Python code, but the code does not produce the desired result because a problem occurs in its logic. If you expect to see a certain action repeated once for each item in a list and it’s executed only once, determine whether you need to simply indent a line or a group of lines.
1 2 3 4
magicians = ['alice', 'david', 'carolina'] for magician in magicians: print(f"{magician.title()}, that was a great trick!") print(f"I can't wait to see your next trick, {magician.title()}.\n")
output:
Alice, that was a great trick! David, that was a great trick! Carolina, that was a great trick! I can’t wait to see your next trick, Carolina.
Indenting Unnecessarily
1 2
message = "Hello Python world!" print(message)
File “hello_world.py”, line 2 print(message) ^ IndentationError: unexpected indent
You can avoid unexpected indentation errors by indenting only when you have a specific reason to do so.
Indenting Unnecessarily After the Loop
1 2 3 4 5
magicians = ['alice', 'david', 'carolina'] for magician in magicians: print(f"{magician.title()}, that was a great trick!") print(f"I can't wait to see your next trick, {magician.title()}.\n") print("Thank you everyone, that was a great magic show!")
1
2
3
4
5
6
7
8
9
10
11
12
Alice, that was a great trick! I can't wait to see your next trick, Alice. Thank you everyone, that was a great magic show! David, that was a great trick! I can't wait to see your next trick, David.
Thank you everyone, that was a great magic show! Carolina, that was a great trick! I can't wait to see your next trick, Carolina. Thank you everyone, that was a great magic show!
This is another logical error, similar to the one in “Forgetting to Indent Additional Lines” on page 54. Because Python doesn’t know what you’re trying to accomplish with your code, it will run all code that is written in valid syntax. If an action is repeated many times when it should be executed only once, you probably need to unindent the code for that action.
Forgetting the Colon
1 2 3
magicians = ['alice', 'david', 'carolina'] for magician in magicians print(magician)
1 2 3 4
File "magicians.py", line 2 for magician in magicians ^ SyntaxError: expected ':'
Making Numerical Lists
Using the range() Function
range(stop) -> range object range(start, stop[, step]) -> range object
Return an object that produces a sequence of integers from start (inclusive) to stop (exclusive) by step. range(i, j) produces i, i+1, i+2, …, j-1. start defaults to 0, and stop is omitted! range(4) produces 0, 1, 2, 3. These are exactly the valid indices for a list of 4 elements. When step is given, it specifies the increment (or decrement).
generate a series of numbers.
1 2
for value inrange(1, 5): print(value)
output: 1 2 3 4
You can also pass range() only one argument, and it will start the sequence of numbers at 0.
Using range() to Make a List of Numbers
convert the results of range() directly into a list using the list() function.
1 2
numbers = list(range(1, 6)) print(numbers)
This is the result: [1, 2, 3, 4, 5]
1 2 3 4 5
squares = [] for value inrange(1, 11): square = value ** 2 squares.append(square) print(squares)
A list comprehension allows you to generate this same list in just one line of code. A list comprehension combines the for loop and the creation of new elements into one line, and automatically appends each new element.
1 2
squares = [value**2for value inrange(1, 11)] print(squares)
output: [1, 4, 9, 16, 25, 36, 49, 64, 81, 100]
Working with Part of a List
Slicing a List
To make a slice, you specify the index of the first and last elements you want to work with. n, Python stops one item before the second index you specify.
players = ['charles', 'martina', 'michael', 'florence', 'eli'] print("Here are the first three players on my team:") 1for player in players[:3]: print(player.title())
Here are the first three players on my team: Charles Martina Michael
Traceback (most recent call last): File "dimensions.py", line 2, in <module> dimensions[0] = 250 TypeError: 'tuple' object does not support item assignment
Tuples are technically defined by the presence of a comma; the parentheses make them look neater and more readable. If you want to define a tuple with one element, you need to include a trailing comma: my_t = (3,)
Looping Through All Values in a Tuple
1 2 3
dimensions = (200, 50) for dimension in dimensions: print(dimension)
200 50
Writing Over a Tuple
Although you can’t modify a tuple, you can assign a new value to a variable that represents a tuple
1 2 3 4 5 6 7 8
dimensions = (200, 50) print("Original dimensions:") for dimension in dimensions: print(dimension) dimensions = (400, 100) print("\nModified dimensions:") for dimension in dimensions: print(dimension)
if Statements 0
Programming often involves examining a set of conditions and deciding which action to take based on those conditions. Python’s if statement allows you to examine the current state of a program and respond appropriately to that state.
a example
1 2 3 4 5 6
cars = ['audi', 'bmw', 'subaru', 'toyota'] for car in cars: if car == 'bmw': print(car.upper()) else: print(car.title())
output
Audi BMW Subaru Toyota
Conditional Tests
an expression that can be evaluated as True or False and is called a conditional test. Python uses the values True and False to decide whether the code in an if statement should be executed.
Checking for Equality
equality operator returns True if the values on the left and right side of the operator match, and False if they don’t match.
1 2 3
>>> car = 'audi' >>> car == 'bmw' False
Ignoring Case When Checking for Equality
1 2 3 4 5 6 7
>>> car = 'Audi' >>> car == 'audi' False >>> car.lower() == 'audi' True >>> car 'Audi'
Checking for Inequality
1 2 3
requested_topping = 'mushrooms' if requested_topping != 'anchovies': print("Hold the anchovies!")
Hold the anchovies!
Numerical Comparisons
mathematical comparisons
1 2 3 4 5 6 7 8 9
>>> age = 19 >>> age < 21 True >>> age <= 21 True >>> age > 21 False >>> age >= 21 False
Checking Multiple Conditions
Using and to Check Multiple Conditions
To check whether two conditions are both True simultaneously, use the keyword and to combine the two conditional tests; if each test passes, the overall expression evaluates to True. If either test fails or if both tests fail, the expression evaluates to False.
banned_users = ['andrew', 'carolina', 'david'] user = 'marie' if user notin banned_users: print(f"{user.title()}, you can post a response if you wish.")
Marie, you can post a response if you wish.
Boolean Expressions
A Boolean expression is just another name for a conditional test. A Boolean value is either True or False, just like the value of a conditional expression after it has been evaluated.
if Statements
Simple if Statements
if conditional_test: do something
if-else Statements
take one action when a conditional test passes and a different action in all other cases. An if-else block is similar to a simple if statement, but the else statement allows you to define an action or set of actions that are executed when the conditional test fails.
1 2 3 4 5 6 7
age = 17 if age >= 18: print("You are old enough to vote!") print("Have you registered to vote yet?") else: print("Sorry, you are too young to vote.") print("Please register to vote as soon as you turn 18!")
Sorry, you are too young to vote. Please register to vote as soon as you turn 18!
The if-elif-else Chain
Python’s if-elif-else syntax. Python executes only one block in an if-elif-else chain. It runs each conditional test in order, until one passes. When a test passes, the code following that test is executed and Python skips the rest of the tests.
1 2 3 4 5 6 7
age = 12 if age < 4: print("Your admission cost is $0.") elif age < 18: print("Your admission cost is $25.") else: print("Your admission cost is $40.")
Your admission cost is $25.
Using Multiple elif Blocks
1 2 3 4 5 6 7 8 9 10
age = 12 if age < 4: price = 0 elif age < 18: price = 25 elif age < 65: price = 40 else: price = 20 print(f"Your admission cost is ${price}.")
Omitting the else Block
Other times, it’s clearer to use an additional elif statement that catches the specific condition of interest
1 2 3 4 5 6 7 8 9 10
age = 12 if age < 4: price = 0 elif age < 18: price = 25 elif age < 65: price = 40 elif age >= 65: price = 20 print(f"Your admission cost is ${price}.")
The else block is a catchall statement. It matches any condition that wasn’t matched by a specific if or elif test, and that can sometimes include invalid or even malicious data. If you have a specific final condition you’re testing for, consider using a final elif block and omit the else block. As a result, you’ll be more confident that your code will run only under the correct conditions.
Testing Multiple Conditions
The if-elif-else chain is powerful, but it’s only appropriate to use when you just need one test to pass. As soon as Python finds one test that passes, it skips the rest of the tests.
sometimes it’s important to check all conditions of interest. In this case, you should use a series of simple if statements with no elif or else blocks. This technique makes sense when more than one condition could be True, and you want to act on every condition that is True.
1 2 3 4 5 6 7 8
requested_toppings = ['mushrooms', 'extra cheese'] if'mushrooms'in requested_toppings: print("Adding mushrooms.") if'pepperoni'in requested_toppings: print("Adding pepperoni.") if'extra cheese'in requested_toppings: print("Adding extra cheese.") print("\nFinished making your pizza!")
Adding mushrooms. Adding extra cheese.
Finished making your pizza!
wrong:
1 2 3 4 5 6 7 8
requested_toppings = ['mushrooms', 'extra cheese'] if'mushrooms'in requested_toppings: print("Adding mushrooms.") elif'pepperoni'in requested_toppings: print("Adding pepperoni.") elif'extra cheese'in requested_toppings: print("Adding extra cheese.") print("\nFinished making your pizza!")
Adding mushrooms.
Finished making your pizza!
Using if Statements with Lists
Checking for Special Items
1 2 3 4 5 6 7
requested_toppings = ['mushrooms', 'green peppers', 'extra cheese'] for requested_topping in requested_toppings: if requested_topping == 'green peppers': print("Sorry, we are out of green peppers right now.") else: print(f"Adding {requested_topping}.") print("\nFinished making your pizza!")
Adding mushrooms. Sorry, we are out of green peppers right now. Adding extra cheese.
Finished making your pizza!
Checking That a List Is Not Empty
we won’t be able to assume that a list has any items in it each time a loop is run. In this situation, it’s useful to check whether a list is empty before running a for loop.
1 2 3 4 5 6 7
requested_toppings = [] if requested_toppings: for requested_topping in requested_toppings: print(f"Adding {requested_topping}.") print("\nFinished making your pizza!") else: print("Are you sure you want a plain pizza?")
Are you sure you want a plain pizza?
Using Multiple Lists
1 2 3 4 5 6 7 8
available_toppings = ['mushrooms', 'olives', 'green peppers', 'pepperoni', 'pineapple', 'extra cheese'] requested_toppings = ['mushrooms', 'french fries', 'extra cheese'] for requested_topping in requested_toppings: if requested_topping in available_toppings: print(f"Adding {requested_topping}.") else: print(f"Sorry, we don't have {requested_topping}.") print("\nFinished making your pizza!")
Adding mushrooms. Sorry, we don’t have french fries. Adding extra cheese.
A dictionary in Python is a collection of key-value pairs. Each key is connected to a value, and you can use a key to access the value associated with that key. A key’s value can be a number, a string, a list, or even another dictionary.
a dictionary is wrapped in braces ({}) with a series of key-value pairs inside the braces
A key-value pair is a set of values associated with each other. When you provide a key, Python returns the value associated with that key. Every key is connected to its value by a colon, and individual key-value pairs are separated by commas.
Accessing Values in a Dictionary
To get the value associated with a key, give the name of the dictionary and then place the key inside a set of square brackets
Adding New Key-Value Pairs
To add a new key-value pair, you would give the name of the dictionary followed by the new key in square brackets, along with the new value.
To modify a value in a dictionary, give the name of the dictionary with the key in square brackets and then the new value you want associated with that key.
1 2 3 4
alien_0 = {'color': 'green'} print(f"The alien is {alien_0['color']}.") alien_0['color'] = 'yellow' print(f"The alien is now {alien_0['color']}.")
The alien is green. The alien is now yellow.
1 2 3 4 5 6 7 8 9 10 11 12 13 14
alien_0 = {'x_position': 0, 'y_position': 25, 'speed': 'medium'} print(f"Original position: {alien_0['x_position']}") # Move the alien to the right. # Determine how far to move the alien based on its current speed. if alien_0['speed'] == 'slow': x_increment = 1 elif alien_0['speed'] == 'medium': x_increment = 2 else: # This must be a fast alien. x_increment = 3 # The new position is the old position plus the increment. alien_0['x_position'] = alien_0['x_position'] + x_increment print(f"New position: {alien_0['x_position']}")
Original x-position: 0 New x-position: 2
Removing Key-Value Pairs
1
2
3
4
alien_0 = {'color': 'green', 'points': 5} print(alien_0) del alien_0['points'] print(alien_0)
A Dictionary of Similar Objects
It’s good practice to include a comma after the last key-value pair as well, so you’re ready to add a new key-value pair on the next line.
1 2 3 4 5 6 7 8
favorite_languages = { 'jen': 'python', 'sarah': 'c', 'edward': 'rust', 'phil': 'python', } language = favorite_languages['sarah'].title() print(f"Sarah's favorite language is {language}.")
Traceback (most recent call last): File "alien_no_points.py", line 2, in <module> print(alien_0['points']) ~~~~~~~^^^^^^^^^^ KeyError: 'points'
As a second optional argument, you can pass the value to be returned if the key doesn’t exist:
1
2
3
alien_0 = {'color': 'green', 'speed': 'slow'} point_value = alien_0.get('points', 'No point value assigned.') print(point_value)
No point value assigned.
If you leave out the second argument in the call to get() and the key doesn’t exist, Python will return the value None. The special value None means “no value exists.” This is not an error: it’s a special value meant to indicate the absence of a value.
for key, value in user_0.items(): print(f"\nKey: {key}") print(f"Value: {value}")
Key: username Value: efermi Key: first Value: enrico Key: last Value: fermi
1
2
3
4
5
6
7
8
favorite_languages = { 'jen': 'python', 'sarah': 'c', 'edward': 'rust', 'phil': 'python', } for name, language in favorite_languages.items(): print(f"{name.title()}'s favorite language is {language.title()}.")
Jen’s favorite language is Python. Sarah’s favorite language is C. Edward’s favorite language is Rust. Phil’s favorite language is Python.
Looping Through All the Keys in a Dictionary
1 2 3 4 5 6 7 8
favorite_languages = { 'jen': 'python', 'sarah': 'c', 'edward': 'rust', 'phil': 'python', } for name in favorite_languages.keys(): print(name.title())
Jen Sarah Edward Phil
Looping through the keys is actually the default behavior when looping through a dictionary, so this code would have exactly the same output if you wrote:
for name in favorite_languages:
1 2 3 4 5 6 7 8 9
favorite_languages = { --snip-- } friends = ['phil', 'sarah'] for name in favorite_languages.keys(): print(f"Hi {name.title()}.") if name in friends: language = favorite_languages[name].title() print(f"\t{name.title()}, I see you love {language}!")
Hi Jen. Hi Sarah. Sarah, I see you love C! Hi Edward. Hi Phil. Phil, I see you love Python!
The keys() method isn’t just for looping: it actually returns a sequence of all the keys
Looping Through a Dictionary’s Keys in a Particular Order
Looping through a dictionary returns the items in the same order they were inserted.
1 2 3 4 5 6 7 8
favorite_languages = { 'jen': 'python', 'sarah': 'c', 'edward': 'rust', 'phil': 'python', } for name insorted(favorite_languages.keys()): print(f"{name.title()}, thank you for taking the poll.")
Edward, thank you for taking the poll. Jen, thank you for taking the poll. Phil, thank you for taking the poll. Sarah, thank you for taking the poll.
Looping Through All Values in a Dictionary
use the values() method to return a sequence of values without any keys
1 2 3 4 5 6 7 8 9
favorite_languages = { 'jen': 'python', 'sarah': 'c', 'edward': 'rust', 'phil': 'python', } print("The following languages have been mentioned:") for language in favorite_languages.values(): print(language.title())
The following languages have been mentioned: Python C Rust Python
To see each language chosen without repetition, we can use a set. A set is a collection in which each item must be unique:
1
2
3
4
5
6
favorite_languages = { --snip-- } print("The following languages have been mentioned:") for language inset(favorite_languages.values()): print(language.title())
The following languages have been mentioned: Python C Rust
You can build a set directly using braces and separating the elements with commas:
languages = {‘python’, ‘rust’, ‘python’, ‘c’} languages {‘rust’, ‘python’, ‘c’}
Unlike lists and dictionaries, sets do not retain items in any specific order.
Nesting
store multiple dictionaries in a list, or a list of items as a value in a dictionary. This is called nesting. You can nest dictionaries inside a list, a list of items inside a dictionary, or even a dictionary inside another dictionary.
# Make an empty list for storing aliens. aliens = [] # Make 30 green aliens. for alien_number inrange(30): new_alien = {'color': 'green', 'points': 5, 'speed': 'slow'} aliens.append(new_alien) # Show the first 5 aliens. for alien in aliens[:5]: print(alien) print("...") # Show how many aliens have been created. print(f"Total number of aliens: {len(aliens)}")
# Store information about a pizza being ordered. pizza = { 'crust': 'thick', 'toppings': ['mushrooms', 'extra cheese'], } # Summarize the order. print(f"You ordered a {pizza['crust']}-crust pizza " "with the following toppings:") for topping in pizza['toppings']: print(f"\t{topping}")
You ordered a thick-crust pizza with the following toppings: mushrooms extra cheese
1 2 3 4 5 6 7 8 9 10
favorite_languages = { 'jen': ['python', 'rust'], 'sarah': ['c'], 'edward': ['rust', 'go'], 'phil': ['python', 'haskell'], } for name, languages in favorite_languages.items(): print(f"\n{name.title()}'s favorite languages are:") for language in languages: print(f"\t{language.title()}")
Jen’s favorite languages are: Python Rust Sarah’s favorite languages are: C Edward’s favorite languages are: Rust Go Phil’s favorite languages are: Python Haskell
Username: aeinstein Full name: Albert Einstein Location: Princeton Username: mcurie Full name: Marie Curie Location: Paris
Notice that the structure of each user’s dictionary is identical. Although not required by Python, this structure makes nested dictionaries easier to work with. If each user’s dictionary had different keys, the code inside the for loop would be more complicated.
User Input and while Loops
How the input() Function Works
The input() function pauses your program and waits for the user to enter some text. Once Python receives the user’s input, it assigns that input to a variable to make it convenient for you to work with.
message = input(“Tell me something, and I will repeat it back to you: “) print(message)
Writing Clear Prompts
include a clear, easy-tofollow prompt that tells the user exactly what kind of information you’re looking for. Any statement that tells the user what to enter should work.
Add a space at the end of your prompts (after the colon in the preceding example) to separate the prompt from the user’s response and to make it clear to your user where to enter their text.
1 2
name = input("Please enter your name: ") print(f"\nHello, {name}!")
Please enter your name: Eric Hello, Eric!
1 2 3 4
prompt = "If you share your name, we can personalize the messages you see." prompt += "\nWhat is your first name? " name = input(prompt) print(f"\nHello, {name}!")
If you share your name, we can personalize the messages you see. What is your first name? Eric Hello, Eric!
Using int() to Accept Numerical Input
1 2 3 4
>>> age = input("How old are you? ") How old are you? 21 >>> age '21'
1 2 3 4 5 6
>>> age = input("How old are you? ") How old are you? 21 >>> age >= 18 Traceback (most recent call last): File "<stdin>", line 1, in <module> TypeError: '>=' not supported between instances of 'str' and 'int'
age = input(“How old are you? “) How old are you? 21 age = int(age) age >= 18 True
The Modulo Operator
modulo operator (%), which divides one number by another number and returns the remainder:
1 2 3 4 5 6
number = input("Enter a number, and I'll tell you if it's even or odd: ") number = int(number) if number % 2 == 0: print(f"\nThe number {number} is even.") else: print(f"\nThe number {number} is odd.")
prompt = "\nTell me something, and I will repeat it back to you:" prompt += "\nEnter 'quit' to end the program. " message = "" while message != 'quit': message = input(prompt) print(message)
Tell me something, and I will repeat it back to you: Enter ‘quit’ to end the program. Hello everyone! Hello everyone! Tell me something, and I will repeat it back to you: Enter ‘quit’ to end the program. Hello again. Hello again. Tell me something, and I will repeat it back to you: Enter ‘quit’ to end the program. quit quit
Using a Flag
more complicated programs in which many different events could cause the program to stop running? trying to test all these conditions in one while statement becomes complicated and difficult.
For a program that should run only as long as many conditions are true, you can define one variable that determines whether or not the entire program is active. This variable, called a flag, acts as a signal to the program. We can write our programs so they run while the flag is set to True and stop running when any of several events sets the value of the flag to False.
1 2 3 4 5 6 7 8 9
prompt = "\nTell me something, and I will repeat it back to you:" prompt += "\nEnter 'quit' to end the program. " active = True while active: message = input(prompt) if message == 'quit': active = False else: print(message)
Using break to Exit a Loop
To exit a while loop immediately without running any remaining code in the loop, regardless of the results of any conditional test, use the break statement.
1 2 3 4 5 6 7 8
prompt = "\nPlease enter the name of a city you have visited:" prompt += "\n(Enter 'quit' when you are finished.) " whileTrue: city = input(prompt) if city == 'quit': break else: print(f"I'd love to go to {city.title()}!")
Using continue in a Loop
Rather than breaking out of a loop entirely without executing the rest of its code, you can use the continue statement to return to the beginning of the loop, based on the result of a conditional test.
1 2 3 4 5 6
current_number = 0 while current_number < 10: current_number += 1 if current_number % 2 == 0: continue print(current_number)
1 3 5 7 9
Avoiding Infinite Loops
1 2 3 4
# This loop runs forever! x = 1 while x <= 5: print(x)
If your program gets stuck in an infinite loop, press CTRL-C or just close the terminal window displaying your program’s output.
Using a while Loop with Lists and Dictionaries
A for loop is effective for looping through a list, but you shouldn’t modify a list inside a for loop because Python will have trouble keeping track of the items in the list. To modify a list as you work through it, use a while loop
Moving Items from One List to Another
1 2 3 4 5 6 7 8 9 10 11 12 13 14
# Start with users that need to be verified, # and an empty list to hold confirmed users. unconfirmed_users = ['alice', 'brian', 'candace'] confirmed_users = [] # Verify each user until there are no more unconfirmed users. # Move each verified user into the list of confirmed users. while unconfirmed_users: current_user = unconfirmed_users.pop() print(f"Verifying user: {current_user.title()}") confirmed_users.append(current_user) # Display all confirmed users. print("\nThe following users have been confirmed:") for confirmed_user in confirmed_users: print(confirmed_user.title())
Verifying user: Candace Verifying user: Brian Verifying user: Alice
The following users have been confirmed: Candace Brian Alice
Removing All Instances of Specific Values from a List
responses = {} # Set a flag to indicate that polling is active. polling_active = True while polling_active: # Prompt for the person's name and response. name = input("\nWhat is your name? ") response = input("Which mountain would you like to climb someday? ") # Store the response in the dictionary. responses[name] = response # Find out if anyone else is going to take the poll. repeat = input("Would you like to let another person respond? (yes/ no) ") if repeat == 'no': polling_active = False # Polling is complete. Show the results. print("\n--- Poll Results ---") for name, response in responses.items(): print(f"{name} would like to climb {response}.")
What is your name? Eric Which mountain would you like to climb someday? Denali Would you like to let another person respond? (yes/ no) yes What is your name? Lynn Which mountain would you like to climb someday? Devil’s Thumb Would you like to let another person respond? (yes/ no) no — Poll Results — Eric would like to climb Denali. Lynn would like to climb Devil’s Thumb.
Functions
Defining a Function
1 2 3 4
defgreet_user(): """Display a simple greeting.""" print("Hello!") greet_user()
The text on the second line is a comment called a docstring, which describes what the function does. When Python generates documentation for the functions in your programs, it looks for a string immediately after the function’s definition. These strings are usually enclosed in triple quotes, which lets you write multiple lines.
Passing Information to a Function
1 2 3 4
defgreet_user(username): """Display a simple greeting.""" print(f"Hello, {username.title()}!") greet_user('jesse')
Hello, Jesse!
Arguments and Parameters
The variable username in the definition of greet_user() is an example of a parameter, a piece of information the function needs to do its job. The value ‘jesse’ in greet_user(‘jesse’) is an example of an argument. An argument is a piece of information that’s passed from a function call to a function.
Passing Arguments
Positional Arguments
def describe_pet(animal_type, pet_name): “””Display information about a pet.””” print(f”\nI have a {animal_type}.”) print(f”My {animal_type}’s name is {pet_name.title()}.”) describe_pet(‘hamster’, ‘harry’)
Multiple Function Calls
1 2 3 4 5 6
defdescribe_pet(animal_type, pet_name): """Display information about a pet.""" print(f"\nI have a {animal_type}.") print(f"My {animal_type}'s name is {pet_name.title()}.") describe_pet('hamster', 'harry') describe_pet('dog', 'willie')
I have a hamster. My hamster’s name is Harry. I have a dog. My dog’s name is Willie.
Order Matters in Positional Arguments
1 2 3 4 5
defdescribe_pet(animal_type, pet_name): """Display information about a pet.""" print(f"\nI have a {animal_type}.") print(f"My {animal_type}'s name is {pet_name.title()}.") describe_pet('harry', 'hamster')
I have a harry. My harry’s name is Hamster.
Keyword Arguments
1 2 3 4 5
defdescribe_pet(animal_type, pet_name): """Display information about a pet.""" print(f"\nI have a {animal_type}.") print(f"My {animal_type}'s name is {pet_name.title()}.") describe_pet(animal_type='hamster', pet_name='harry')
Default Values
When writing a function, you can define a default value for each parameter. If an argument for a parameter is provided in the function call, Python uses the argument value. If not, it uses the parameter’s default value.
When you use default values, any parameter with a default value needs to be listed after all the parameters that don’t have default values. This allows Python to continue interpreting positional arguments correctly.
1 2 3 4 5
defdescribe_pet(pet_name, animal_type='dog'): """Display information about a pet.""" print(f"\nI have a {animal_type}.") print(f"My {animal_type}'s name is {pet_name.title()}.") describe_pet(pet_name='willie')
Because positional arguments, keyword arguments, and default values can all be used together, you’ll often have several equivalent ways to call a function
1 2 3 4 5 6 7 8
defdescribe_pet(pet_name, animal_type='dog'): # A dog named Willie. describe_pet('willie') describe_pet(pet_name='willie') # A hamster named Harry. describe_pet('harry', 'hamster') describe_pet(pet_name='harry', animal_type='hamster') describe_pet(animal_type='hamster', pet_name='harry')
Avoiding Argument Errors
1
2
3
4
5
defdescribe_pet(animal_type, pet_name): """Display information about a pet.""" print(f"\nI have a {animal_type}.") print(f"My {animal_type}'s name is {pet_name.title()}.") describe_pet()
1 2 3 4 5 6 7
Traceback (most recent call last): File "pets.py", line 6, in <module> describe_pet() ^^^^^^^^^^^^^^ TypeError: describe_pet() missing 2 required positional arguments: 'animal_type' and 'pet_name'
Return Values
1 2 3 4 5 6
defget_formatted_name(first_name, last_name): """Return a full name, neatly formatted.""" full_name = f"{first_name}{last_name}" return full_name.title() musician = get_formatted_name('jimi', 'hendrix') print(musician)
defbuild_person(first_name, last_name, age=None): """Return a dictionary of information about a person.""" person = {'first': first_name, 'last': last_name} if age: person['age'] = age return person musician = build_person('jimi', 'hendrix', age=27) print(musician)
Using a Function with a while Loop
1 2 3 4 5 6 7 8 9 10 11 12 13 14 15 16
defget_formatted_name(first_name, last_name): """Return a full name, neatly formatted.""" full_name = f"{first_name}{last_name}" return full_name.title() whileTrue: print("\nPlease tell me your name:") print("(enter 'q' at any time to quit)") f_name = input("First name: ") if f_name == 'q': break l_name = input("Last name: ") if l_name == 'q': break formatted_name = get_formatted_name(f_name, l_name) print(f"\nHello, {formatted_name}!")
Passing a List
1 2 3 4 5 6 7
defgreet_users(names): """Print a simple greeting to each user in the list.""" for name in names: msg = f"Hello, {name.title()}!" print(msg) usernames = ['hannah', 'ty', 'margot'] greet_users(usernames)
Hello, Hannah! Hello, Ty! Hello, Margot!
Modifying a List in a Function
1 2 3 4 5 6 7 8 9 10 11 12 13
# Start with some designs that need to be printed. unprinted_designs = ['phone case', 'robot pendant', 'dodecahedron'] completed_models = [] # Simulate printing each design, until none are left. # Move each design to completed_models after printing. while unprinted_designs: current_design = unprinted_designs.pop() print(f"Printing model: {current_design}") completed_models.append(current_design) # Display all completed models. print("\nThe following models have been printed:") for completed_model in completed_models: print(completed_model)
1 2 3 4 5 6 7 8 9 10 11 12 13 14 15 16 17 18 19
defprint_models(unprinted_designs, completed_models): """ Simulate printing each design, until none are left. 144 Chapter 8 Move each design to completed_models after printing. """ while unprinted_designs: current_design = unprinted_designs.pop() print(f"Printing model: {current_design}") completed_models.append(current_design) defshow_completed_models(completed_models): """Show all the models that were printed.""" print("\nThe following models have been printed:") for completed_model in completed_models: print(completed_model) unprinted_designs = ['phone case', 'robot pendant', 'dodecahedron'] completed_models = [] print_models(unprinted_designs, completed_models) show_completed_models(completed_models)
Preventing a Function from Modifying a List
You can send a copy of a list to a function like this: function_name(list_name[:])
defmake_pizza(*toppings): """Print the list of toppings that have been requested.""" print(toppings) make_pizza('pepperoni') make_pizza('mushrooms', 'green peppers', 'extra cheese')
defmake_pizza(*toppings): """Summarize the pizza we are about to make.""" Functions 147 print("\nMaking a pizza with the following toppings:") for topping in toppings: print(f"- {topping}") make_pizza('pepperoni') make_pizza('mushrooms', 'green peppers', 'extra cheese')
Making a pizza with the following toppings:
pepperoni Making a pizza with the following toppings:
mushrooms
green peppers
extra cheese
Mixing Positional and Arbitrary Arguments
If you want a function to accept several different kinds of arguments, the parameter that accepts an arbitrary number of arguments must be placed last in the function definition. Python matches positional and keyword arguments first and then collects any remaining arguments in the final parameter.
1 2 3 4 5 6 7
defmake_pizza(size, *toppings): """Summarize the pizza we are about to make.""" print(f"\nMaking a {size}-inch pizza with the following toppings:") for topping in toppings: print(f"- {topping}") make_pizza(16, 'pepperoni') make_pizza(12, 'mushrooms', 'green peppers', 'extra cheese')
Making a 16-inch pizza with the following toppings:
pepperoni
Making a 12-inch pizza with the following toppings:
mushrooms
green peppers
extra cheese
Using Arbitrary Keyword Arguments
def build_profile(first, last, **user_info): “””Build a dictionary containing everything we know about a user.””” user_info[‘first_name’] = first user_info[‘last_name’] = last return user_info user_profile = build_profile(‘albert’, ‘einstein’, location=’princeton’, field=’physics’) print(user_profile)
write functions that accept as many key-value pairs as the calling statement provides
You’ll often see the parameter name **kwargs used to collect nonspecific keyword arguments.
Storing Your Functions in Modules
storing your functions in a separate file called a module and then importing that module into your main program. An import statement tells Python to make the code in a module available in the currently running program file
Importing an Entire Module
1 2 3 4 5
defmake_pizza(size, *toppings): """Summarize the pizza we are about to make.""" print(f"\nMaking a {size}-inch pizza with the following toppings:") for topping in toppings: print(f"- {topping}")
The best approach is to import the function or functions you want, or import the entire module and use the dot notation. This leads to clear code that’s easy to read and understand
Classes
Creating and Using a Class
1 2 3 4 5 6 7 8 9 10 11 12
classDog: """A simple attempt to model a dog.""" def__init__(self, name, age): """Initialize name and age attributes.""" self.name = name self.age = age defsit(self): """Simulate a dog sitting in response to a command.""" print(f"{self.name} is now sitting.") defroll_over(self): """Simulate rolling over in response to a command.""" print(f"{self.name} rolled over!")
The __init__() method is a special method that Python runs automatically whenever we create a new instance based on the Dog class. This method has two leading underscores and two trailing underscores, a convention that helps prevent Python’s default method names from conflicting with your method names.
The self parameter is required in the method definition, and it must come first, before the other parameters. It must be included in the definition because when Python calls this method later (to create an instance of Dog), the method call will automatically pass the self argument. Every method call associated with an instance automatically passes self, which is a reference to the instance itself; it gives the individual instance access to the attributes and methods in the class
Making an Instance from a Class
1 2 3
my_dog = Dog('Willie', 6) print(f"My dog's name is {my_dog.name}.") print(f"My dog is {my_dog.age} years old.")
classDog: --snip-- my_dog = Dog('Willie', 6) your_dog = Dog('Lucy', 3) print(f"My dog's name is {my_dog.name}.") print(f"My dog is {my_dog.age} years old.") my_dog.sit() print(f"\nYour dog's name is {your_dog.name}.") print(f"Your dog is {your_dog.age} years old.") your_dog.sit()
My dog’s name is Willie. My dog is 6 years old. Willie is now sitting. Your dog’s name is Lucy. Your dog is 3 years old. Lucy is now sitting.
Working with Classes and Instances
1 2 3 4 5 6 7 8 9 10 11 12 13
classCar: """A simple attempt to represent a car.""" def__init__(self, make, model, year): """Initialize attributes to describe a car.""" self.make = make self.model = model self.year = year defget_descriptive_name(self): """Return a neatly formatted descriptive name.""" long_name = f"{self.year}{self.make}{self.model}" return long_name.title() my_new_car = Car('audi', 'a4', 2024) print(my_new_car.get_descriptive_name())
2024 Audi A4
Setting a Default Value for an Attribute
1 2 3 4 5 6 7 8 9 10 11 12 13 14 15
classCar: def__init__(self, make, model, year): """Initialize attributes to describe a car.""" self.make = make self.model = model self.year = year self.odometer_reading = 0 defget_descriptive_name(self): --snip-- defread_odometer(self): """Print a statement showing the car's mileage.""" print(f"This car has {self.odometer_reading} miles on it.") my_new_car = Car('audi', 'a4', 2024) print(my_new_car.get_descriptive_name()) my_new_car.read_odometer()
classCar: --snip-- defupdate_odometer(self, mileage): """Set the odometer reading to the given value.""" self.odometer_reading = mileage my_new_car = Car('audi', 'a4', 2024) my_new_car.update_odometer(23) my_new_car.read_odometer()
2024 Audi A4 This car has 23 miles on it.
1 2 3 4 5 6 7 8 9 10 11
classCar: --snip-- defupdate_odometer(self, mileage): """ Set the odometer reading to the given value. Reject the change if it attempts to roll the odometer back. """ if mileage >= self.odometer_reading: self.odometer_reading = mileage else: print("You can't roll back an odometer!")
Incrementing an Attribute’s Value Through a Method
1 2 3 4 5 6 7 8 9 10 11 12 13
classCar: --snip-- defupdate_odometer(self, mileage): --snip-- defincrement_odometer(self, miles): """Add the given amount to the odometer reading.""" self.odometer_reading += miles my_used_car = Car('subaru', 'outback', 2019) print(my_used_car.get_descriptive_name()) 2 my_used_car.update_odometer(23_500) my_used_car.read_odometer() my_used_car.increment_odometer(100) my_used_car.read_odometer()
2019 Subaru Outback This car has 23500 miles on it. This car has 23600 miles on it.
classCar: """A simple attempt to represent a car.""" def__init__(self, make, model, year): """Initialize attributes to describe a car.""" self.make = make self.model = model self.year = year self.odometer_reading = 0 defget_descriptive_name(self): """Return a neatly formatted descriptive name.""" long_name = f"{self.year}{self.make}{self.model}" return long_name.title() defread_odometer(self): """Print a statement showing the car's mileage.""" print(f"This car has {self.odometer_reading} miles on it.") defupdate_odometer(self, mileage): """Set the odometer reading to the given value.""" if mileage >= self.odometer_reading: self.odometer_reading = mileage else: print("You can't roll back an odometer!") defincrement_odometer(self, miles): """Add the given amount to the odometer reading.""" self.odometer_reading += miles
classElectricCar(Car): """Represent aspects of a car, specific to electric vehicles.""" def__init__(self, make, model, year): """Initialize attributes of the parent class.""" super().__init__(make, model, year) my_leaf = ElectricCar('nissan', 'leaf', 2024) print(my_leaf.get_descriptive_name())
2024 Nissan Leaf
Defining Attributes and Methods for the Child Class
1 2 3 4 5 6 7 8 9 10 11 12 13 14 15 16 17
classCar: --snip-- classElectricCar(Car): """Represent aspects of a car, specific to electric vehicles.""" def__init__(self, make, model, year): """ Initialize attributes of the parent class. Then initialize attributes specific to an electric car. """ super().__init__(make, model, year) self.battery_size = 40 defdescribe_battery(self): """Print a statement describing the battery size.""" print(f"This car has a {self.battery_size}-kWh battery.") my_leaf = ElectricCar('nissan', 'leaf', 2024) print(my_leaf.get_descriptive_name()) my_leaf.describe_battery()
2024 Nissan Leaf This car has a 40-kWh battery.
Overriding Methods from the Parent Class
the class Car had a method called fill_gas_tank(). This method is meaningless for an all-electric vehicle, so you might want to override this method
1 2 3 4 5
classElectricCar(Car): --snip-- deffill_gas_tank(self): """Electric cars don't have gas tanks.""" print("This car doesn't have a gas tank!")
classBattery: """A simple attempt to model a battery for an electric car.""" def__init__(self, battery_size=40): """Initialize the battery's attributes.""" self.battery_size = battery_size defdescribe_battery(self): """Print a statement describing the battery size.""" print(f"This car has a {self.battery_size}-kWh battery.")
classElectricCar(Car): """Represent aspects of a car, specific to electric vehicles.""" def__init__(self, make, model, year): """Initialize attributes of the parent class.""" super().__init__(make, model, year) self.battery = Battery()
classCar: --snip-- classBattery: --snip-- defget_range(self): """Print a statement about the range this battery provides.""" if self.battery_size == 40: range = 150 elif self.battery_size == 65: range = 225 print(f"This car can go about {range} miles on a full charge.") classElectricCar(Car): --snip-- my_leaf = ElectricCar('nissan', 'leaf', 2024) print(my_leaf.get_descriptive_name()) my_leaf.battery.describe_battery() my_leaf.battery.get_range()
"""A class that can be used to represent a car.""" classCar: """A simple attempt to represent a car.""" def__init__(self, make, model, year): """Initialize attributes to describe a car.""" self.make = make self.model = model self.year = year self.odometer_reading = 0 defget_descriptive_name(self): """Return a neatly formatted descriptive name.""" long_name = f"{self.year}{self.make}{self.model}" return long_name.title() defread_odometer(self): """Print a statement showing the car's mileage.""" print(f"This car has {self.odometer_reading} miles on it.") defupdate_odometer(self, mileage): """Set the odometer reading to the given value.""" if mileage >= self.odometer_reading: self.odometer_reading = mileage else: print("You can't roll back an odometer!") defincrement_odometer(self, miles): """Add the given amount to the odometer reading.""" self.odometer_reading += miles
my_car.py
1 2 3 4 5
from car import Car my_new_car = Car('audi', 'a4', 2024) print(my_new_car.get_descriptive_name()) my_new_car.odometer_reading = 23 my_new_car.read_odometer()
"""A set of classes used to represent gas and electric cars.""" classCar: --snip--
classBattery: """A simple attempt to model a battery for an electric car.""" def__init__(self, battery_size=40): """Initialize the battery's attributes.""" self.battery_size = battery_size defdescribe_battery(self): """Print a statement describing the battery size.""" print(f"This car has a {self.battery_size}-kWh battery.")
defget_range(self): """Print a statement about the range this battery provides.""" if self.battery_size == 40: range = 150 elif self.battery_size == 65: range = 225 print(f"This car can go about {range} miles on a full charge.")
classElectricCar(Car): """Represent aspects of a car, specific to electric vehicles.""" def__init__(self, make, model, year): """Initialize attributes of the parent class.""" super().__init__(make, model, year) self.battery = Battery()
my_electric_car.py
1 2 3 4 5
from car import ElectricCar my_leaf = ElectricCar('nissan', 'leaf', 2024) print(my_leaf.get_descriptive_name()) my_leaf.battery.describe_battery() my_leaf.battery.get_range()
2024 Nissan Leaf This car has a 40-kWh battery. This car can go about 150 miles on a full charge.
Importing Multiple Classes from a Module
1 2 3 4 5
from car import Car, ElectricCar my_mustang = Car('ford', 'mustang', 2024) print(my_mustang.get_descriptive_name()) my_leaf = ElectricCar('nissan', 'leaf', 2024) print(my_leaf.get_descriptive_name())
This method is not recommended for two reasons. First, it’s helpful to be able to read the import statements at the top of a file and get a clear sense of which classes a program uses. With this approach it’s unclear which classes you’re using from the module. This approach can also lead to confusion with names in the file. If you accidentally import a class with the same name as something else in your program file, you can create errors that are hard to diagnose.
Importing a Module into a Module
car.py
“””A class that can be used to represent a car.””” class Car: –snip–
electric_car.py
“””A set of classes that can be used to represent electric cars.””” from car import Car class Battery: –snip– class ElectricCar(Car): –snip–
my_cars.py
1 2 3 4 5 6
from car import Car from electric_car import ElectricCar my_mustang = Car('ford', 'mustang', 2024) print(my_mustang.get_descriptive_name()) my_leaf = ElectricCar('nissan', 'leaf', 2024) print(my_leaf.get_descriptive_name())
Using Aliases
from electric_car import ElectricCar as EC my_leaf = EC(‘nissan’, ‘leaf’, 2024)
import electric_car as ec my_leaf = ec.ElectricCar(‘nissan’, ‘leaf’, 2024)
try: code to be attempted(may lead to an error) except: code will execute in case there is an error in try block finally: a final block of code to be executed, ragardless of an error
1 2 3 4 5 6 7 8 9 10 11 12 13 14
try: print('10' + 10) except IOError: print('you have input/output error!') print('do you check the file permissions?') except TypeError: print('you are using the wrong data types!') except: print("there is an error!") # else: # print("Else block ran") finally: print("finally will always run, error or no error!")
sqrt() function is an inbuilt function in Python programming language that returns the square root of any number. Syntax: math.sqrt(x) Parameter: x is any number such that x>=0 Returns: It returns the square root of the number passed in the parameter. Error: When x<0 it does not executes due to a runtime error.
x = int(input('x = ')) y = int(input('y = ')) # 如果x大于y就交换x和y的值 if x > y: # 通过下面的操作将y的值赋给x, 将x的值赋给y x, y = y, x # 从两个数中较小的数开始做递减的循环 for factor inrange(x, 0, -1): if x % factor == 0and y % factor == 0: print('%d和%d的最大公约数是%d' % (x, y, factor)) print('%d和%d的最小公倍数是%d' % (x, y, x * y // factor)) break
import sys f = [x for x inrange(1, 10)] print(f) f = [x + y for x in'ABCDE'for y in'1234567'] print(f) # 用列表的生成表达式语法创建列表容器 # 用这种语法创建列表之后元素已经准备就绪所以需要耗费较多的内存空间 f = [x ** 2for x inrange(1, 1000)] print(sys.getsizeof(f)) # 查看对象占用内存的字节数 print(f) # 请注意下面的代码创建的不是一个列表而是一个生成器对象 # 通过生成器可以获取到数据但它不占用额外的空间存储数据 # 每次需要数据的时候就通过内部的运算得到数据(需要花费额外的时间) f = (x ** 2for x inrange(1, 1000)) print(sys.getsizeof(f)) # 相比生成式生成器不占用存储数据的空间 print(f) for val in f: print(val)
通过yield关键字将一个普通函数改造成生成器函数。
1 2 3 4 5 6 7 8 9 10 11 12 13 14
deffib(n): a, b = 0, 1 for _ inrange(n): a, b = b, a + b yield a
defmain(): for val in fib(20): print(val)
if __name__ == '__main__': main()
1 2 3 4 5 6
# instead of doing: temp = a a = b b = temp # do this: a, b = b, a
defmain(): test = Test('hello') # AttributeError: 'Test' object has no attribute '__bar' test.__bar() # AttributeError: 'Test' object has no attribute '__foo' print(test.__foo)
# 修改标签上的文字 defchange_label_text(): nonlocal flag flag = not flag color, msg = ('red', 'Hello, world!')\ if flag else ('blue', 'Goodbye, world!') label.config(text=msg, fg=color)
# 确认退出 defconfirm_to_quit(): if tkinter.messagebox.askokcancel('温馨提示', '确定要退出吗?'): window.quit()
defmain(): account = Account() threads = [] for _ inrange(100): t = AddMoneyThread(account, 1) threads.append(t) t.start() for t in threads: t.join() print('账户余额为: ¥%d元' % account.balance)
A package is a collection of code, which is analogous to a library in most other programming languages.
Some packages require other packages to be installed first. Certain packages have conflicts with other packages. You can also install specific versions of a package, depending on what exactly you need. This is why virtual environments exist.
A virtual environment is a sandbox where you can install only the Python packages you need for a particular project, without the risk of those packages clashing with those for another project (or your system). You never actually change what Python packages are installed on your system, so you avoid breaking important things that have nothing to do with your project.
You may even create virtual environments that have nothing to do with a particular project.
Creating a Virtual Environment
To create the virtual environment with the name venv_1 in the current working directory, run the following command in the command line:
python3 -m venv venv_1
venv_1 is the desired path to the virtual environment. In this case, venv is just a relative path, creating a venv/ directory in the current working directory. However, you could also use an absolute path, and you could call it whatever you want
python3 -m venv /opt/myvirtualenv
vscode
python create environment
Activating a Virtual Environment
On Windows, run this:
venv_1\Scripts\activate.bat
venv_1/Scripts/activate.bat
vscode python select interpreter
If you have multiple shells (usually terminal windows) open, you should be aware that the virtual environment is only active for the one shell you explicitly activated it in!
environment paths will be overridden by the virtual environment. Practically speaking, any packages you install in the virtual environment are only usable there, and from the venv, the system-wide packages cannot be accessed unless you explicitly specify otherwise.
If you want the virtual environment to also see the system-wide packages, you can do so with a special flag
python3 -m venv –system-site-packages venv_1
Leaving a Virtual Environment
venv_1\Scripts\deactivate.bat
Introducing pip
System-Wide Packages
python3 -m pip command
Installing Packages
pip install package
If you want to install a specific version of something, append two equal signs (==), followed by the desired version number (no spaces):
pip install PySide6==6.1.2
Bonus: you can even use operators like >=, to mean “at least this version or greater.” These are called requirement specifiers.
pip install PySide6>=6.1.2
If you’re on a UNIX-like system, you may need to use pip install “PySide6>=6.1.2” instead, since > has another meaning in the shell.
requirements.txt
writing a requirements .txt file for your project. This file lists the packages your project needs. When creating a virtual environment, you and other users can install all the required packages with a single command, using this file.
To create this file, list the name of a pip package, as well as its version (if required), on each line.
requirements.txt
1 2
PySide2>=5.11.1 appdirs
install all those packages in one shot with this command:
pip install -r requirements.txt
Upgrading Packages
pip install –upgrade PySide6
pip install –upgrade -r requirements.txt
Removing Packages
pip uninstall package
Installing one package will also install any other packages it relies upon, which we call its dependencies. Uninstalling a package does not remove its dependencies, so you may need to go through and remove them yourself.
Herein lies one more advantage of virtual environments. Once I’m in that sort of a pickle, I can delete the virtual environment, create a new one, and install only those packages I need.
Seriously. Never use sudo pip
Virtual Environments and Git
If you’re using Git, create or edit a file called .gitignore in the root directory of your repository. Add this line somewhere in it:
venv_1/
the whole shebang
The shebang (short for haSH-BANG, or #!) 1 provides the path to the Python interpreter. While it’s optional, I strongly recommend including it in your code, as it means the file can be marked as executable and run directly, like this:
./hello_world.py
hello_world.py
1 2
#!/usr/bin/env python3 print("Hello, world!")
If you happen to have a script which runs in both Python 2 and Python 3, use this shebang instead:
#!/usr/bin/env python
File Encoding
Since Python 3.1, all Python files have used the UTF-8 encoding, allowing the interpreter to use all of the characters in Unicode. (Prior to that version, the default was to use the old ASCII encoding.)
# -*- coding: latin-1 -*-
# coding: latin-1
# This Python file uses the following encoding: latin-1
Whatever you use, it must be exactly as shown above, except for swapping latin-1 for whatever encoding you want. For this reason, the first or second forms are preferred.
A Few Extra Virtual Environment Tricks
Using a Virtual Environment Without Activating
assuming my virtual environment is venv, I could do this in the terminal:
import pylint still will not work on the system-wide Python interactive shell
Quality Control: Static Analyzers
static analyzer, which reads your source code, looking for potential problems or deviations from the standards.
One common type of static analyzer, called a linter, checks your source code for common mistakes, potential errors, and style inconsistencies. Two of the most popular linters are Pylint and PyFlakes.
Pylint
Style Janitors: Autoformatting Tools
an autoformatter, which can automatically change your Python code—spacing, indentation, and preferred equivalent expressions (such as != instead of <>)—to be PEP 8 compliant. Two options are autopep8 and Black.
An Exhibition of Code Editors
PyCharm
The professional edition adds tools for data, scientific development, and web development.
SYNTA X CR ASH COURSE
Statements and Expression
Each line of code in Python that ends with a line break is a statement, sometimes more specifically known as a simple statement.
A section of code that evaluates to a single value is called an expression.
put expressions nearly anywhere a value is expected. The expression is evaluated down to a value, and that value is used in that position in the statement.
The Importance of Whitespace
PEP 8 style guide stresses using either four spaces or a single tab per indentation level. Consistency is key! Python really doesn’t care whether you use tabs, two spaces, four spaces, or even seven spaces (although that’s probably a step too far) for each level of indentation. The point is to be consistent within any and every given block of code.
Doing Nothing
On occasion, you will need to insert a statement that has absolutely no effect. This is particularly useful when you need to put a syntactically valid placeholder where a suite of code will exist later. For this purpose, Python provides the pass keyword.
1 2 3
raining = True if raining: pass
Comments and Docstrings
To write comments in Python, precede the line with a hash (#). Everything between the hash and the end of the line is a comment and will be ignored by the interpreter.
Docstrings
Docstrings exist to provide documentation for functions, classes, and modules, especially public ones. They conventionally begin and end with three quotation marks (“””), allowing the string to automatically span multiple lines. You would typically place docstrings at the top, inside of whatever they’re defining, such as in the function above.
There are three important distinctions between comments and docstrings:
Docstrings are string literals, and they are seen by the interpreter; comments are ignored.
Docstrings are used in automatic documentation generation.
Docstrings are generally only docstrings when they appear at the top of the module, function, class, or method they define. Comments can live anywhere.
It is perfectly possible to use a triple-quoted string literal to write a sort of “multiline comment,” but it’s not recommended, since a string literal can easily get left in a place where Python will try to use it as a value.
Declaring Variables
Python is dynamically typed, meaning the data type of a value is determined when it is evaluated. This contrasts with statically typed languages, in which you declare the data type initially. (C++ and Java are both statically typed.)
using the assignment operator (=). It infers the data type. If the name is a new variable, Python will create it; if the name already exists, Python will change the value. It’s a pretty straightforward system.
two rules to follow with Python variables:
Define a variable before you access it; otherwise, you’ll get an error.
Don’t change what kind of data you’re storing in the variable, even when replacing a value.
Python is considered a strongly typed language, meaning you usually can’t magically combine data of different types. For example, it won’t allow you to add an integer and a string together.
Python is, however, weakly bound, so it is possible to assign a value of a different type to an existing variable. While this is technically permissible, it is strongly discouraged, as it can produce confusing code.
What About Constants?
Python doesn’t have any formally defined constants. In keeping with PEP 8, you would indicate a variable is intended to be treated as a constant by using all-caps names with underscores. This naming convention is sometimes humorously referred to as screaming snake case for the all-caps (screaming) and the underscores (snakes).
For example, the name INTEREST_RATE
Mathematics
Meet the Number Types
Integers (int) store whole numbers. In Python, integers are always signed and effectively have no maximum value. Integers use decimal base (base-10) by default,
Floating-point numbers (float) store numbers with a decimal part (for example, 3.141592). Internally, values are stored as double-precision, IEEE 754 floatingpoint numbers, which are subject to the limits inherent in that format.
specify an invalid number with float(“nan”), a number larger than the largest possible value with float(“inf”), or a number smaller than the smallest possible value with float(“-inf”).
Decimal stores fixed-point decimal numbers, while Fraction does the same for fractions To use either, you’ll need to import them first.
print(-42) # negative (unary), evaluates to -42 print(abs(-42)) # absolute value, evaluates to 42 print(40 + 2) # addition, evaluates to 42 print(44 - 2) # subtraction, evaluates to 42 print(21 * 2) # multiplication, evaluates to 42 print(680 / 16) # division, evaluates to 42.5 print(680 // 16) # floor division (discard remainder), evaluates to 42 print(1234 % 149) # modulo, evaluates to 42 print(7 ** 2) # exponent, evaluates to 49 print((9 + 5) * 3) # parentheses, evaluates to 42
Python offers augmented assignment operators, sometimes informally called compound assignment operators. These allow you to perform an operation with the current value of the variable as the left operand.
1
2
3
4
5
6
7
8
foo = 10 foo += 10# value is now 20 (10 + 10) foo -= 5# value is now 15 (20 – 5) foo *= 16# value is now 240 (15 * 16) foo //= 5# value is now 48 (240 // 5) foo /= 4# value is now 12.0 (48 / 4) foo **= 2# value is now 144.0 (12.0 ** 2) foo %= 51# value is now 42.0 (144.0 % 15)
the divmod() function to efficiently perform the calculation, returning the two results in a tuple. Thus, c = divmod(a, b) is the same as c = (a // b, a % b).
bitwise operators
1 2 3 4 5 6
print(9 & 8) # bitwise AND, evaluates to 8 print(9 | 8) # bitwise OR, evaluates to 9 print(9 ^ 8) # bitwise XOR, evaluates to 1 print(~8) # unary bitwise ones complement (flip), evaluates to -9 print(1 << 3) # bitwise left shift, evaluates to 8 print(8 >> 3) # bitwise right shift, evaluates to 1
the math module
1 2 3 4 5 6 7 8 9
import math print(math.pi) # PI 3.141592653589793 print(math.tau) # TAU 6.283185307179586 print(math.e) # Euler's number 2.718281828459045 print(math.inf) # Infinity print(math.nan) # Not-a-Number infinity_1 = float('inf') infinity_2 = math.inf print(infinity_1 == infinity_2) # prints True
1 2 3 4 5 6 7 8 9 10
import math distance_ft = 65# the distance to the object angle_deg = 74# the angle to the top of the object # Convert from degrees to radians angle_rad = math.radians(angle_deg) # Calculate the height of the object height_ft = distance_ft * math.tan(angle_rad) # Round to one decimal place height_ft = round(height_ft, 1) print(height_ft) # outputs 226.7
Comparison Operators
1 2 3 4 5 6 7 8
score = 98 high_score = 100 print(score == high_score) # equals, evaluates to False print(score != high_score) # not equals, evaluates to True print(score < high_score) # less than, evaluates to True print(score <= high_score) # less than or equals, evaluates to True print(score > high_score) # greater than, evaluates to False print(score >= high_score) # greater than or equals, evaluates to False
Boolean, None, and Identity Operators
Take particular note of the last condition, eggs is spam which illustrates an important gotcha with the is operator. It actually compares the identity of the variables, rather than the value
spam = True eggs = False potatoes = None if spam isTrue: # Evaluates to True print("We have spam.") if spam isnotFalse: # Evaluates to True print("I DON'T LIKE SPAM!") if spam: # Implicitly evaluates to True (preferred) print("Spam, spam, spam, spam...") if eggs isFalse: # Evaluates to True print("We're all out of eggs.") if eggs isnotTrue: # Evaluates to True print("No eggs, but we have spam, spam, spam, spam...") ifnot eggs: # Implicitly evaluates to True (preferred) print("Would you like spam instead?") if potatoes isnotNone: # Evaluates to False (preferred) print("Yum") # We never reach this...potatoes is None! if potatoes isNone: # Evaluates to True (preferred) print("Yes, we have no potatoes.") if eggs is spam: # Evaluates to False (CAUTION!!!) print("This won't work.")
Truthiness
Most expressions and values in Python can be evaluated to a True or False value. This is typically done by using the value as an expression by itself, although you can also pass it to the bool() function to convert it explicitly.
1 2 3 4
answer = 42 if answer: print("Evaluated to True") # this runs print(bool(answer)) # prints True
When an expression will evaluate to True, it is considered “truthy.” When it will evaluate to False, it is “falsey.”
The None constant, values representing zero, and empty collections are all considered “falsey,” while most other values are “truthy.”
Logical Operators
1 2 3 4 5 6 7 8
spam = True eggs = False if spam and eggs: # AND operator, evaluates to False print("I do not like green eggs and spam.") if spam or eggs: # OR operator, evaluates to True print("Here's your meal.") if (not eggs) and spam: # NOT (and AND) operators, evaluates to True print("But I DON'T LIKE SPAM!")
1 2 3 4
score = 98 high_score = 100 print(score != high_score) # not equals operator, evaluates to True print(not score == high_score) # not operator, evaluates to True
The condition employing the != operator is preferred for readability.
The Walrus Operator
Python 3.8 introduced assignment expressions, which allow you to assign a value to a variable and use that variable in another expression at the same time. This is possible with the so-called walrus operator (:=).
1
2
3
if (eggs := 7 + 5) == 12: print("We have one dozen eggs") print(eggs) # prints 12
Python first evaluates the expression on the left (7+5) and then assigns it to the variable eggs. The assignment expression is then evaluated to a single value, namely the value of eggs, which is used in the comparison
Two particularly useful style rules are put forth by this PEP: • If either assignment statements or assignment expressions can be used, then prefer statements; they are clear declarations of intent. • If using assignment expressions would lead to ambiguity about execution order, then restructure to use statements instead.
Strings
String Literals
The only time you’d really need to escape either single or double quotes with backslashes would be if you had both types of quotes in the string at once: question = "What do you mean, \"it's fine\"?"
triple quotes define multiline string literals. In other words, I can use them to do this:
1 2 3 4 5 6 7 8 9
parrot = """\ This parrot is no more! He has ceased to be! He's expired and gone to meet his maker! He's a stiff! Bereft of life, he rests in peace!""" print(parrot)
The only exception occurs when you use a backslash (\) to escape particular character, like I did with that newline at the beginning 1. It is conventional to escape the first newline after the opening triple quotes, just to make the code look cleaner.
concatenate (combine) string literals, simply by writing them next to one another, without any operators between them. For example, spam = “Hello “ “world” “!” is valid, resulting in the string Hello world!.
Raw Strings
Raw strings constitute another form of string literal, wherein the backslash (\) is always treated as a literal character. They’re preceded with an r, such as in this example: print(r"I love backslashes: \ Aren't they cool?")
Formatted Strings
1 2 3
in_stock = 0 print("This cheese shop has " + str(in_stock) + " types of cheese.") print(f"This cheese shop has {in_stock} types of cheese.")
Instead, you’d have to evaluate that expression in advance, assign the result to a name, and use it in the f-string.
The ord() function returns the number representing the unicode code of a specified character.
print(f”{ord(‘\n’)}”) # SyntaxError
newline_ord = ord(‘\n’) print(f”{newline_ord}”) # prints “10”
Format Specifications
Immediately after the expression, you may choose to include one of three special flags: !r, !a, or !s (although that last one is the default behavior, so it can be omitted in most cases). These determine which function is used to fetch the string representation of some value: repr(), ascii(), or str(), respectively
Next comes the format specification itself, which always begins with a colon (:), followed by one or more flags. These have to be specified in a particular order to work, although any of them may be omitted if they’re not desired:
Align An alignment flag, specifying left (<), right (>), center (^), or (if numeric) split with the sign aligned left but the digits aligned right (=). This is optionally preceded by a character that will be used to fill any blank space in the alignment. Sign A flag controlling when the sign is displayed on a number. The plus (+) flag displays the sign on both positive and negative numbers, while the minus (–) flag only displays it on negative numbers. A third option is to show a leading space on positive numbers and a sign on negative numbers (SPACE). Alternative form The hash (#) flag turns on the “alternative form,” which has different meanings for different types (see documentation). Leading zeros The zero (0) flag causes leading zeros to be displayed (unless a fill character is specified for alignment). Width The width of the output string in characters. This is where the alignment comes into play. Grouping A flag controlling whether numbers should separate thousands with a comma (,) or an underscore (_). If omitted, no separator is used. If enabled, the underscore separator also appears every four digits in octal, hexadecimal, and binary numbers. Precision A dot (.), followed by an integer for decimal precision Type A flag controlling how numbers are displayed; common options include binary (b), character (c), decimal (d), hexadecimal (x), exponent notation (e), fixed-point (f), and general (g). There are more (see documentation).
1 2 3 4 5 6
spam = 1234.56789 print(f"{spam:=^+15,.2f}") # prints "===+1,234.57===" spam = 42 print(f"{spam:#07x}") # prints "0x0002a" spam = "Hi!" print(f"{spam:-^20}") # prints "--------Hi!---------"
String Conversion
str(), is the one you’ll use most often, as it returns the human-readable representation of the value.
repr() returns the canonical string representation of the value: that is, (usually) the value as Python sees it. In the case of many basic data types, this will return the same thing as str(), but when used on most objects, the output contains additional information useful in debugging.
The ascii() function is the same as repr(), except that the string literal it returns is completely ASCII-compatible, having escaped any non-ASCII (for example, Unicode) characters.
A Note on String Concatenation
Typical concatenation with + or the join() function has the same result, but the latter function will be as fast or faster, especially when you’re using other implementations of Python besides CPython. Therefore, whenever you need to concatenate and f-strings aren’t right for the job, you should consider using join() instead of the + or += operators. In practice, f-strings are the fastest, but join() is your next-best option.
1 2 3 4 5 6 7 8 9
greeting = "Hello" name = "Jason"
message = greeting + ", " + name + "!"# value is "Hello, Jason!" print(message)
message = "".join((greeting, ", ", name, "!")) # value is "Hello, Jason!" print(message)
Functions 0
Python functions are first-class citizens, which means they can be treated like any other object
Classes and Objects 0
Error Handling 0
1 2 3 4 5 6 7
num_from_user = input("Enter a number: ") try: num = int(num_from_user) except ValueError: print("You didn't enter a valid number.") num = 0 print(f"Your number squared is {num**2}")
Tuples and Lists
Lists constitute the most array-like collection in Python. In CPython, they are implemented as variable-length arrays
A tuple is somewhat similar to a list, but with a few key differences. First, a tuple cannot have items added, reassigned, or removed after its creation. Attempting to modify the contents of a tuple with bracket notation will result in a TypeError. This is because tuples, unlike lists, are immutable, effectively meaning their contents cannot be modified
The guideline is to use tuples for collections of items of different types (heterogeneous collections) and to use lists for collections of items of the same type (homogeneous collections).
Loops
Structural Pattern Matching
Python 3.10 gained structural pattern matching via PEP 634. This provides conditional logic that is at least syntactically similar to switch statements of other languages. In short, you test a single subject, such as a variable, against one or more patterns. If the subject matches the pattern, the associated suite of code runs.
lunch_order = input(“What would you like for lunch? “) match lunch_order: case ‘pizza’: print(“Pizza time!”) case ‘sandwich’: print(“Here’s your sandwich”) case ‘taco’: print(‘Taco, taco, TACO, tacotacotaco!’) case _: print(“Yummy.”)
The underscore (_) in the last case is the wildcard, which will match any value. This serves as a fallback case, and it must come last, as it will match anything.
PROJECT STRUCTURE AND IMPORTS
Setting Up the Repository
Your Python code belongs in a separate subdirectory and not in the root of the repository. This is very important, as your repository’s root directory will get mighty cluttered with build files, packaging scripts, documentation, virtual environments, and all manner of other things that aren’t actually part of the source code.
Modules and Packages
A module is any Python (.py) file.
A package, occasionally called a regular package, is one or more modules within a directory. That directory must include a file called __init__ .py (which can be empty). The __init__.py file is important! If it isn’t there, Python will not know the directory constitutes a package.
PEP 8 and Naming
Modules should have short, all-lowercase names. Underscores can be used in the module name if it improves readability. Python packages should also have short, all-lowercase names, although the use of underscores is discouraged.
Do this: omission/data/data_loader.py NOT this: omission/Data/DataLoader.py
another special file in my top-level package: __main__.py. This is the file that runs when I execute my top-level package directly, via this command:
Import Dos and Don’ts
1 2 3 4 5 6 7 8
#!/usr/bin/env python3 defopen(): print("Ahhhhhhhhhhhhhh.") defclose(): print("Thank you for making a simple door very happy.") import smart_door smart_door.open() smart_door.close()
The namespace of open() and close() is smart_door. A namespace is an explicitly defined path to something, such as a function. The function open() has the namespace smart_door, which tells me that open() belongs to that particular module.
I have a class GameMode defined within the game_enums.py module, which lives in the omission/common package. I want to use that class within my game_round_settings.py module, defined in the omission/data package
Because I defined omission as a top-level package and organized my modules into subpackages, it’s pretty straightforward. In game_round_settings.py, I’d write the following:
from omission.common.game_enums import GameMode
This line is an absolute import. It starts at the top-level package, omission, and walks down into the common package
Relative Imports
You can also import from a module in the same package or subpackage. This is known as a relative import or an intrapackage reference.
A module knows what package it belongs to, and a package knows its parent package (if it has one). Because of this, relative imports can start the search from the current package and move up and down through the project structure.
Within omission/data/game_round_settings.py, I can use the following import statement:
from ..common.game_enums import GameMode
Listing 4-11: game_round_settings.py:1c
The two dots (..) mean “the current package’s direct parent package,” which, in this case, is omission
Importing from the Same Package
In omission/data/settings.py, I have this statement for importing a class from the module omission/data/game _round_settings.py:
from omission.data.game_round_settings import GameRoundSettings
from game_round_settings import GameRoundSettings
However, that will not work. It will fail to locate the game_round_settings .py module because I am running the top-level package (python3 -m omission), and absolute imports for anything within the package being executed (omission) have to start from the top.
use a relative import, which looks much simpler than the absolute import:
from .game_round_settings import GameRoundSettings
Entry Points
The parts of the project that are run first when importing or executing are called entry points
Module Entry Points
When you import a Python module or package, it is given a special variable called __name__. This contains the fully qualified name of the module or package, which is the name as the import system sees it. For example, the fully qualified name of the module omission/common/game_enums.py would be omission.common.game_enums.
when a module or package is run directly, its __name__ is set to the value “__main__“.
a package called testpkg, which contains the module awesome.py. It defines a function, greet():
1 2 3
defgreet(): print("Hello, world!") print("Awesome module was run.")
In another module in the same directory as testpkg, I have this module (example.py), which I run directly with python3 example.py:
1 2 3
from testpkg import awesome print(__name__) # prints "__main__" print(awesome.__name__) # prints "testpkg.awesome"
1 2 3
Awesome module was run. __main__ testpkg.awesome
what if I want that first message to appear only if awesome.py is executed directly, and not when the module is only imported? To accomplish that, I’d check the value of __name__ variable in a conditional statement. I’ve rewritten my awesome.py file to do exactly that:
1 2 3 4
defgreet(): print("Hello, world!") if __name__ == "__main__": print("Awesome module was run.")
Package Entry Points
omission project has a file called __main__ in the top-level package. This file is automatically run when a package is executed directly, but never when importing the package
So, when executing omission via python3 -m omission, Python first runs the __init__.py module (as always), followed by its __main__.py module. Otherwise, if the package is imported instead, only __init__.py is executed.
A good __main__.py for a top-level package would look something like the following:
1 2 3 4
defmain(): # Code to start/run your package. if __name__ == "__main__": main()
Program Entry Points
However, you (or your eventual end user) may want to run the program merely by double-clicking or directly executing some single Python file. With everything else in place, this is trivial to implement.
To make my omission project easy to run, I created a single script file outside the top-level package, named omission.py:
1 2
from omission.__main__ import main main()
VARIABLES AND TYPES
Variables According to Python: Names and Values
A name refers to a value or an object . A value is a particular instance of data in memory The term variable refers to the combination of the two: a name that refers to a value.
answer = 42 insight = answer
insight is not bound to answer, but rather to the same value that answer was already bound to when I assigned insight. A name always points to a value.
is doesn’t check whether a name points to equivalent values, but rather whether it points to the same value in memory.
When you make an assignment, Python makes its own decisions behind the scenes about whether to create a new value in memory or bind to an existing value
spam = 123456789 maps = spam eggs = 123456789
print(spam == maps) # prints True print(spam == eggs) # prints True
print(spam is maps) # prints True print(spam is eggs) # prints False (probably)
(Interactive session)
answer = 42 insight = 42 print(answer is insight) # prints True
The is operator checks identity. Unless you really know what you’re doing, only use this to check if something is None.>
the built-in function id() returns an integer representing the identity of whatever is passed to it.
Data Types
Names are bound to values, and those values exist in memory, as long as there is some reference to them. You can bind a name to literally any value you want, but you are limited as to what you can do with any particular value.
The type() Function
print(type(answer)) # prints <class 'int'>
if type(answer) is int: print(“What’s the question?”)
use isinstance() instead of type(), as it accounts for subclasses and inheritance
if isinstance(answer, int): print(“What’s the question?”)
Duck Typing
If it looks like a duck, walks like a duck, and quacks like a duck, then it probably is a duck.
Python doesn’t care much about what a value’s data type is, but rather it cares about the functionality of the value’s data type.
If your class behaves as it should, it usually won’t matter what it inherits from.
Scope and Garbage Collection
Scope is what defines where a variable can be accessed from. It might be available to an entire module or limited to the suite (body) of a function.
A name can be global, meaning it is defined by itself in a module, or it can be local, meaning it only exists within a particular function or comprehension.
Local Scope and the Reference-Counting Garbage Collector
Functions (including lambdas) and comprehensions define their own scope; they are the only structures in the language to do so.
When a scope reaches its end, all the names defined within it are automatically deleted.
. Modules and classes don’t have their own scope in the strictest sense; they only have their own namespace.
loops don’t have their own scope.
a reference count, which is simply a count of how many references exist for that value. Every time a value is bound to a name, a reference is created (although there are other ways the language may create references). When there are no more references, the value is deleted. This is the reference-counting garbage collector, and it efficiently handles most garbage collection scenarios.
def spam(): message = “Spam” word = “spam” for _ in range(100): separator = “, “ message += separator + word message += separator message += “spam!” return message
output = spam() print(output) even though the name message is deleted when spam() exits, the value is not.
Interpreter Shutdown
When the Python interpreter is asked to shut down, such as when a Python program terminates, it enters interpreter shutdown. During this phase, the interpreter goes through the process of releasing all allocated resources, calling the garbage collector multiple times, and triggering destructors in objects.
Global Scope
When a name is defined within a module but outside of any function, class, or comprehension, it is considered to be in global scope
using the global high_score name. This means that anywhere I assign a value to the name high_score in score(), the function will use the global name, instead of trying to create a new local name.
If you’re only accessing the current value bound to a global name, you don’t need to use the global keyword.
The Dangers of Global Scope
The nonlocal Keyword
trying to assign to a global name will actually define a new local name that shadows the global one.
The same behavior is true of the inner function using names defined in the outer function, which is known as the nested scope or enclosing scope.
To get around this, I specify that eggs is nonlocal,
The nonlocal keyword starts looking for the indicated name in the innermost nested scope, and if it doesn’t find it, it moves to the next enclosing scope above that. It repeats this until it either finds the name or determines that the name does not exist in a nonglobal enclosing scope.
Scope Resolution
which scopes it searches for a name, and in what order, is called the scope resolution order
the acronym LEGB
Local Enclosing-function locals (that is, anything found via nonlocal) Global Built-in
The Curious Case of the Class
Every name declared directly within a class is known as an attribute, and it is accessed through the dot (.) operator on the class (or object) name.
The Immutable Truth
Values in Python can be either immutable or mutable. The difference hinges on whether the values can be modified in place, meaning they can be changed right where they are in memory.
Immutable types cannot be modified in place. For example, integers (int), floating-point numbers (float), strings (str), and tuples (tuple) are all immutable.
If you attempt to mutate an immutable value, you’ll wind up with a completely different value being created:
eggs = 12 carton = eggs print(eggs is carton) # prints True eggs += 1 print(eggs is carton) # prints False print(eggs) # prints 13 print(carton) # prints 12
Mutable types, on the other hand, can be modified in place. Lists constitute one example of a mutable type:
temps = [87, 76, 79] highs = temps print(temps is highs) # prints True temps += [81] print(temps is highs) # prints True print(highs) # prints [87, 76, 79, 81] print(temps) # prints [87, 76, 79, 81]
Posted Updated a few seconds read (About 86 words)
URL encoding is an encoding format used in URLs. The standard allows the use of arbitrary data inside a Uniform Resource Identifier (a URI; typically a URL) while using only a narrow set of US-ASCII characters.
The encoding exists because URLs and HTTP request parameters often contain characters (or other data) that cannot be represented with the limited set of US-ASCII characters (i.e. control characters, etc.).
arbitrary随心所欲的 not seeming to be based on a reason, system or plan and sometimes seeming unfair
Reserved and unreserved characters
Unreserved characters are characters that have no special meaning; they can be displayed as-is and require no special handling. These include uppercase and lowercase letters (A-Z, a-z), decimal digits (0-9), hyphen (-), period (.), underscore (_), and tilde (~).
Reserved characters, on the other hand, are characters that may delimit the URI into sub-components: characters such as / # & and others. The following is the list of all reserved characters: ! # $ & ‘ ( ) * + , / : ; = ? @ [ ].
We cannot use reserved character as-is, because this would create ambiguous URIs.
Percent encoding
To encode reserved characters, we use the percent-encoding scheme. In percent-encoding, each byte is encoded as a character triplet that consists of the percent character % followed by the two hexadecimal digits that represent the byte numeric value.
For instance, %23 is the percent-encoding for the binary octet 00100011, which in US-ASCII, corresponds to the character #.
Other characters
Percent encoding is also used to represent other characters; characters that are neither reserved nor unreserved.
As an example, imagine a GET request containing a non-ASCII string parameter, such as a search query zajec in jež which is Slovenian for a rabbit and a hedgehog.
In such cases, we have to first encode non-ASCII characters as UTF-8 and then encode each byte of the new string with percent-encoding.
Encoding the space character
using the + instead of %20 is valid only when encoding the application/x-www-form-urlencoded content, such as the query part of an URL.
static website: website where files are simply sent to browser as they are front end development
dynamic website: website files are assembled on the server back end development webserver app db back-end languages that run on servers
html -> content -> nouns css -> presentation -> adjectives js -> programming language: dynamic effects and web applications -> verbs
HTML fundamentals
introduction to html
html: hypertext markup language
html is a markup language that web developers use to structure and descripe the content of a webpage(not a programming language)
html consists of elements that describe different types of content: paragraphs, links, headings, images, video, etc.
web browsers understand html and render Html code as websites
<p>HTML is a markup language</p>
<p>opening tag: name of the element, wrapped in < and >
content: content of the element, in this example text. but it might be another element(child element). some elements have no content(e.g. <img>)
</p>closing tag: same as opening tag, but with a /. when element has no content, it’s omitted.
HTML document structure
1 2 3 4 5 6 7 8 9
<!DOCTYPE html> <html> <head> <title>The Basic Language of the Web: HTML</title> </head> <body> <h1>The Basic Language of the Web: HTML</h1> </body> </html>
text elements
<em></em>emphersized
lists
images and attributes
hyperlinks
Structure our page
semantic html
css fundamentals
cascading style sheets
css describes the visual style and presentation of the content written in HTML
css consists of countless properties that developers use to format the content: properties about font, text, spacing, layout, etc.
inline, internal and external css
styling text
16px default
combining selectors
working with colors
rgb(12,125,255)
rgba(0,255,255,0.3)
#00ffff #0ff when allcolors are identical pairs
when colors in all 3 channels are the same, we get a gray color
inline elements occupies only the space necessary for its content causes on line-break after or before the element box model applies in a different way: heights and widths do not apply paddings and margins are applied only horizontally(left and right)
a strong em button
with css display: inline
block level elements elements are formatted visually as blocks elements occupy 100% of parent element’s width, no matter the content elements are stacked vertically by default, one after another the box-model applies as showed earlier
with css display: block
inline block boxes looks like inline from the outside, behaves like block-level on the inside occupies only content’s space causes no line-breaks box-model applies as showed
img
with css display: inliblock
absolute positioning
normal flow in flow: laid out according to their order in the html code
absolute positioning out of flow: no impact on surrounding elements, might overlap them use top, bottom, left, or right to offset the element from its relatively positioned container(the first)
pseudo elements
+ adjacent sibling sibling right after the element
googling and reading documentation
debugging and asking questions
chrome dev tool font-size arrow shift arrow
challenge #3
the 3 ways of building layouts
layout is the way text, images and other content is placed and arranged on a webpage layout gives the page a visual structure, into which we place our content
building a layout: arranging page elements into a visual struture, instead of simply having them placed one after another(normal flow)
page layout
component layout
float layouts old way
element is removed from the normal flow: “out of flow” text and inline elements will wrap around the floated element the container will not adjust its height to the element
flexbox laying out elements in a 1-dimensional row without using floats. perfect for componnet layouts
css grid for laying out element in a fully-fledged 2-dimentional grid. perfect for page layouts and complex componnets.
using floats
both children float collapse of the elements
clearing float
box-sizing: border-box
challenge #1
introduction to flexbox
tall as the tallest
a flexbox overview
flexbox is a set of related css properties for building 1 dimentional layout the main idea behind flexbox is that empty space inside a container element can be automatically divided by its child elemennts flexbox makes it easy to automatically align items to one another inside a parent container, both horizontally and vertically flexbox solves common problems such as vertical centering and creating equal-height colums
spacing and aligning flex items
the flex property
add flexbox to our project
building a simple flexbox layout
challenge #2
introduction to css grid
a css grid overview
css gird is a set of css properties for building 2-dimentional layouts the main idea behind css grid is that we divide a container element into rows and columns that can be filled with its child elements in two-dimentional contexts, css grid allows us write less nested html and easier to read css css grid is not meant to replace flexbox! instead, they work perfectly together. need a 1d layout? use flexbox. need 2D layout? use css gird
sizing grid columns and rows
fr fraction
placing and spanning grid items
aligning grid items and tracks
building a simple css grid layout
challenge #3.0
web design rules and framework
overview of web design and website personalities
ingredients
typography
colors
images/illustrations
icons
shaows
border-radius
whitespace
visual hierarchy
user experience
componnets/layout
rule #1 typography
serif
sans-serif
use only good and popular typefaces and play it safe
its okay to use just one typeface per page! if you want more, limit to typefaces.
choose the right typefaced according to your website personality:
choose the right personality for your website
decide between a serif and sans-serif typeface
experiment with all the “good” typefaces(and other typefaces from google fonts!) to see which ones best fits your websites message
keep trying different typefaces as you design and build the page
use good font sizes and weights
when choosing font-sizes, limit choices! use a “type scale” tool or other pre-defined range
use a font size between 16px and 32px for normal text
for long text (like a blog post), try a size of 20px or even bigger
for headlines, you can go really big (50px+) and bold (600+), depending on personality
for any text, dont use a font weight under 400 (regular)
create a good reading experience
use less than 75 character per line
for normal-sized text, use a line height between 1.5 and 2. for big text, go below 1.5
the smaller or longer the text, ther larger the line height needs to be!
decrease letter spcing in headlines, if it looks unnatural(this will come from experience, if the headline looks not nature)
experiment with all caps for short titles. make them small and bold and decrease letter spacing
usually, dont justify text(每行平铺)
dont center long text blocks. small blocks are fine.
rule # colors
choose the right color
make the main color match your website’s personality: colors covey meaning!
red drawing a lot of attention, and symbolizes power, passion, and excitment
orange is less aggressive, and conveys hapiness, cheerfulness, and creativity
yellow means joy, brightness and intelligece
greens represents harmony, nature, growth, and health
blue is associated with peach, trustworthiness and professionalism
purple conveys wealth, wisdom, and masic
pink represents romance, care and affection
brown is associated with nature, durability and comfort
black symbolizes power, elegence and minimalism, but also grief and sorrow -use a good color tone! dont choose a random tone or css named colors.
establish a color system
you need at least two types of colors in your color palette: a main color and a gray color
with more experience, you can add more colors: accent(secondary)
for diversity, create lighter and darker “version”(tints and shades)
when and how to use colors
use main color to draw attention to the most important elements on the page
use colors to add interesting accents or make entire components or sectoin stand out
you can try to use your color stategically in images and illustrations
color and typograghy
on dark colored backgrounds, try to use a tint of the background (“lighter version”) for text
text should usually not be completely black. lighten it up it looks heavy and uninviting
dont make text too light! use a tool to check contrast between text and background colors (tool: coolors)
contrast ratio needs to be at least 4.5:1 for normal text and 3 : 1 for large text(18px+)
implenting colors
images and illustations
different types of images: product photos, storytelling photos, illustrations, patterns
storytelling: using or related to the product
abstract way of storytelling
pattens -> background
use images to support your websites message and story. so only use relevant images!
perfer original images. if not possible, use orginal-looking stock images(not generic ones!)
try to show real people to trigger users emtions
if necessary, corp images to fit your message
experiment combining photos, illustration and pattern
handling text on images
method #1 darker or brighten image(completely or partially, using a gradient)
method #2 postion text into neutral image area
method #3 put text in a box
some technical details
to account for high-res screens, make image dimensions 2X as big as their displayed size
compress imgaes for a lower file size and better perfomance
when using multiple images side by side, make sure they have the exack same dimensions
rule #4: ICONS
use a good icon pack, there are tons of free and paid icons packs
use only one icon pack. dont mix icons from different icon packs
use svg icons or icon fonts. dont use bitmap image formats(.jpg and .png)!
adjust to website personality! roundness, weight and filled/outlined depend on typography
when to use icons
use icons to provide visual assitance to text
use icons for product feautre blocks
use icons associated with actions, and label them(unless no space or icon is 100% clear)
use icons as bullet points (list)
use icons well
to keep icons neutral, use same color as text. to draw more attention, use different color
dont confuse your users: icons need to make sense and fit the text or action!
dont make icons larger than what they were designed for. if needed, enclose them in a shape
icons were designed for big use:lots of details, thine lines
implementing icons
rules #5: shadows
shadow creates depth(3d): ther more shaow, the further away from the interface the element is
use shadows well
you dont have to use shadows! only use them if it makes sense for the website personality
serious/elegant -> less shadows
playfull/fun -> more shadows
use shadows in small doses: dont add shadows to every element!
go light on shadows, dont make them too dark!
use shadows in the right situation
use small shadows for smaller elements that should stand out (to draw attention)
use medium-sized shadows for larger areas that should stand out a bit more
use large shadows for elements that should really float above the interface
experiment with changing shadows on mouse interaction (click and hover)
bonus: experiment with glows(colored shadows)
implementing shadows
rules #6: border-radius
use border-radius to increase the playfulness and fun of the design, to make it less serious
typefaces have a certain roundness: make sure that border-radius matches that roundness!
use border-radius on buttons, image, around icons, standout sections and other elements
implementing border-radius
rules #7: whitespace
the right amount of whitespace make designs look clean, mordern and polished whitespace communicates how different pieces of information are related to one another whitespace implies invisible relationships between the elements of a layout
where to use whitespace
use tons of whitespace between sections
use a lot of whitespace between groups of elements
use whitespace between elements
inside groups of elements, try to use whitespace instead of lines
how much whitespace
the more some elements(or groups of elements) belong together, the closer they should be!
start with a lot of whitespace, maybe even too much! then remove whitespace from there
to much whitespace looks detached, too little looks too crammed
match other design choices.
if you have big text or big icons, you need more whitespace.
try a hard rule, such as using multiplesof 16px for all spacing
rule #8: visual hierarchy
establishing which elements of a design are the most important ones
visual hierarchy is about drawing attention to these most important elements
visual hierarchy is about defining a “path” for users, to guide them through the page
we use a combination of position, size, colors, spacing, borders, and shadows to establish a meaningful visual hierarchy between elements/components
fundamentals
position important elements closer to the top the page, where they get more attention
use images mindfully, as they draw a lot of attention(larger images get more attention)
whitespace create separation, so use whitespace strategically to emphasize elements
hierarchy for text elements
for text elements, use font size, font weight, color, and whitespace to convey importance.
what text elements to emphasize? titles, subtitles, links, buttons, data points, icons
you can de-emphasize less important text, like labels or secondary/additional information
hierarchy between components
emphasize an important component using background color, shadows, or border(or multiple)
try emphasizing some component a over component b by de-emphasizing component b
what components to emphasize?
testimonials, call-to-action sections, highlight sections, preview cards, form, pricing tables, important rows/columns in table, etc.
typography: boxy/squered sans-serif typefaces, small body font size
colors: usually black or dark grey, on pure white background. usually just one color throughout the design images: few images, which can be uesed to add some color to the design. usually no illustrations, but if, then just black icons: usally no icons, but small simple black icons may be used
shadow: usually no shadows border-radius: usually no border-redius
layout: simple layout, a narrow one-column layout is quite common.
plain/neutral
industries: well-established corporations, companies that dont want to make an impact through design
typography: neutral-looking sans-serif typefaces are used, and text is usually small and doesnt have visual impact
colors: safe colors are employed, nothing too bright or to washed-out. bule and blacks are common
images: images are frequently used, but usually in a small format
icons: usally no icons, but simple icons may be used
shadows: usually no shadows
border-radius: usually no border-radius
layout: structured and condensed layout, with lots of boxes and rows
bold/confident
industries: digital agencies, software starups, travel, “strong” companies
typography: boxy/squared sans-serif typefaces, big and bold typography, especially headings. uppercase headings are common
color: usually multiple bright colors. big color blocks/sections are used to draw attention
images: lots of big images are usually displayed
icons, shadows, border-radius: usually no
layout: all kinds of layouts, no particular tendencies
calm/peaceful
industries: healthcare, all products with focus on consummer well-being
typography: soft serif typefaces frequently used for headings, but sans-serif heading might be used too
colors: pastel/washed-out colors: light oranges, yellows, browns, greens, blues
images: images and illustrations are usual, matching calm color palette
icons: icons are quite frequent
shadows: usually no shadows, but might be used sparingly
border-radius: some border-radius is usual
layout: all kinds of layout, no particular tendencies
startup/upbeat
industries: software starups, and other modern-looking companies
typography: medium-sized headings(not too large), usually one sans-serif typeface in whole design. tendency for light text colors
colors: blues, greens and purples are widely used. lots of light background(mainly gray), gradients are also common
image: images or illustrations are always usesd. 3d illustartions are morden. sometimes patterns and shapes add visual details
icons: icons are very frequent
shadows: subtle shadows are frequent. glows are becoming modern
border-radius: border-radius is very common
layout: rows of cards and z-pattens are usual, as well as animations
playful/fun
industries: child products, animal products, food
typography: round and creative(e.g. handwritten) sans-serif typefaces are ferquent. centered text is more common
colors: multiple colors are frequently used to design a colorful layout, all over background and text
images: images, hand-drawn(or 3d)illustrations, and geometric shapes and patterns are all very frequently used
icons: icons are very frequent. many times in a hand-drawing style
shadows: subtle shadows are quite common, but not always used
border-radius: border-radius is very common
layout: all kinds of layouts, no particular tendencies
components and layout patterns
rule #10 - part 1: elements and components
elements -> components ->layouts -> webpage
use common elements and components to convey your websites information
combine components into layout using common layout patterns
assemble different layout areas into a complete, final page
A elements
text buttons images input elements tags
B components
breadcrumbs pagination alert and status bars statistics gallery feature box preview and profile cards accordion tabs carousel customer testimonials customer logos featured-in logos steps forms tables pricing tables modal widows
C section components
navigaiton herosection footer call to action section feature row
D layout patterns
row of boxes or cards grid of boxes or cards z pattern f pattern single column sidebar multi-column/magzine asymmetry/experimental
define who the website is for. is it for yourself? for a client of your agency or your freelancing bussiness?
define what the website is for. in other words, define bussiness and user goals of your website project
bussiness goal examples: selling premium dog food user goal example: finding high-quality dog food for good price
define a target audience. Be really specific if possible and if it makes sense for your website
example: “weomen, 20 to 40 years old, living in europe, earning over 2000$/month, with a passion for dogs”
plan the project
plan and gather website content: copy (text), images, videos etc.
content is usually provided by the client, but you also can help
for bigger sites, plan out the sitemap: what pages the site needs, and how they are related to one another(content hierachy)
based on the content, plan what sections each page needs in order to convey the contents message, and in which order
define the website personality
sketch layout and component ideas
think out what components you need, and how you can use them in layout pattens
get ideas out of your head: sketch them with pen and paper or with some design software(e.g. figma)
this is an iterative process: experiment with different components and layouts, until you arrive at a first good solution
you dont need to sktch everything, and dont make it perfect. at some point, youre ready to jump into html and css
design and build
use decisions, content and sketches from step 1, 2, 3
use layout and components to design the actual visul styles
create the design based on selected website personality, the design guidelines, and inspiration
use the client’s branding(if exists) for design decisions whenever possible: colors, typography, icons, etc.
test and optimize
make sure website works well in all major browsers
test the website on actual mobile devices, not just in dev tools
optimize all images, in term of dimension and file size
fix simple accessibility problems
run the lighthouse performance test in chrome devtools and try to fix reported issues
think about search engine optimization
launch the masterpiece
upload your website files to hosting platform.
choose and buy a great domain name, one that represents the brand well, is memorable and easy to write.
maintain and keep updating website
install analytic software(e.g. google analytics or fathom) to get statics about website users. this myy inform future changes in the site structure and content.
a blog that is updated regularly is a good way to keep users coming back, and is also good for seo.
defining and planning the project
step 1
whe the website is for
for a client
what the website is for
business goal: selling monthly food subscrition user goal: eating well effortlessly, without spending a lot of time and money
define target audience
busy people who like technology, are interesting in a health diet, and have a well-paying job.
fluid layouts to allow webpgae to adapt to the current viewport width(or even height) use %(or vh/vw) unit instead of px for elements that should adapt to viewport(usually layout) use max-width instead of width
responsive units use rem unit instead of px for most lengths to make it easy to scale the entire layout down (or up) automatically helpfull trick: setting 1rem to 10px for easy calculations
flexible images by default, images dont scale automatically as we change the viewport, so we need to fix that always use % for image dimensions, together with the max-width property
media queries bring responsive sites to life to change css styles on certain viewport widths(called breakpoints)
rem -> root element default browser font size 16px
1 2 3 4
html { font-size: 62.5%; /* set to percent so the user can change the root font size*/ }
building the hero - part 1
rarr: right arrow
building the hero - part 2
css default line height: 1.2 Normal: The default line height. If you’re using a desktop browser, the default is 1.2. However, this varies based on the element font family. Length: The length you identify is used to calculate line box height.
1 2 3 4 5 6 7 8 9 10 11 12 13 14
/* trick to add border inside */ a {box-shadow: inset 0003px#fff; } a:link, a:visited { /* put transition on original "state" */ transition: background-color 1s; }

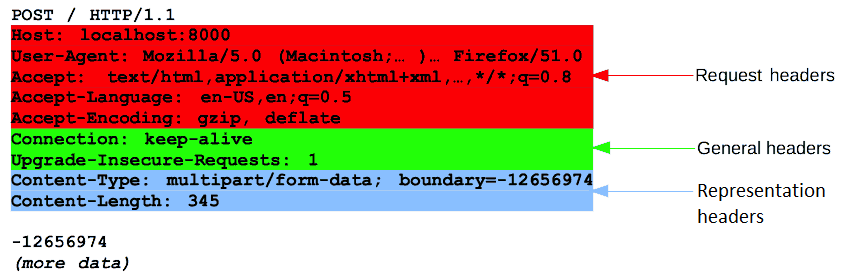
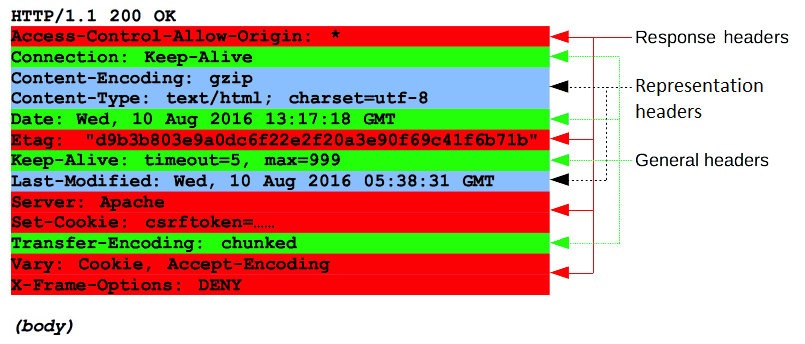
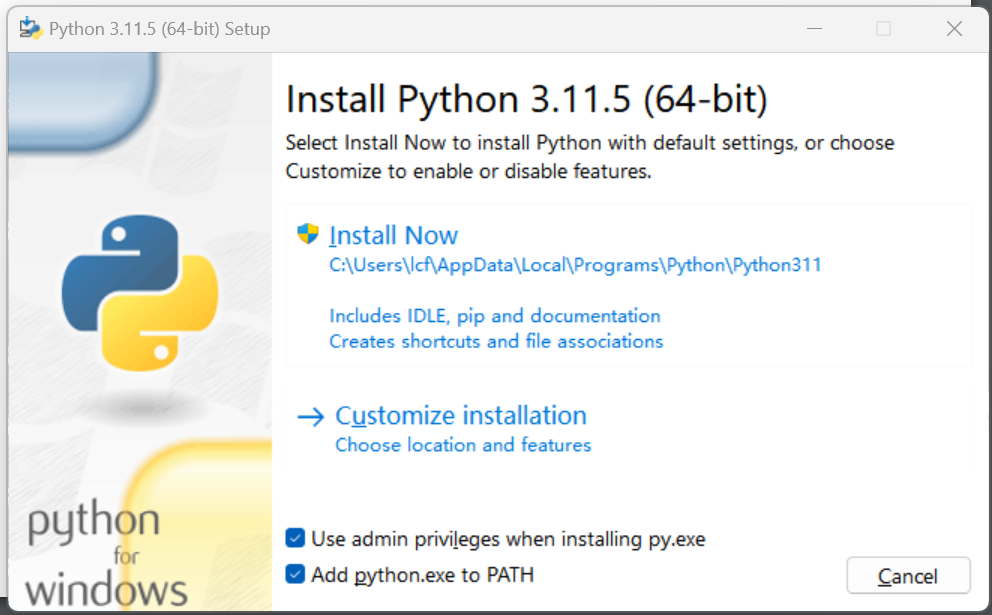
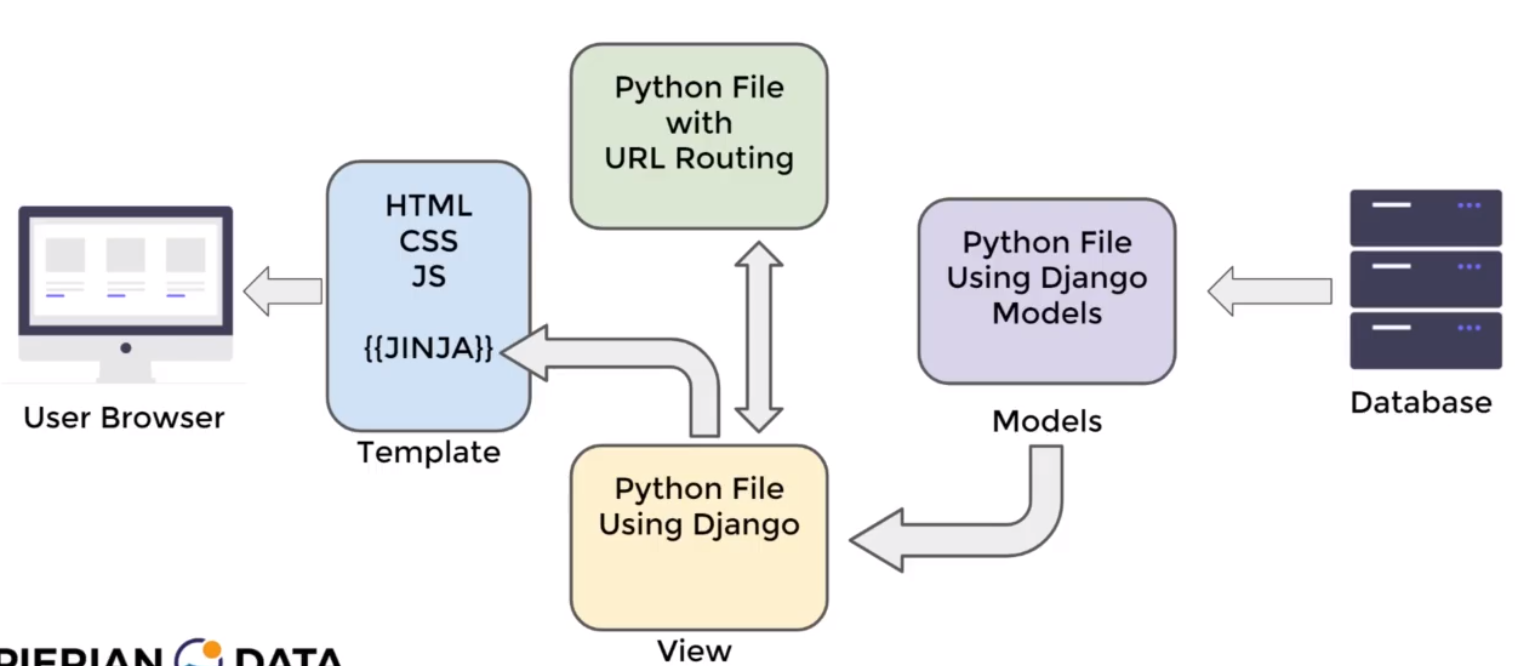
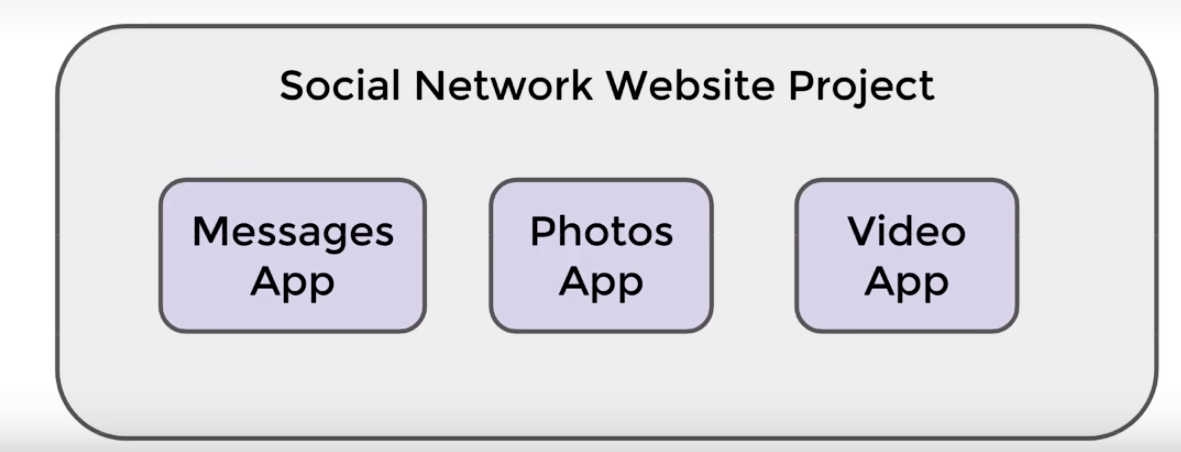
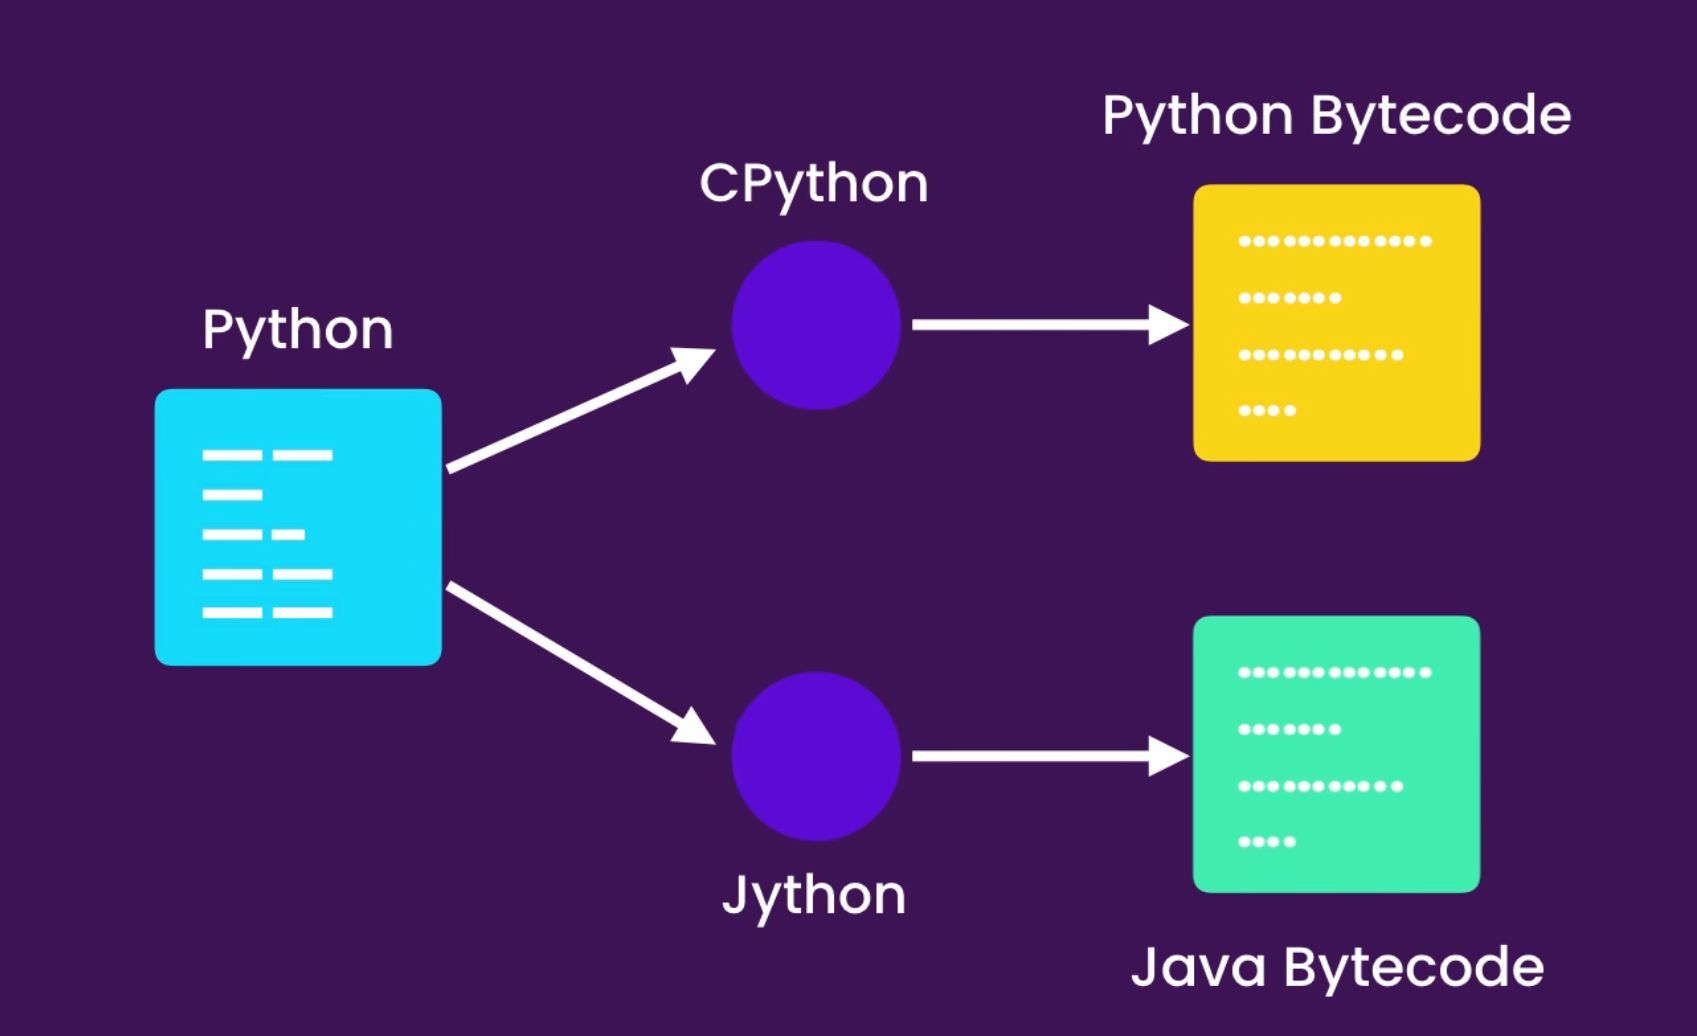
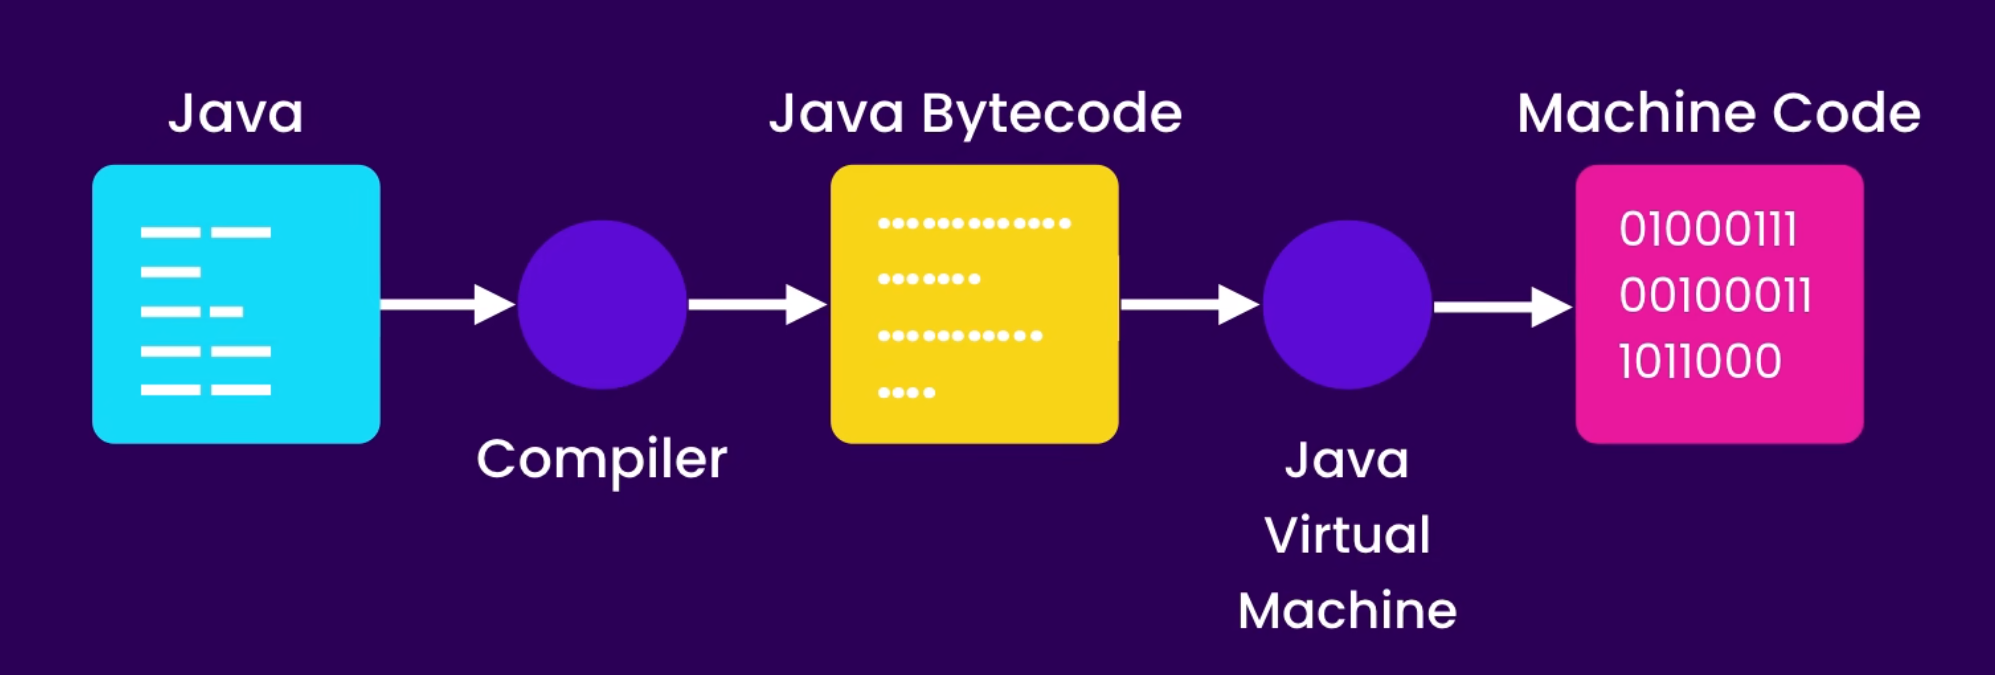
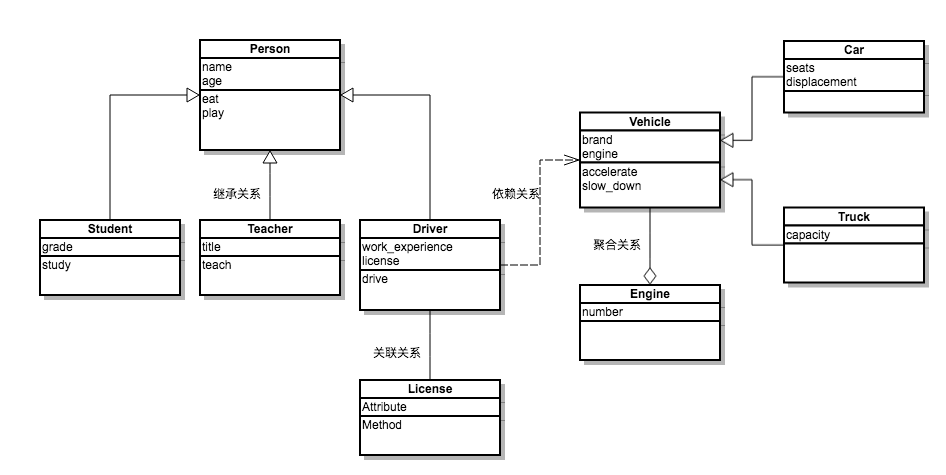
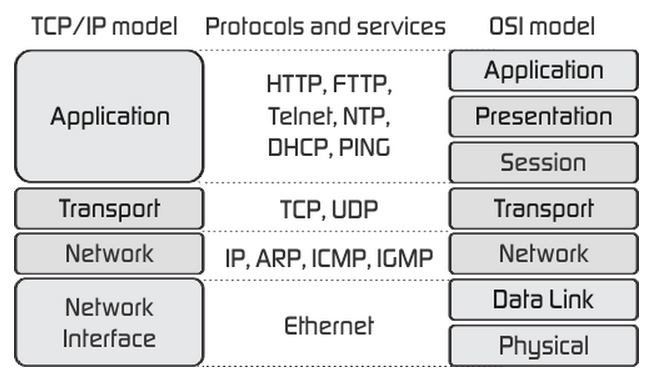
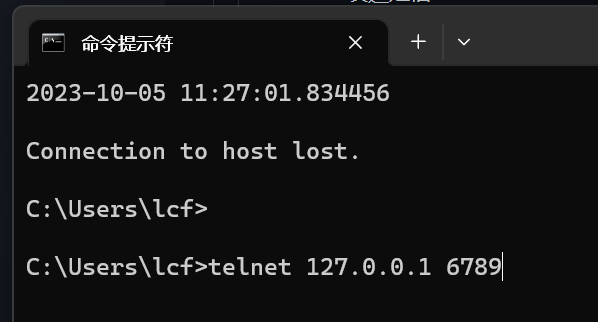
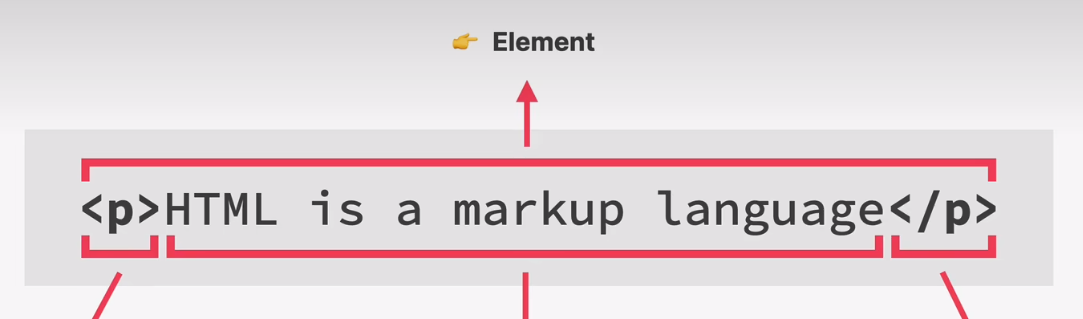
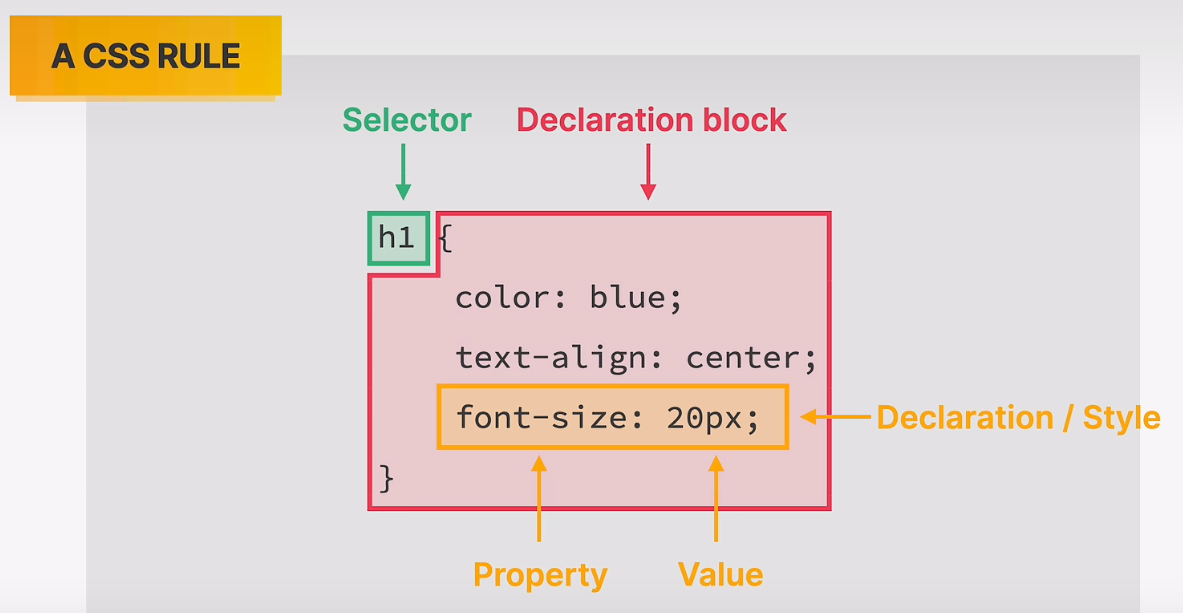
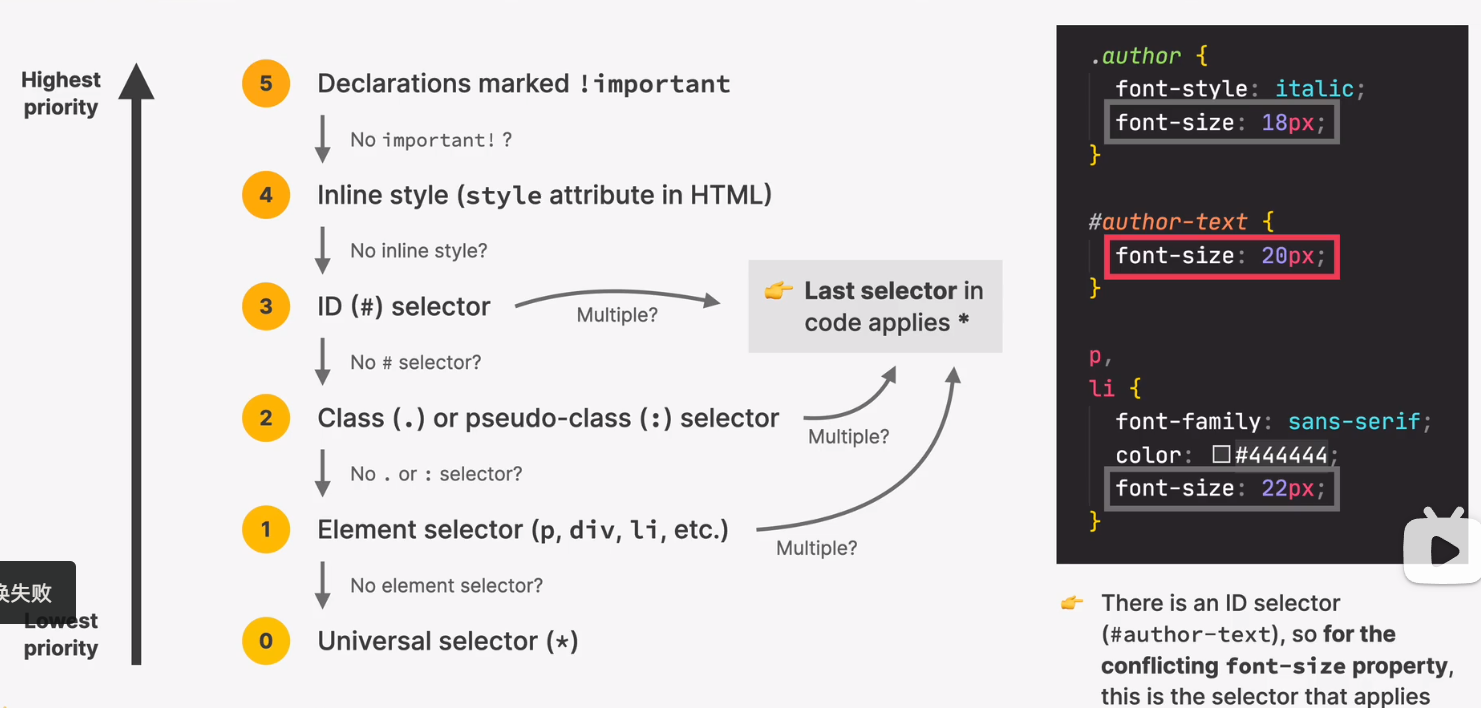
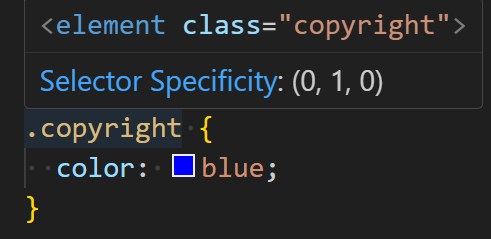
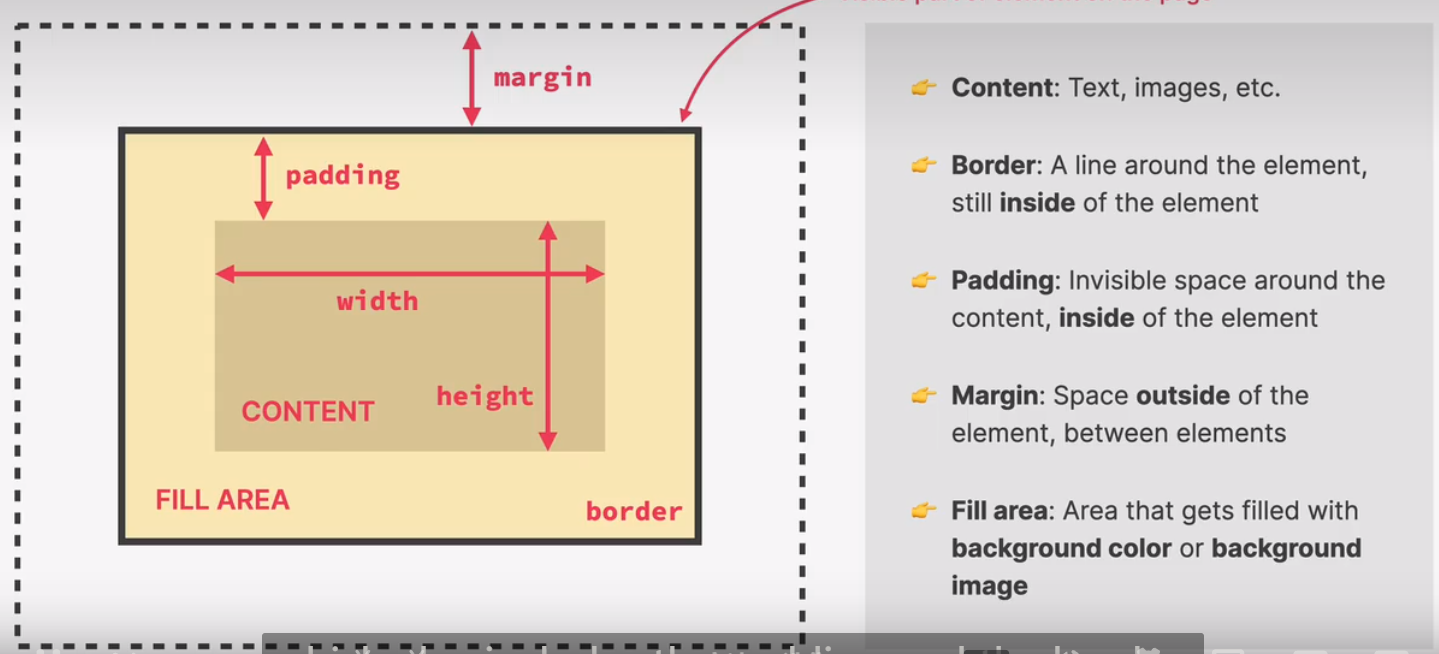

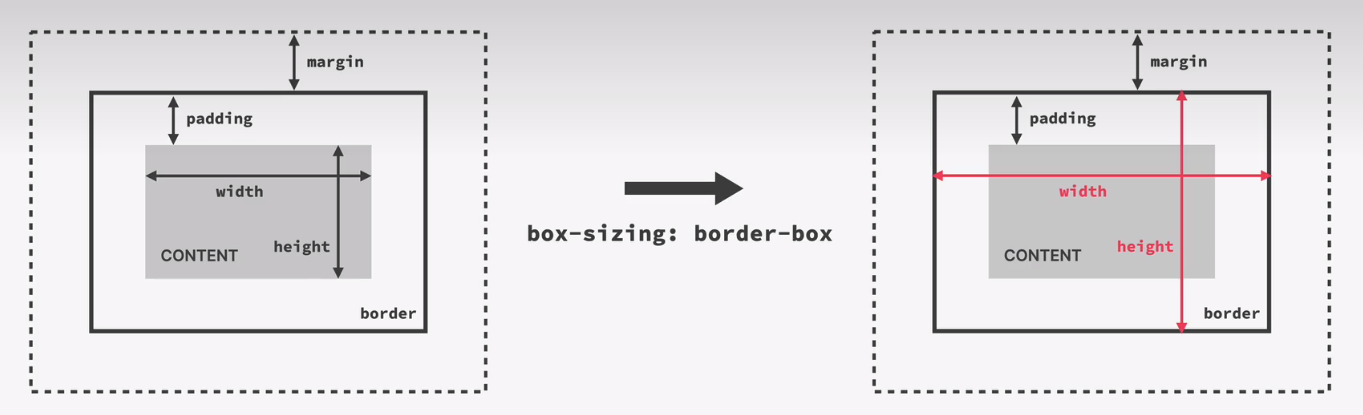
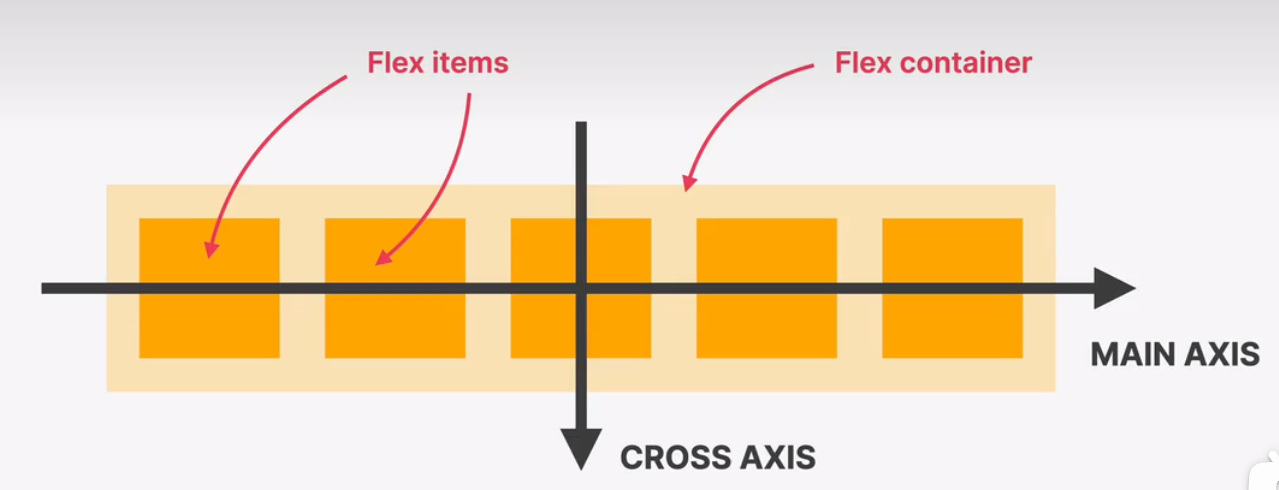
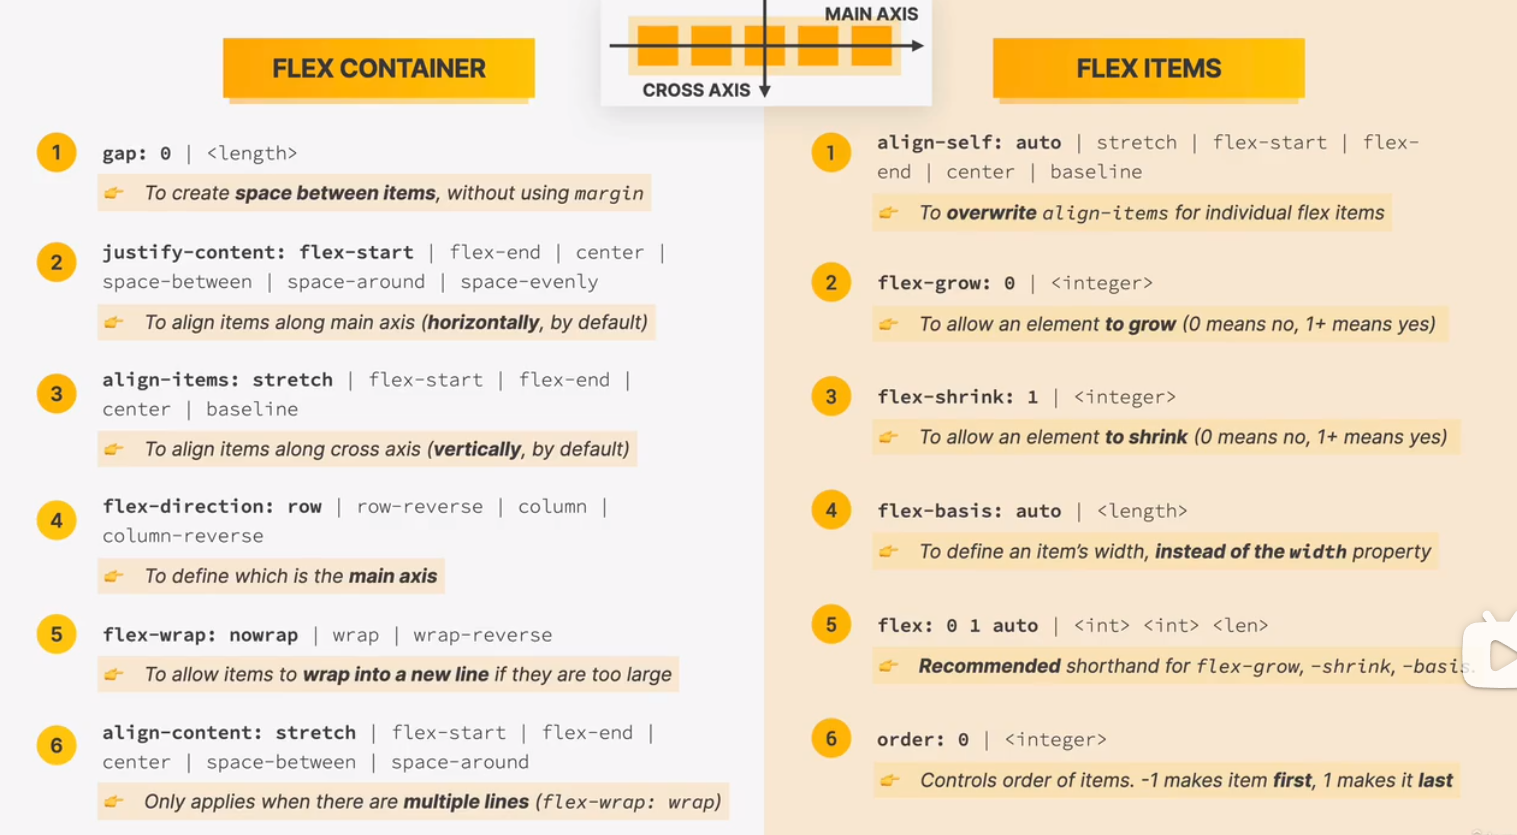
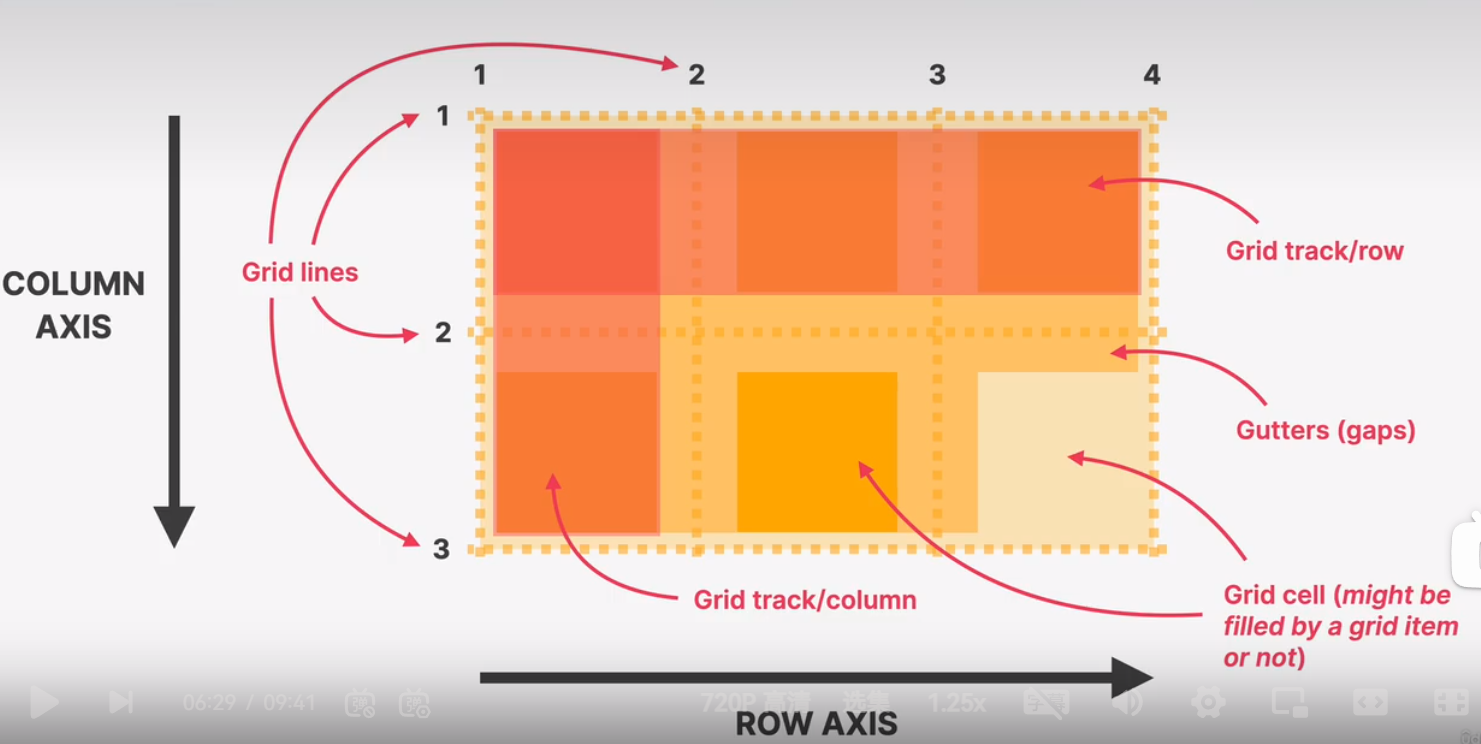
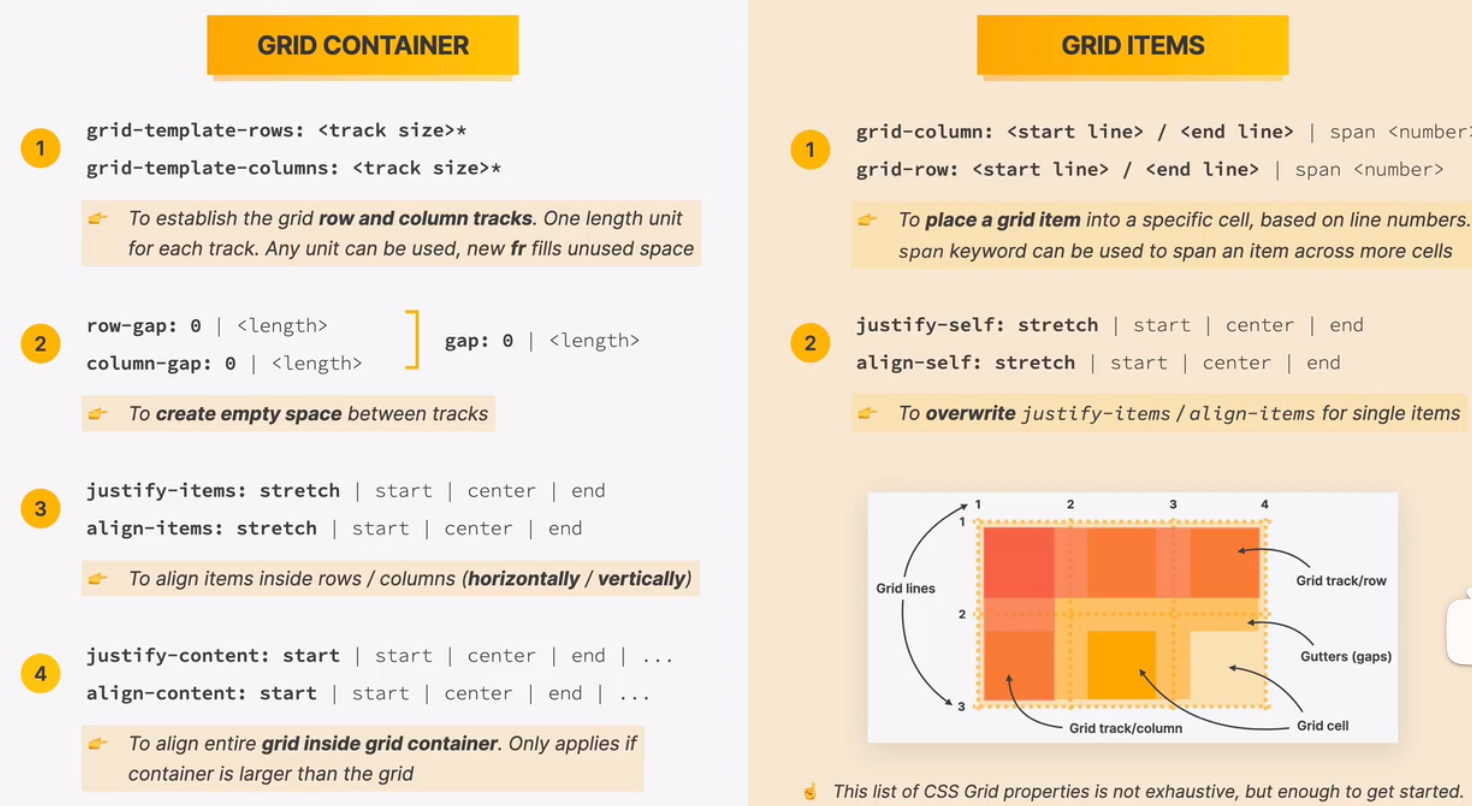
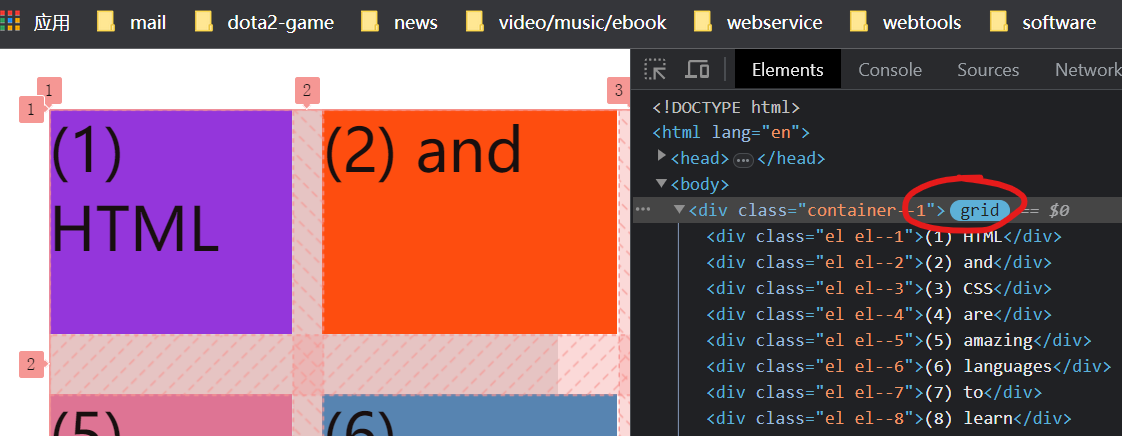

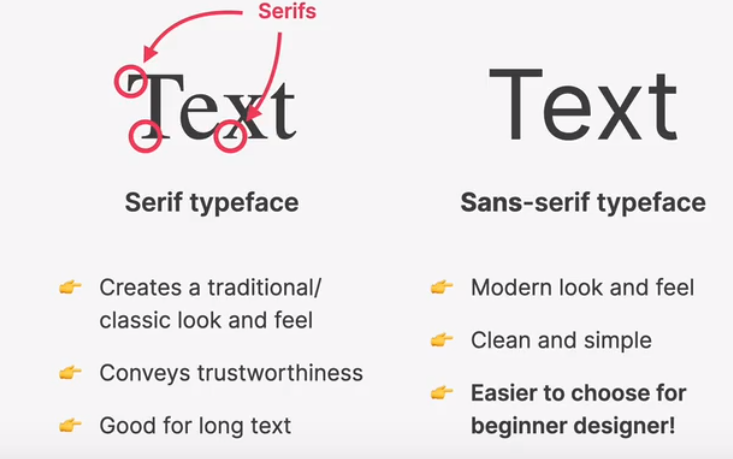


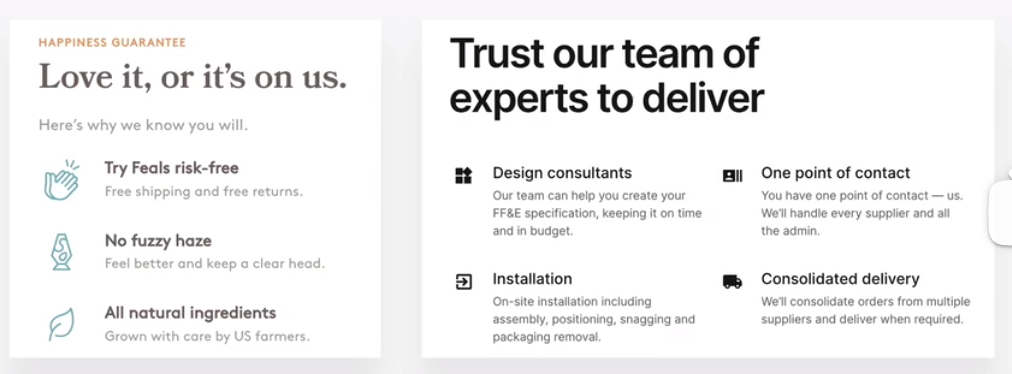


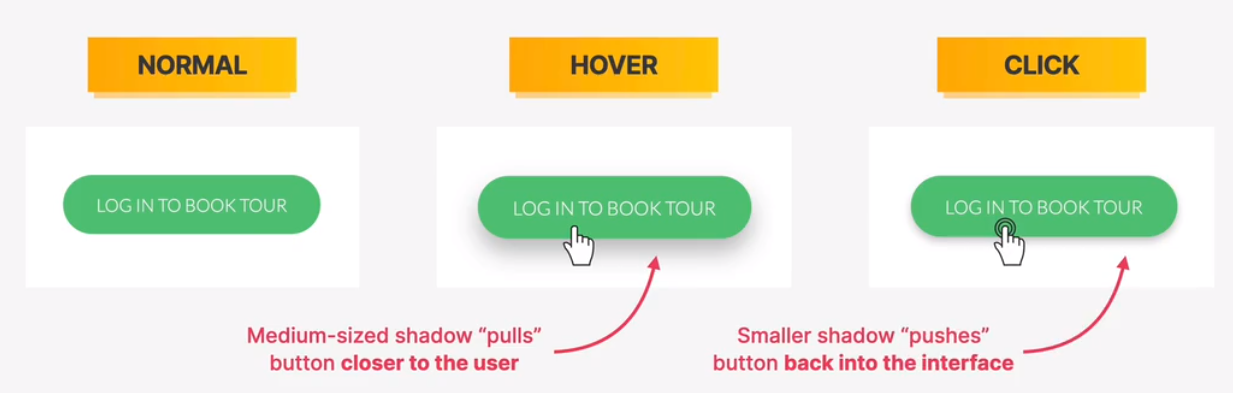
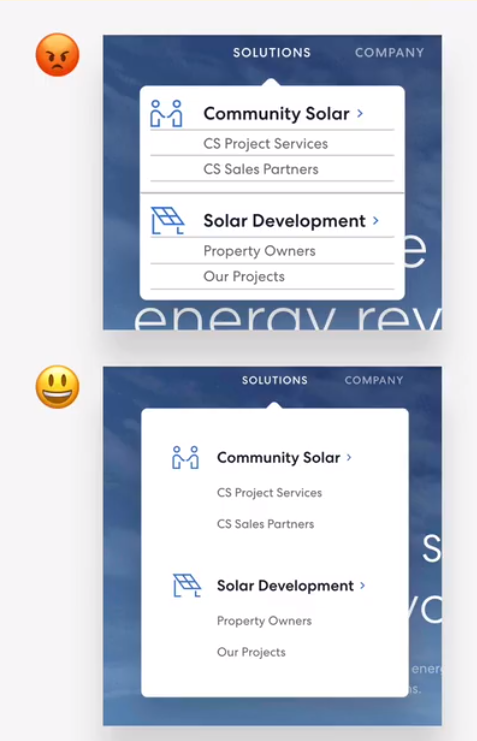
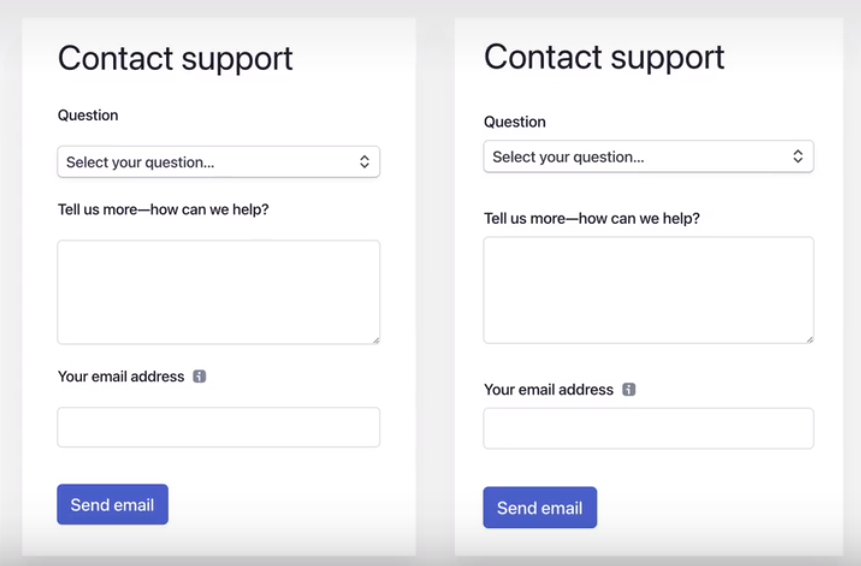
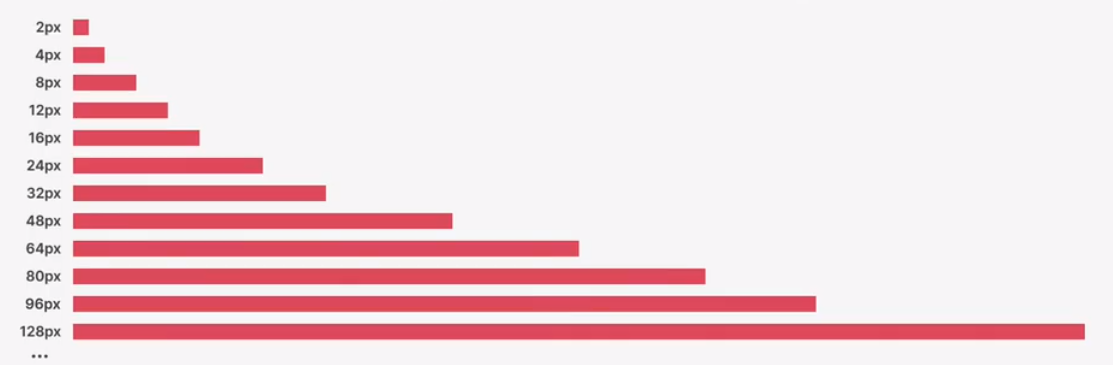
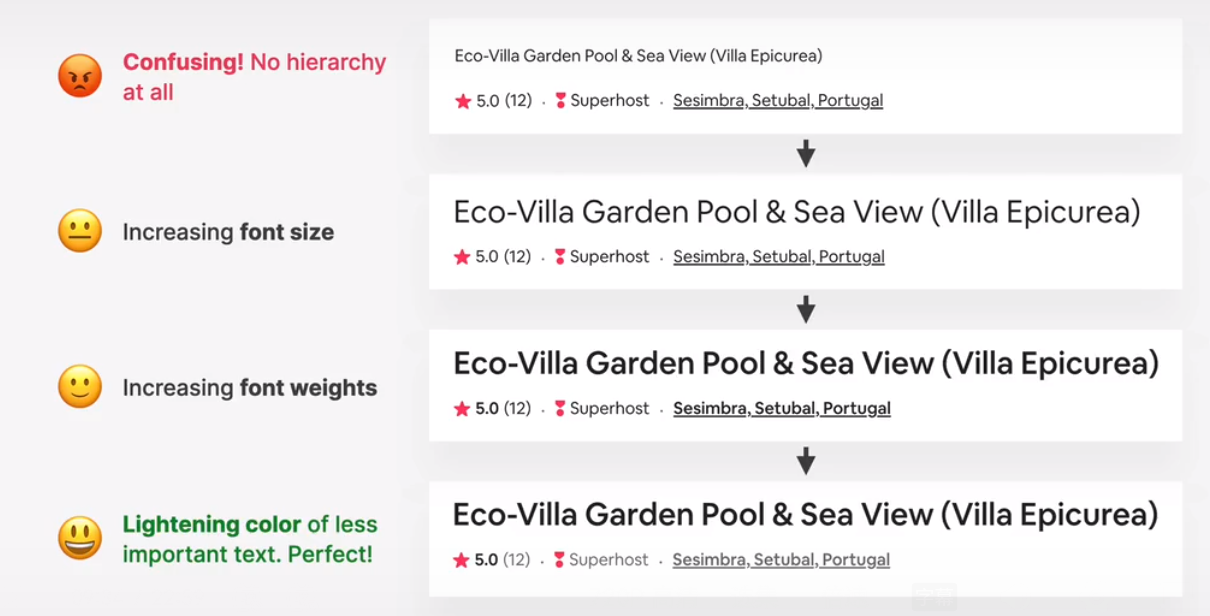


 testimonials, call-to-action sections, highlight sections
 preview cards
 form, pricing tables, important rows/columns